Easy Crocheted Dog Sweater

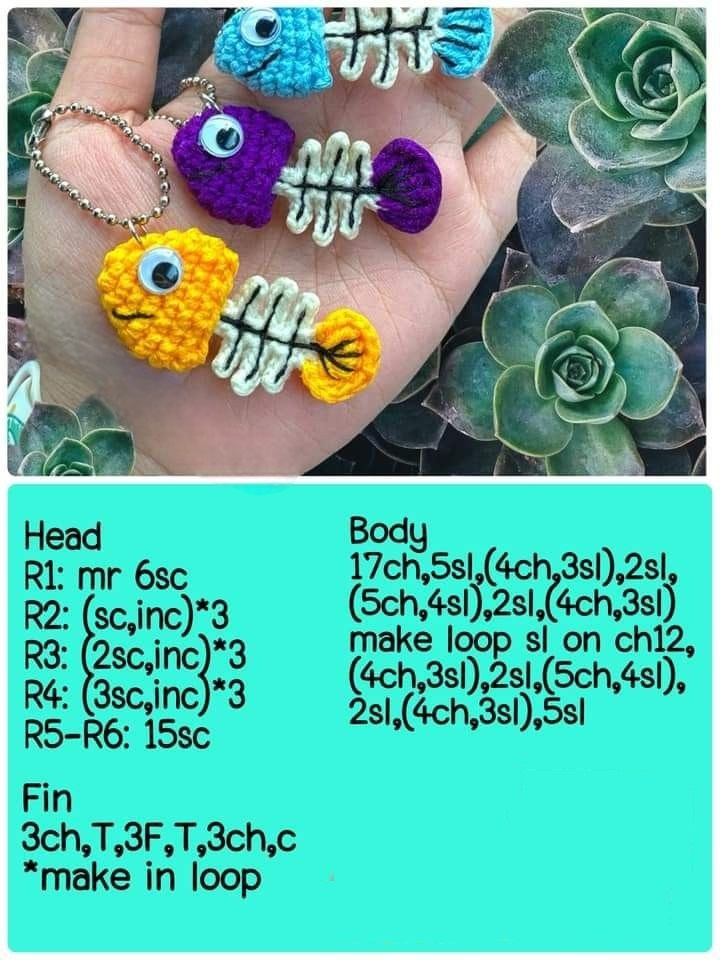
The Crochet Fishbone – Tutorial is a creative and enjoyable project for any crocheter who loves detailed shapes and decorative pieces. Right from the first stitches, this pattern captures attention with its unique texture and flowing structure, making it perfect for keychains, appliqués, embellishments, or even themed décor. Because the Crochet Fishbone – Tutorial is simple to follow and adaptable to different yarn weights, it is a great choice for both beginners and experienced crafters.
Working on a Crochet Fishbone – Tutorial teaches important crochet skills such as shaping, stitch placement, and building symmetrical motifs. These techniques not only enhance your crafting confidence but also expand your ability to create more intricate designs in the future. Many people enjoy using this pattern to add handmade charm to bags, hats, pet accessories, and children’s décor.
In this article, you will learn everything you need to start and complete your own Crochet Fishbone – Tutorial with ease. The steps are described in clear, humanized language and optimized for SEO, ensuring beginners feel comfortable and advanced crocheters feel inspired.
The Crochet Fishbone – Tutorial begins with a simple foundation that gradually expands into the iconic fishbone shape. Understanding how each stitch contributes to the overall structure helps you achieve crisp, well-defined edges. This clarity is especially helpful if you plan to create multiple pieces for a set.
Most crocheters appreciate how flexible the pattern is. You can easily adjust the size of your fishbone by changing hook sizes or yarn thickness. A lightweight cotton yarn will give you delicate results, while a thicker acrylic yarn creates bold and sturdy decorations. This versatility is one of the reasons the Crochet Fishbone – Tutorial is so popular.
The stitch combination used in this pattern focuses on single crochets, slip stitches, and occasional increases or decreases. These basic elements make it approachable for beginners, yet still interesting for experienced makers. Understanding the logic behind these stitches will help you stay consistent throughout the project.
You’ll also discover that tension control plays an important role. The fishbone requires even stitches to maintain symmetry. Practicing on small motifs like this helps improve your overall crochet technique and prepares you for more complex designs.
Some crafters even use this pattern to teach children or young beginners. Its short length and recognizable shape make it a fun introduction to crochet. The final product is rewarding and encourages continued learning.
Whether you are creating your fishbone for decorations, gifts, or personal enjoyment, mastering the basics in this first stage sets the foundation for a beautiful finished piece.
For the Crochet Fishbone – Tutorial, you only need a few basic materials, making it ideal for stash-busting. A small amount of yarn—any color you enjoy—will work perfectly. Cotton yarn is a favorite choice due to its clean stitch definition and durability, especially if you will use the fishbone as a keychain or appliqué.
Your hook size will depend on the yarn, but most crocheters use a 3.0 mm to 4.0 mm hook. A smaller hook helps maintain tight stitches and prevents gaps in the motif. If you prefer a softer, more flexible look, a slightly larger hook is also fine. This is why preparation is important: choosing the right tools helps the piece look polished.
You may also want a pair of small scissors and a yarn needle for weaving in ends. Since this pattern includes shaping at both the head and tail, clean finishing touches make a big difference in how professional your fishbone appears. Many crocheters recommend keeping your tension consistent right from the first row.
Before working on the Crochet Fishbone – Tutorial, it’s helpful to practice the stitches involved. Even though the pattern is beginner-friendly, being comfortable with increases and decreases will make the experience smoother. Spend a few minutes reviewing stitch placement to avoid mistakes later.
Some people prefer to create a small swatch, especially if they want a specific size. Swatching helps ensure the finished fishbone meets your expectations and maintains even proportions. This is particularly useful when making multiple pieces.
Lastly, set up a comfortable workspace with good lighting. Since the fishbone includes narrow sections and small details, proper visibility ensures neat results and enjoyable crocheting.
To begin the Crochet Fishbone – Tutorial, start with a slip knot and create the initial chain. This chain forms the backbone of the entire pattern. The number of chains depends on the size you want, but the principle remains the same: this base supports the symmetrical shaping.
Once the foundation chain is complete, you will begin crocheting down one side of the chain. This is where the fishbone structure starts to take shape. Small increases are added in specific spots to represent the bone sections, while decreases help taper the body toward the tail. Each stitch is simple, but placement requires attention.
As you proceed, the texture begins to develop naturally. This is one of the most fun parts of the Crochet Fishbone – Tutorial. Watching the shape appear row by row is satisfying and encourages creativity. Some crocheters even adjust the number of stitches to give their fishbone a personalized look.
After finishing one side, you will turn and repeat similar shaping on the opposite side of the chain. This creates symmetry and thickness, giving the fishbone its signature structure. Working both sides evenly helps the motif look balanced and professional.
The head of the fishbone is typically formed by adding a few stitches at the top before tapering back down. This final touch gives the design personality and makes it instantly recognizable. You can also add small embellishments such as safety eyes, embroidery, or beads if desired.
Once the shape is complete, weave in the ends neatly. At this point, your fishbone is ready to be used as an appliqué, keychain, or decorative piece for other craft projects.
One of the great joys of the Crochet Fishbone – Tutorial is how versatile the final product can be. Many crafters use it as a playful keychain accessory. Its compact size makes it practical, and its charming look adds personality to any bag or set of keys.
The fishbone also works well as an appliqué for clothing or home décor. You can attach it to hats, scarves, backpacks, or blankets to create a nautical or whimsical theme. When made in different colors, it becomes an eye-catching embellishment.
Some crocheters incorporate the fishbone into pet accessories. It makes a cute decoration for cat or dog toys, especially when attached to safe, crochet-friendly items. Just be sure to avoid small detachable pieces if giving it to animals.
Holiday decorations are another creative option. Fishbones can be used in beach-themed Christmas trees, party garlands, or summer-themed celebrations. Using metallic yarns or sparkly fibers adds a festive touch.
If you enjoy teaching crochet, this motif is a great classroom project. It keeps beginners engaged and provides immediate results without overwhelming them. The compact size and repetitive structure make it ideal for practice sessions.
Finally, you can combine multiple fishbones in different sizes to create a stunning wall hanging. When arranged vertically or horizontally, they form a unique piece of textile art that showcases your skills and creativity.
1. Is the Crochet Fishbone pattern good for beginners?
Yes, the Crochet Fishbone – Tutorial is beginner-friendly because it uses basic stitches, simple shaping, and a small project size.
2. How long does it take to complete one fishbone?
Most crocheters finish one in 10–20 minutes, depending on experience level and stitch speed.
3. What yarn works best for this pattern?
Cotton yarn provides excellent stitch definition, but acrylic yarn also works well, especially for playful keychains.
4. Can I make the fishbone in different sizes?
Absolutely. Adjust the hook size, yarn weight, or foundation chain length to create custom sizes.
5. Do I need advanced shaping skills?
No. Only basic increases and decreases are needed, and the tutorial guides you through each part.
6. Can I use the fishbone as part of a larger crochet project?
Yes. It works wonderfully as an appliqué on blankets, bags, hats, or home décor pieces.
The Crochet Fishbone – Tutorial is a delightful project that combines creativity, simplicity, and endless customization opportunities. Throughout this article, you learned the essential steps, materials, and creative ideas for making your own fishbone motif.
PATTERN VIDEO:
Whether you’re creating a quick gift, adding personality to your accessories, or practicing shaping techniques, this pattern offers both fun and satisfaction. I hope this guide has inspired you to pick up your hook and try it today. Please feel free to share your honest opinion and suggestions—I love hearing your thoughts and ideas!