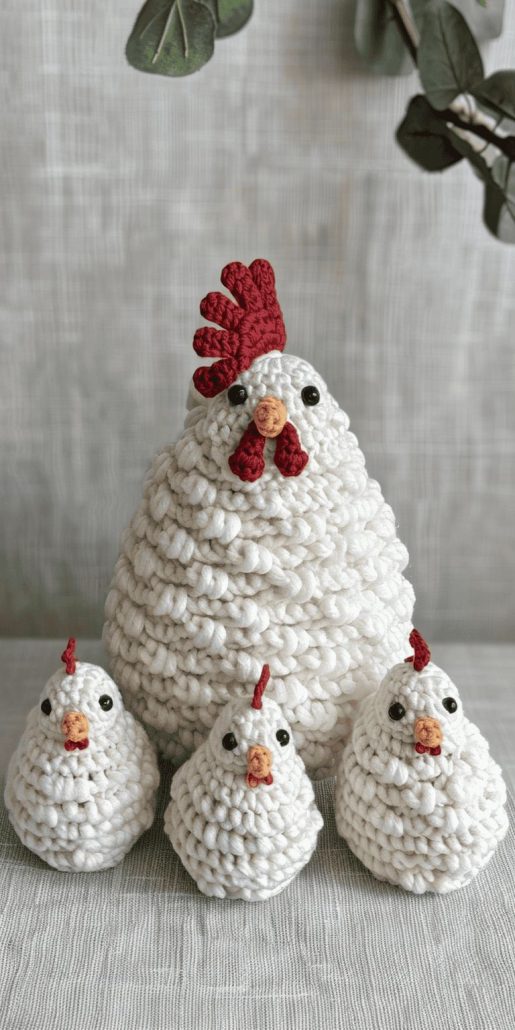
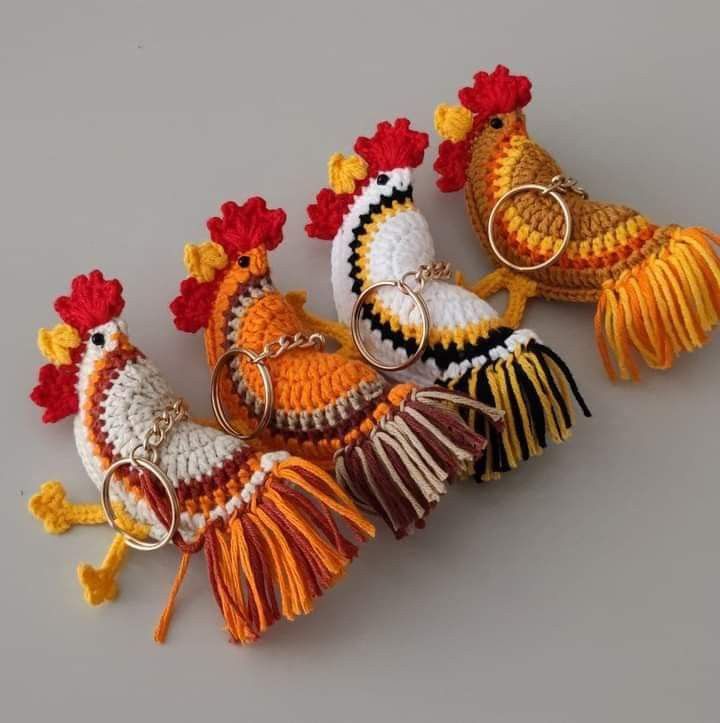
Chicken Crochet - Pattern

The Crochet Mini 🐓Rooster Keychain – TUTORIAL is the perfect little project for crochet lovers who enjoy creating cute, practical accessories with personality. This miniature rooster keychain adds a charming touch to your keys, bags, or even as a small handmade gift for friends and family. It’s quick to make, fun to customize, and a wonderful way to use up leftover yarn. Whether you’re a beginner looking for a small, easy project or an experienced crocheter wanting something delightful to whip up, this crochet pattern will brighten your crafting time.
Working on the Crochet Mini 🐓Rooster Keychain – TUTORIAL teaches you essential amigurumi techniques, such as shaping small parts, sewing them together neatly, and adding embroidered details for extra character. The best part is that you can finish this project in one sitting. It’s a great idea for craft fairs or last-minute handmade gifts. The finished rooster can be as colorful or simple as you like—add bright reds, yellows, and whites for a traditional look, or experiment with pastels and soft tones for a more modern style.
Crochet keychains like this rooster are perfect stash-busters and a creative way to express your love for handmade crafts. The finished piece is lightweight, durable, and irresistibly cute. Plus, with this Crochet Mini 🐓Rooster Keychain – TUTORIAL, you’ll have the freedom to adapt the size or details to make your keychain truly one of a kind.
Before you begin, gather all the materials you’ll need. You’ll want small amounts of yarn in white, red, yellow, and orange, as well as a crochet hook suited for fine yarn—typically a 2.5 mm or 3 mm hook. You’ll also need a keyring, a yarn needle, scissors, and some polyester fiberfill for stuffing. The Crochet Mini 🐓Rooster Keychain – TUTORIAL is beginner-friendly and uses basic stitches like single crochet (sc), increase (inc), and decrease (dec).
Start by making sure your yarn tension is even. Since this is a miniature project, tight stitches help the piece hold its shape better. Choose cotton yarn for durability and a neat finish—it keeps your stitches defined and withstands everyday use.
Prepare your keyring and chain attachments before starting the main crochet work. This will help you gauge the right size for your rooster body, ensuring it fits perfectly once finished.
A stitch marker will be useful to keep track of rounds, especially when crocheting the rooster’s head and body. As with any amigurumi project, working in continuous spirals rather than joined rounds creates a seamless look.
Make sure to stuff the rooster lightly but firmly. Too little stuffing will make it floppy, while too much can stretch the stitches. Use a small tool, like the back of your crochet hook, to push the stuffing evenly into tight areas.
Finally, organize your workspace and keep your yarn colors close at hand. This will make it easier to switch colors for the rooster’s comb, beak, and tail as you work through the pattern.
The Crochet Mini 🐓Rooster Keychain – TUTORIAL begins with the rooster’s round body. Start with a magic ring and work a small number of single crochets into it. Gradually increase each round until you achieve a small sphere shape. This round form serves as both the body and head, giving the rooster its adorable plump look.
After shaping the body, you’ll switch to white or your chosen base color. The key to creating a balanced look is consistent stitch tension. Remember to keep count of your rounds—using a row counter or simply jotting notes can prevent mistakes later.
Once you’ve reached the desired body size, begin decreasing evenly to close the bottom. Before the final stitches, add stuffing to fill out the shape. Make sure the form stays symmetrical.
Next, move on to crocheting the rooster’s comb. Using red yarn, crochet a few small chain loops to form the comb ridges, then attach them to the top of the head. This tiny detail brings your rooster to life.
The beak is made with a small triangle shape in yellow or orange. Crochet a few stitches, shape it, and sew it onto the face area. Adding a tiny bit of embroidery thread or small black beads for eyes gives the rooster its playful personality.
Once the head and body are complete, you’ll notice how quickly this little project comes together. It’s satisfying to see how a few stitches can form such a cute and expressive character.
To crochet the rooster’s tail, use a combination of red, yellow, and orange yarns. Chain several stitches of varying lengths, then attach them together at one end. This creates a feathery effect that looks dynamic and full of life. Sew the tail onto the back of the rooster’s body, adjusting the shape to your liking.
The wings are small oval pieces that can be crocheted separately and sewn on each side of the body. Keep the stitches tight so the wings hold their form well. You can use a slightly darker shade of your main yarn for contrast.
For extra charm, some crafters like to add a tiny felt wattle under the beak. You can also crochet a miniature wattle using a few red stitches and attach it carefully. These small touches give your crochet pattern an even more finished look.
Once all the parts are attached, check your stitches and seams to make sure everything feels secure. Use your yarn needle to weave in all ends neatly. It’s important that no loose yarn remains, especially for keychains that are handled often.
If you’d like to personalize your Crochet Mini 🐓Rooster Keychain – TUTORIAL, experiment with different yarn colors. Try pastel tones for a soft, modern version, or bright primary colors for a fun and traditional rooster look.
Lastly, give your rooster a quick fluff and shape before attaching the keyring. These final adjustments make all the difference in creating a professional finish.
Attaching the keychain is simple but requires care. Use a strong metal jump ring or small chain to connect your rooster to the keyring. Make sure it’s secure enough to withstand regular use. For extra stability, sew or loop the attachment directly through the top stitches of the rooster’s head.
To add a polished touch, you can tie a small bow or ribbon around the top of the rooster. This is especially charming if you plan to gift it. Adding a drop of fabric glue to the ends of your bow will keep it from fraying.
If you’re selling your handmade crafts, the Crochet Mini 🐓Rooster Keychain – TUTORIAL makes a perfect product. Its small size, quick completion time, and adorable appeal make it popular at craft markets and online shops.
You can also turn it into a seasonal gift idea. For example, create red and gold roosters for Lunar New Year or pastel roosters for Easter baskets. Handmade keychains like this are personal and meaningful tokens.
Caring for your keychain is easy—simply spot clean it with mild soap and water when needed. Avoid soaking it, as this may loosen the stitches or damage the keyring.
Once you’ve completed your rooster, take a photo and share your creation online with other crocheters. It’s inspiring to see how everyone adds their personal flair to this cheerful little pattern.
Is the Crochet Mini 🐓Rooster Keychain suitable for beginners?
Yes! This tutorial is designed for beginners. It uses basic stitches and small pieces, making it a fun introduction to amigurumi-style crochet.
How long does it take to make one keychain?
Most crocheters can complete this keychain in about one to two hours, depending on skill level.
Can I use different yarn types?
Absolutely. Cotton yarn is recommended for durability, but acrylic yarn can work too. Just make sure to adjust your hook size accordingly.
How can I make my rooster keychain larger?
Use thicker yarn and a larger hook. Just remember that this will also require more stuffing and slightly more time to complete.
Can I sell items made from this pattern?
Yes, you can sell finished items made from the Crochet Mini 🐓Rooster Keychain – TUTORIAL, but always give design credit when sharing or selling online.
What other animals can I make using this base pattern?
This pattern can easily be adapted into other small animals, such as chicks, owls, or penguins, by changing colors and adjusting small features.
Conclusion
The Crochet Mini 🐓Rooster Keychain – TUTORIAL is an adorable, quick, and satisfying crochet project that brings creativity and joy to your crafting time. It’s ideal for beginners or experienced crocheters who love making cute, functional pieces.
PATTERN VIDEO:
With just a few materials and a little time, you can create a charming accessory that adds personality to your keys or bags. Try it out, share your results, and let us know your thoughts in the comments below. Your feedback and suggestions help inspire more beautiful crochet tutorials for everyone to enjoy!