
Sewing Hearts & Nine Patch

The Candy Cane Quilt Block – Tutorial is a delightful and festive pattern that captures the essence of the holiday season in every stitch. Perfect for quilters of all levels, this block combines traditional quilting techniques with cheerful Christmas charm. The candy cane, a symbol of sweetness and celebration, becomes a stunning centerpiece in any quilt, table runner, or wall hanging. With its simple yet striking design, this project is ideal for using up festive fabric scraps while creating something timeless and full of character.
Learning how to make a Candy Cane Quilt Block is both fun and rewarding. The project allows you to explore color contrast, precision piecing, and creative layout ideas, all while adding a personal handmade touch to your holiday décor. Whether you’re creating an entire Christmas quilt or a single accent piece, this pattern brings a nostalgic warmth that everyone will love.
In this Candy Cane Quilt Block – Tutorial, we’ll walk you through everything you need to know—from fabric selection and cutting to sewing and assembling your block. By the end, you’ll have a charming quilt block ready to brighten your holiday season and inspire future quilting projects.
Before you begin, gather all your materials. For this Candy Cane Quilt Block – Tutorial, you’ll need red and white fabrics to create the classic candy cane stripes. You can also add green or gold accents to give your block a festive twist. High-quality cotton quilting fabric works best because it’s easy to handle, durable, and presses beautifully.
In addition to fabric, you’ll need a rotary cutter, cutting mat, ruler, sewing machine, and matching thread. If you prefer, you can sew the block by hand with small, precise stitches. Keep an iron nearby to press your seams flat after each step—this ensures clean lines and accurate measurements.
For the background, choose a neutral color like white, cream, or light gray to make your candy cane design stand out. Alternatively, a snowy blue background adds a wintry touch that enhances the holiday theme.
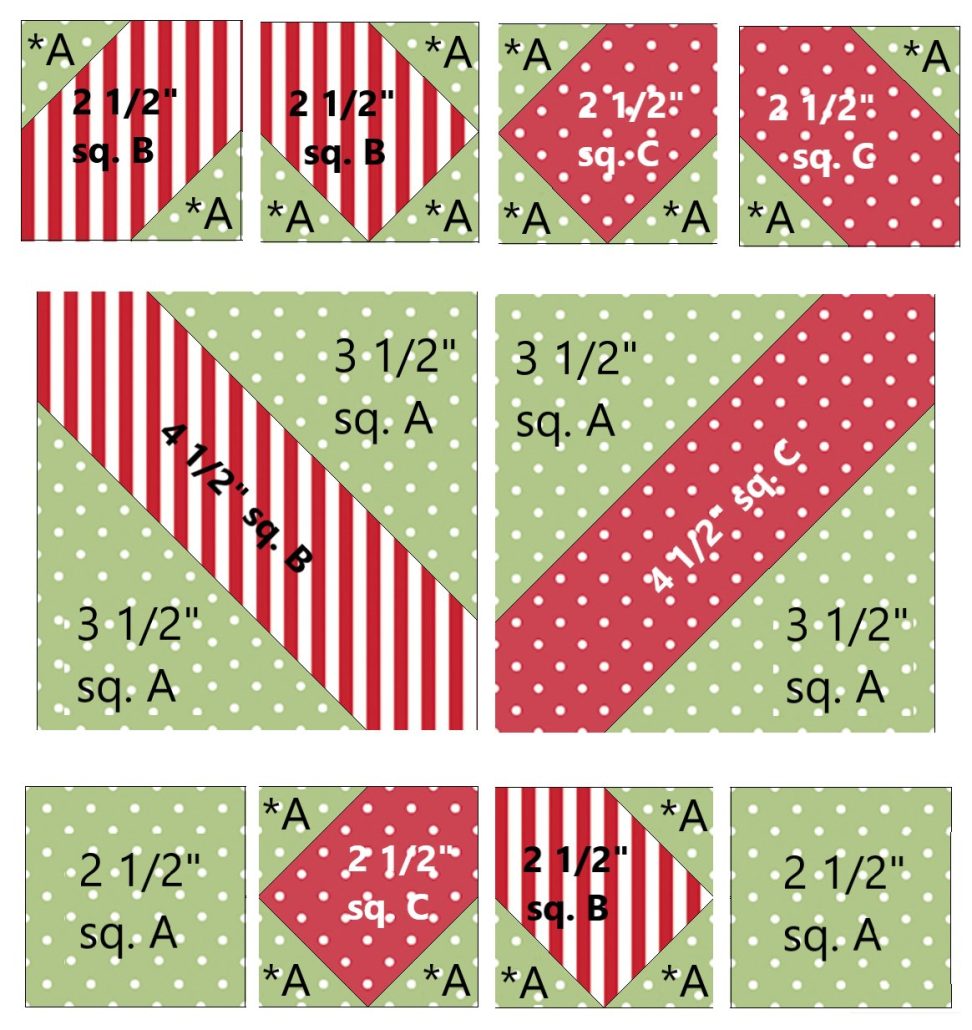
Once your materials are ready, cut your fabric strips according to the pattern’s measurements. The red and white strips should be of equal width so the candy cane stripes remain uniform and balanced. Carefully label your pieces to keep your layout organized.
Preparing everything before sewing ensures your project runs smoothly and saves time. This step is the foundation of creating a clean, professional-looking Candy Cane Quilt Block that’s both eye-catching and precise.
The next step in the Candy Cane Quilt Block – Tutorial is sewing the red and white strips together to form the iconic candy cane pattern. Begin by alternating your fabric strips—red, white, red, white—and sew them edge to edge with a ¼-inch seam allowance. Press the seams toward the darker fabric to prevent shadows from showing through the lighter sections.
Once you’ve created a striped panel, cut it diagonally into smaller segments. These diagonal cuts will become the angled candy cane sections that give your block its distinct shape. Arrange them carefully to form the curved or diagonal layout of the candy cane.
When joining these diagonal pieces, pay close attention to matching the stripe intersections. Accurate alignment is what makes the candy cane look crisp and clean. Take your time and pin the sections before sewing for best results.
If you’re new to quilting, this step is an excellent opportunity to practice precision piecing and seam matching. Don’t rush—quilting is as much about the process as it is about the finished piece.
Once your candy cane is complete, press it gently and trim any excess fabric around the edges to ensure a perfect square block. This will make assembly easier when adding it to your quilt or table runner.
Now, your striped candy cane design is ready to shine. You can already see the holiday spirit taking form in your Candy Cane Quilt Block!
With your candy cane stripes complete, it’s time to add the background pieces to finish your Candy Cane Quilt Block – Tutorial. These background sections help shape the candy cane and frame it beautifully against the fabric canvas.
Lay out your background pieces around the candy cane to visualize the final look before sewing. Once you’re happy with the arrangement, begin stitching each background section to the candy cane design using a ¼-inch seam allowance.
Press all seams open or to one side, depending on your preference. A well-pressed quilt block always looks more professional and lies flat, making it easier to assemble into larger projects later on.
If you’d like to add extra detail, consider stitching a decorative border around the candy cane. You can use festive prints, metallic thread, or even tiny appliqué stars or holly leaves to enhance the Christmas feel.
Once complete, trim your block to the desired size, typically 12.5 inches square for a standard quilt block. Make sure the edges are straight and the corners are sharp—precision makes all the difference in quilting.
Your Candy Cane Quilt Block is now ready to be joined with other holiday blocks, turned into a pillow, or framed as a standalone piece of Christmas décor.
One of the best things about the Candy Cane Quilt Block – Tutorial is its versatility. You can use it in countless ways to spread Christmas cheer throughout your home. Combine several blocks to create a festive quilt or table runner that brings warmth to your holiday gatherings.
Smaller versions of the block can be used for mug rugs, placemats, or wall hangings. If you’re making handmade gifts, these quilt blocks can easily become part of a cozy patchwork blanket or decorative cushion cover.
You can also experiment with different fabric colors. Try pastel pink and white for a sweet candy-inspired twist or bold red and gold for a more elegant, traditional look. The possibilities are endless, limited only by your imagination.
If you’re a beginner, this project is a fun way to practice basic quilting techniques like strip piecing, diagonal cutting, and block assembly. For experienced quilters, it’s an enjoyable, quick project that adds festive flair to any collection.
The Candy Cane Quilt Block can also be paired with other Christmas-themed blocks, like stars, trees, or snowflakes, to create a stunning holiday sampler quilt. Every block tells part of the Christmas story, adding joy and creativity to your craft.
With each stitch, you’ll feel the excitement of the season grow—and when you see your finished block, you’ll know the time spent creating it was truly worth it.
1. Is the Candy Cane Quilt Block suitable for beginners?
Yes! The Candy Cane Quilt Block – Tutorial is beginner-friendly and an excellent way to learn basic piecing and fabric alignment.
2. What size should my block be?
A standard size is 12.5 inches square, but you can easily adjust the measurements to make larger or smaller versions.
3. What fabrics should I use?
100% cotton quilting fabric works best. Choose bright reds and whites for a classic candy cane look, or experiment with holiday prints.
4. Can I sew this block by hand?
Absolutely. Hand-sewing works fine as long as you keep your stitches small and even.
5. How can I use the finished block?
You can use it in quilts, table runners, pillows, or even frame it as wall art for festive décor.
6. How long does it take to complete one block?
On average, it takes about 1 to 2 hours, depending on your sewing speed and level of detail.
The Candy Cane Quilt Block – Tutorial is a joyful, creative way to bring the magic of Christmas into your quilting projects. With its simple design and endless customization options, it’s a perfect addition to any holiday collection. From festive quilts to handmade gifts, this block captures the sweetness and spirit of the season in every stitch.
We hope you enjoy making your own Candy Cane Quilt Block! Share your thoughts, ideas, and experiences in the comments below—your feedback helps inspire other quilters too. May your holiday season be filled with creativity, warmth, and the happiness that comes from handmade art. 🎄❤️


