Crochet Hat Display – TUTORIAL

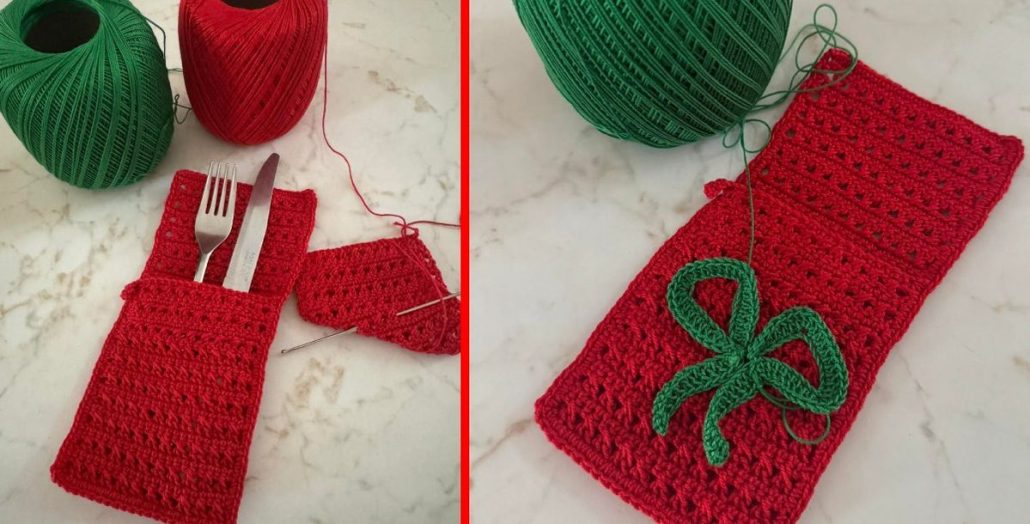
The holiday season is all about joy, warmth, and creating special memories with family and friends. In this Christmas Cutlery Holder – TUTORIAL, you’ll learn how to make adorable and festive cutlery holders that will elevate your Christmas table decor. This easy project allows you to add a handmade touch to your holiday setup while keeping your tableware beautifully organized and themed for the season. Whether you’re an experienced crafter or a beginner, this tutorial will guide you step-by-step through the process of creating something truly special.
Adding a Christmas Cutlery Holder to your holiday table instantly transforms the ambiance. It’s not only decorative but also practical—keeping forks, knives, and spoons neatly in place while adding charm and personality to every setting. You can make these holders in a variety of styles, from elegant to whimsical, depending on your holiday theme. With the right materials and a touch of creativity, you’ll be amazed at how simple it is to make professional-looking holders right at home.
In this detailed Christmas Cutlery Holder – TUTORIAL, you’ll discover how to choose the best fabrics, follow the cutting and sewing process, and decorate your holders for that perfect festive look. These cute holders can even double as small gifts or party favors. By the end of this tutorial, you’ll have mastered a craft that will impress your guests and make your Christmas table unforgettable.
To start this Christmas Cutlery Holder – TUTORIAL, you’ll need some basic crafting supplies. Gather pieces of fabric in Christmas-themed prints—think reds, greens, golds, and whites, or patterns with snowflakes, reindeer, or holly leaves. You’ll also need scissors, pins, a ruler, a needle and thread, or a sewing machine if you prefer quicker assembly.
Choosing the right fabric is essential. Cotton or felt works best for this project because they are easy to handle and provide a clean, polished look. Felt, in particular, adds a cozy texture that’s perfect for winter decorations. You can even use scraps of leftover fabric from other Christmas crafts.
In addition to fabric, you’ll want some embellishments to make your holders stand out. Ribbons, lace, buttons, or small ornaments can add delightful details. Decorative stitching with contrasting thread can also make your work look elegant and personalized.
If you prefer a no-sew option, fabric glue or hot glue can be used instead of sewing. This makes the project even simpler, especially if you’re crafting with kids or creating a large batch. Just ensure the glue you choose works well with fabric and dries clear.
Don’t forget about measurements. A typical cutlery holder should be large enough to fit a fork, knife, and spoon comfortably—about 10 inches long and 5 inches wide is a good starting point. You can adjust the size depending on your table setting and cutlery dimensions.
Once you have all the materials ready, clear your workspace and prepare to begin. Having everything organized before you start ensures your Christmas Cutlery Holder – TUTORIAL goes smoothly and keeps the creative process enjoyable.
Let’s begin crafting your Christmas Cutlery Holder. Start by cutting your fabric according to the measurements mentioned earlier. You’ll need two identical pieces for each holder—one for the front and one for the back. If you’re using patterned fabric, make sure the design is facing the right direction before cutting.
Next, place the two fabric pieces together, with the right sides facing inward. Pin them in place to prevent slipping while sewing. Using a straight stitch, sew around the edges, leaving a small opening at the top. If you’re gluing, carefully apply a thin line of glue around the edges and press firmly.
Turn the holder right side out through the opening. Use a pencil or chopstick to push out the corners neatly. Once done, press the fabric with an iron to flatten and smooth out any wrinkles. This helps give your holder a crisp, professional look.
Now fold the bottom third of the fabric upward to create a pocket for the cutlery. Pin the sides again and sew or glue along the edges to secure the pocket. You should now have a pouch-like shape where your utensils will rest.
You can test the size by inserting your fork, knife, and spoon. If needed, adjust the seam allowance to make the pocket larger or smaller. The key is to keep it snug but not too tight.
Repeat these steps to make as many holders as you need. Once you get into a rhythm, you’ll find that creating multiple holders becomes quick and enjoyable. This Christmas Cutlery Holder – TUTORIAL is simple enough to complete in an afternoon and leaves plenty of room for creativity.
Now comes the fun part—decorating your Christmas Cutlery Holder. This is where you can let your creativity shine and personalize each piece to match your holiday theme. Add festive embellishments such as ribbons, miniature bells, buttons, or even embroidered initials. These small details turn a simple fabric holder into a memorable piece of holiday decor.
If you love sparkle, use glitter glue or metallic thread to stitch along the borders. A touch of gold or silver instantly adds elegance to your table. For a cozy, rustic vibe, consider using jute twine or small pinecone accents.
You can also make themed holders shaped like Santa’s suit, a Christmas tree, or a snowman. Use felt for these designs since it’s easy to cut and doesn’t fray. For example, a red felt base with a black belt and white trim can look just like Santa’s outfit.
Adding a name tag to each holder can also serve as a place card, helping guests find their seats. This adds an extra layer of charm and thoughtfulness to your dinner table setup.
If you’re giving these holders as gifts, consider wrapping them around sets of cutlery tied with a festive ribbon. They make wonderful additions to Christmas gift baskets or as stocking stuffers for loved ones who enjoy hosting.
The best part about this Christmas Cutlery Holder – TUTORIAL is its flexibility. You can keep it simple for a minimalist look or go all out with embellishments. Every design choice helps make your holiday table uniquely yours.
Once the holiday season is over, you’ll want to store your Christmas Cutlery Holder properly so it stays in great condition for next year. If you used fabric, wash them gently with mild detergent and air dry to prevent shrinkage or color fading. Avoid using bleach or harsh cleaners, as they can damage the fabric’s texture and colors.
After cleaning, iron them lightly to restore their shape and keep them crisp. If your holders include glued decorations, avoid ironing directly over embellishments—use a pressing cloth to protect the surface.
Store them flat in a clean, dry box or a fabric bag to keep them dust-free. Keeping them organized by theme or color will make it easier to find them when the next Christmas season arrives.
If you’ve made holders using felt or thicker materials, you can also stack them to save space. Make sure they are completely dry before storing to avoid mold or odor buildup.
These holders are not just for one-time use. You can reuse them year after year, or repurpose them for other holidays by changing the decorations. For instance, swap out Christmas embellishments for hearts and pink tones to create Valentine’s Day holders.
With proper care, your Christmas Cutlery Holder – TUTORIAL creations will last for many festive seasons, making them both eco-friendly and cost-effective.
1. What type of fabric is best for making a Christmas Cutlery Holder?
Cotton and felt are the most popular choices because they are durable, easy to sew, and available in many festive patterns.
2. Can I make these holders without sewing?
Yes! You can use fabric glue or hot glue for a no-sew version. Just ensure you use glue that’s suitable for textiles and dries clear.
3. How many holders can I make from one yard of fabric?
Depending on your chosen size, you can typically make 8 to 10 holders from one yard of fabric.
4. Can I wash the cutlery holders after use?
Yes, if you used fabric and thread, they can be gently hand-washed or machine-washed on a delicate cycle. Avoid washing if you used glue or heavy embellishments.
5. What other designs can I create?
You can design holders shaped like Christmas trees, stockings, or reindeer. The possibilities are endless with a bit of creativity.
6. Are Christmas Cutlery Holders good for gifts?
Absolutely! They make thoughtful and affordable handmade gifts, especially when paired with matching napkins or cutlery sets.
The Christmas Cutlery Holder – TUTORIAL is a fun and rewarding craft that brings festive joy to your table. You’ve learned how to choose materials, sew or glue your holders, decorate them beautifully, and store them for future holidays. These handmade pieces add a touch of warmth, creativity, and care to your celebrations.
Try making a few different designs and share them with friends and family to spread the Christmas spirit. I’d love to hear your honest opinions and suggestions—what colors, fabrics, or designs would you like to try next? Leave your thoughts below and let’s keep creating magic together!