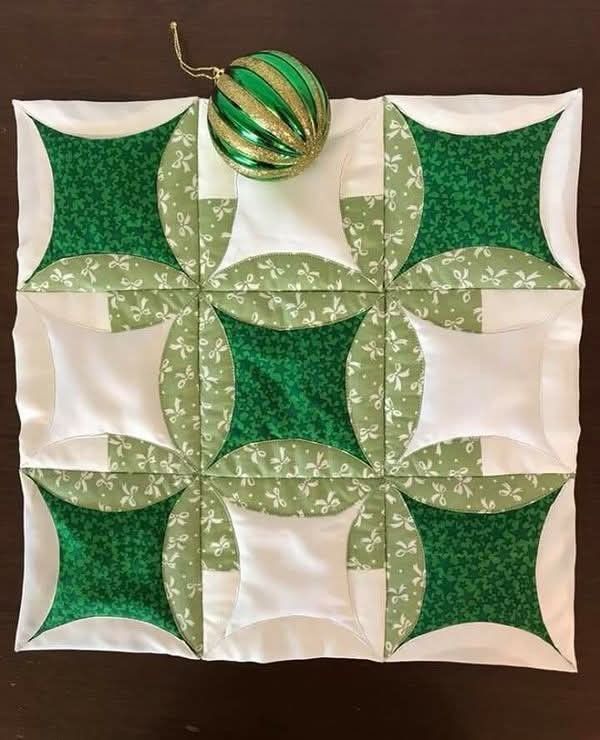
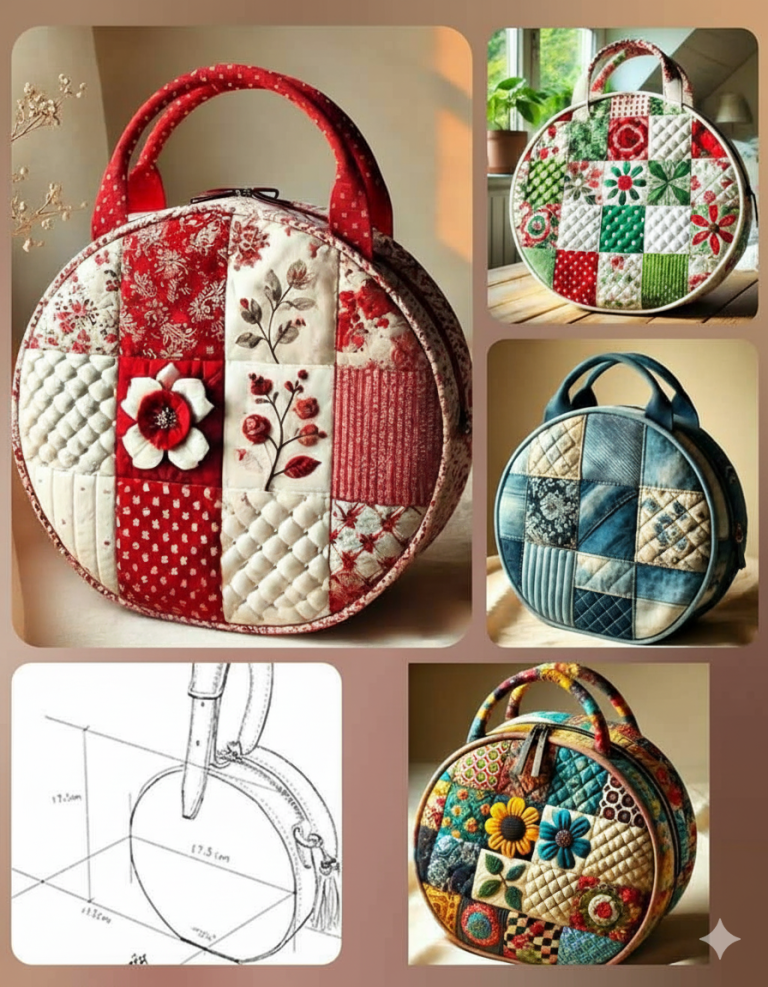
Cathedral Window Block – PATTERN


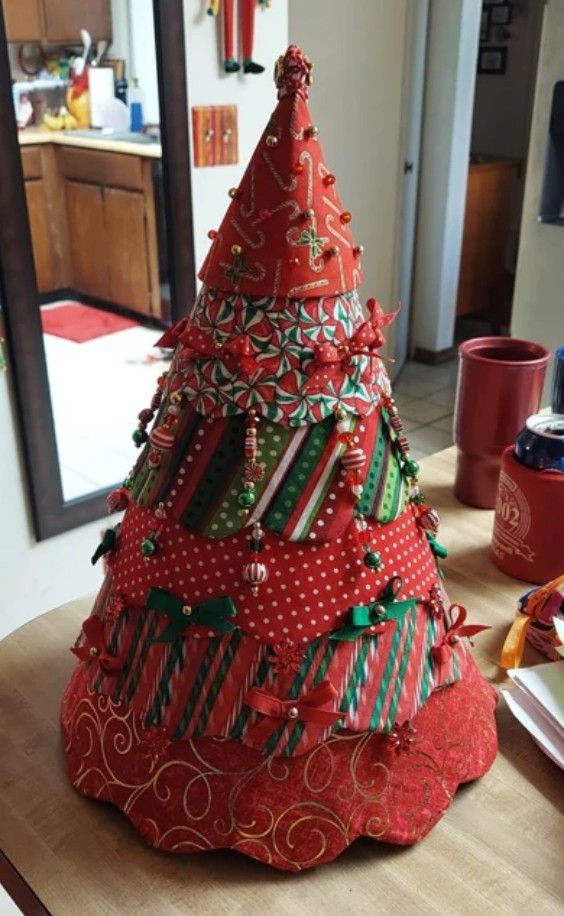
The Fabric Christmas Tree – TUTORIAL is a beautiful and creative way to bring handmade charm into your holiday decorations. Unlike a traditional Christmas tree, this quilted version uses fabric, stitching, and imagination to create a festive piece that can last for years. Whether you display it on a wall, table, or mantel, a fabric Christmas tree adds warmth and personal touch to your seasonal decor.
Making a Fabric Christmas Tree is not only fun but also an excellent scrap-busting project for quilters. You can use leftover holiday fabrics, glittery cottons, or cozy flannels to build layers that resemble tree branches. Each piece can be personalized with unique patterns and colors, reflecting your own festive style.
In this Fabric Christmas Tree – TUTORIAL, you’ll learn everything you need—from gathering materials and cutting your fabrics to assembling and decorating your final tree. This guide is designed for both beginners and experienced quilters who want to create something meaningful and handmade for the holiday season. Let’s get started on your festive quilting adventure!
Before starting your Fabric Christmas Tree – TUTORIAL, gather all the materials you’ll need. Having everything ready ensures a smooth, enjoyable crafting experience.
Begin with fabric selection. Choose a combination of green tones for the tree, but don’t be afraid to add gold, silver, red, or patterned Christmas prints for a playful look. Cotton fabric works best because it’s easy to handle and quilt, but you can also mix textures for extra dimension.
You’ll also need batting or felt to give your tree structure and depth. Batting adds a soft, quilted texture, while felt creates a firmer base that stands well on tabletops or walls.
For your tree trunk, use brown or wood-textured fabric to create contrast. You can even repurpose old fabric scraps or small quilting remnants for this purpose.
Gather your sewing supplies: thread, sewing machine (or hand-sewing needle), scissors, rotary cutter, ruler, and cutting mat. A fabric marker will help outline your pattern, and pins or clips will keep everything aligned while sewing.
Lastly, collect embellishments like buttons, ribbons, beads, or miniature ornaments to decorate your fabric tree once it’s complete. These small touches bring your creation to life and make it sparkle with holiday spirit.
Now that your materials are ready, let’s begin crafting your Fabric Christmas Tree step by step. This process is simple, relaxing, and produces stunning results perfect for decorating your home or gifting to loved ones.
Start by cutting the fabric. Depending on the size of the tree you want, draw and cut several triangle shapes in different sizes to represent the tree’s layers. For a more dynamic effect, use a mix of fabric prints for each section.
Next, cut a piece of batting or felt in the same shapes as your fabric triangles. Layer one fabric triangle on top of the batting, then place another triangle (right sides facing) on top. Pin them together to hold everything in place.
Now, sew around the edges of each triangle, leaving a small opening to turn it right side out. Once stitched, turn each piece carefully, and press it flat with an iron. This gives the fabric a crisp, clean finish and defines the tree shape nicely.
Once all your layers are sewn and pressed, begin stacking them from largest to smallest, creating a tiered Christmas tree effect. You can stitch or glue the layers together depending on whether you want a soft or structured result.
For the tree trunk, sew a small rectangular piece of brown fabric, lightly stuffed with batting, and attach it to the bottom of your layered tree. Make sure it’s centered for balance.
Finally, it’s time to decorate your tree! Sew or glue small beads, buttons, ribbons, or miniature stars onto your tree to make it sparkle. You can also add a felt star or embroidered snowflakes for an extra touch of holiday magic.
One of the joys of this Fabric Christmas Tree – TUTORIAL is how easy it is to personalize. No two trees have to look alike—you can adapt this pattern to match your home decor or holiday theme.
For a rustic look, use burlap, linen, or earthy-toned fabrics. Add twine bows, wooden buttons, and simple embroidery for a cozy farmhouse-style tree. This design looks great displayed on wooden tables or entryway shelves.
If you prefer a modern aesthetic, go for monochromatic fabrics like white, silver, or pastel shades. Add metallic thread or minimalist stitching to create a sleek, elegant effect. This version fits beautifully in contemporary or Scandinavian-inspired homes.
For kids’ rooms, try making a colorful and playful tree using bright fabrics with fun patterns like polka dots, stripes, or Christmas cartoons. Add felt ornaments that children can move or change each day like an advent activity.
You can also turn this project into a hanging wall quilt by attaching a loop or rod pocket at the top. It makes a charming decoration for narrow spaces like hallways or doors.
For small gifts or party favors, create mini fabric trees that fit in the palm of your hand. These can be used as ornaments, gift toppers, or place cards at holiday dinners.
Lastly, consider using this tutorial to make a family quilting project. Everyone can design their own mini tree using their favorite fabrics, creating a set that represents your household’s creativity and love for handmade art.
After completing your Fabric Christmas Tree, you’ll have a versatile decoration that can be displayed in many delightful ways. Handmade fabric trees can transform any space into a cozy holiday haven.
For a table centerpiece, arrange several trees of varying heights together. Add candles, pinecones, or fairy lights around them for a magical holiday display. This setup works beautifully for Christmas dinners or family gatherings.
If you made a wall-hanging version, showcase it in your living room or entryway to welcome guests with festive warmth. It’s a lovely alternative to traditional wreaths or garlands.
These trees also make wonderful gifts. Wrap them in clear cellophane with a ribbon or present them in small baskets with hot cocoa mix, cookies, or ornaments. Handmade gifts like these always carry sentimental value and show your care and effort.
You can even use this tutorial as part of a holiday craft fair collection. Handmade Fabric Christmas Trees sell well because of their charm, durability, and reusability. Be sure to photograph them beautifully and include SEO-friendly descriptions if selling online.
Another creative option is to make themed sets—for example, a snowy white tree set, a red-and-green patchwork set, or trees decorated with miniature beads and stars. These themed groups make elegant, ready-to-display home decor sets.
No matter how you use them, these quilted fabric trees bring warmth, color, and a personal touch to your Christmas celebrations.
1. Is this project suitable for beginners?
Yes, the Fabric Christmas Tree – TUTORIAL is beginner-friendly and uses simple quilting and sewing techniques that anyone can follow.
2. What kind of fabric works best?
Cotton and felt are ideal because they hold their shape well and are easy to sew and decorate.
3. Can I make the tree larger?
Absolutely! You can scale up your pattern to create larger decorative trees for tabletops or walls.
4. How do I make my tree stand upright?
Use thicker batting, interfacing, or even light cardboard inside the layers for added stability.
5. Can I wash my fabric Christmas tree?
Yes, gently hand wash it in cold water and let it air dry to preserve its shape and decorations.
6. What can I use for decorations?
Buttons, ribbons, felt stars, sequins, and small beads all work beautifully for decorating your fabric tree.
The Fabric Christmas Tree – TUTORIAL is a wonderful way to blend quilting creativity with holiday joy. You’ve learned how to gather materials, sew layered pieces, decorate your tree, and display it beautifully in your home. This project captures the heart of Christmas—creativity, warmth, and handmade love.
PATTERN HERE:
Whether you make one for yourself or as a thoughtful gift, your fabric tree will surely become a cherished part of your holiday tradition. We hope you enjoyed this tutorial! Please leave your honest opinion and suggestions below—your feedback helps inspire future quilting guides and festive DIY ideas.


