
Sewing Hearts & Nine Patch

Learn how to make a neck pillow is one of the most relaxing and creative DIY projects you can try at home. Whether you want to create something soft and cozy for your travels or a handmade gift for someone you love, this project is both fun and practical. By following this guide, you’ll not only learn the steps to sew a neck pillow but also understand how to customize it to your personal style and comfort. Making your own neck pillow gives you the freedom to choose fabrics, patterns, and fillings that suit your needs perfectly.
A neck pillow is designed to support your head and neck during rest or travel, preventing stiffness and improving posture. Many store-bought options don’t offer the perfect fit or comfort, but when you make one yourself, you can adjust the shape and firmness to your liking. This tutorial is ideal for beginners and those who want to learn simple sewing techniques while creating something truly useful.
Throughout this Learn how to make a neck pillow tutorial, you’ll discover how easy and enjoyable it is to craft a personalized pillow. All you need are basic sewing materials and a little bit of creativity. The process involves measuring, cutting, sewing, and stuffing — simple steps that even a beginner can handle with ease. You’ll soon have a pillow that’s both beautiful and functional, ready to accompany you wherever you go.
Before you start creating your pillow, it’s important to gather all the materials you’ll need for this project. The great thing about this Learn how to make a neck pillow tutorial is that it requires only a few basic supplies that you may already have at home. You’ll need fabric, stuffing, thread, scissors, a sewing machine (or needle for hand sewing), and a pattern.
When choosing the fabric, consider comfort first. Soft fabrics like cotton, flannel, or fleece work beautifully for neck pillows because they feel good against your skin. You can even use leftover fabric scraps from other projects if you want to make your pillow eco-friendly and budget-friendly.
Next, select your filling. Polyester fiberfill is the most common choice because it’s lightweight and holds its shape well. However, you can also use memory foam, buckwheat hulls, or even rice for a more natural alternative. Each filling type provides a different level of firmness and comfort.
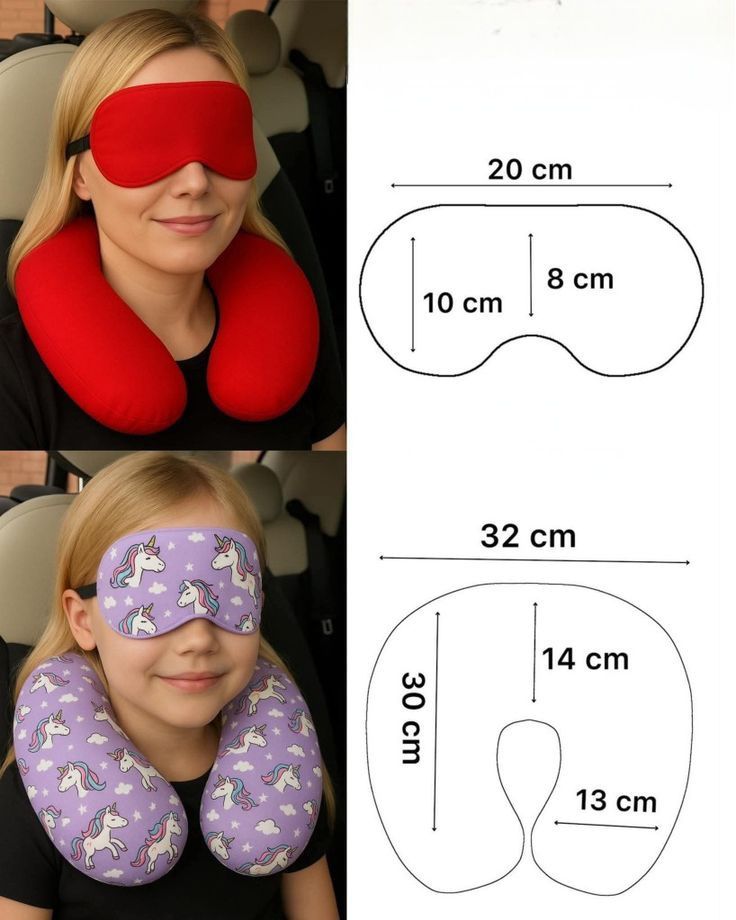
Having a paper pattern or template is essential for cutting the pillow pieces accurately. You can easily find free templates online or create one by tracing around an existing neck pillow. Make sure your pattern includes a seam allowance for easy sewing.
A sewing machine will make the process faster, but you can absolutely hand-sew this project if you prefer. Using a backstitch or a small, tight running stitch will ensure durability. Lastly, don’t forget to match your thread color to your fabric for a professional finish.
Once you have everything prepared, set up your workspace. A clean, well-lit area will make cutting and sewing much easier. Organize your materials before starting so you can enjoy a smooth crafting experience.
Now that you’ve gathered your materials, it’s time to begin the fun part — cutting and assembling your neck pillow pieces. Using your chosen pattern, lay the template on top of your fabric, pin it down, and carefully cut around it. You’ll need two identical pieces of fabric for one pillow.
Make sure to cut as neatly as possible since accurate edges will make sewing easier later. You can even iron your fabric before cutting to remove wrinkles and ensure smooth lines. If you’re using printed fabric, remember to place both pieces with the right sides facing each other when you sew.
Once your fabric is cut, pin the pieces together around the edges, leaving a small opening of about two inches. This gap will be used for turning the pillow right side out and for adding the stuffing later. Pinning helps keep the layers in place while you sew.
Start sewing slowly around the edges, following the outline of your pattern. Be sure to leave that small opening unstitched. If you’re using a sewing machine, choose a medium stitch length. For hand sewing, use tight, even stitches to keep the seams strong.
After sewing, trim any excess fabric from the seam allowance, but be careful not to cut too close to your stitching. This step helps the pillow keep its shape and reduces bulk around the edges.
Finally, turn the pillow right side out through the opening you left. Use a blunt tool, like the back of a pen, to push out the corners and curves neatly. Your pillow should now start looking like its final shape!
Now that your neck pillow is sewn together and turned right side out, it’s time to add the stuffing. This is where your pillow comes to life, so take your time and fill it evenly for the best result.
Start by adding small handfuls of stuffing at a time. Use your fingers or a chopstick to push the filling into all the curves and corners. The goal is to fill the pillow enough so that it’s firm but still soft enough to mold around your neck.
If you’re using polyester fiberfill, distribute it evenly to avoid lumps. For natural fillings like rice or buckwheat hulls, you can use a funnel to pour them in. Each filling type will give your pillow a slightly different texture and weight.
As you stuff, keep testing the firmness by gently pressing and bending the pillow. Add or remove filling until you find your perfect level of comfort. Remember that travel neck pillows usually need to be a bit firmer to support your head during long trips.
When you’re satisfied with the shape and feel, it’s time to close the opening. Fold the raw edges inward and sew the gap shut with a small, invisible ladder stitch or a slip stitch. This will make your pillow look clean and professional.
Once closed, give your pillow a final fluff and gently massage it to spread the filling evenly. Your handmade neck pillow is now complete and ready for use!
One of the best parts of this Learn how to make a neck pillow project is the ability to personalize your design. You can make each pillow unique by adding creative touches that reflect your personality or make it more functional.
Try using different fabric colors and prints to match your mood or travel gear. Floral, geometric, or animal patterns can make your pillow fun and stylish. You could even use themed fabrics for holidays or special occasions.
Adding embellishments like embroidery or appliqué can make your pillow extra special. For example, embroider your initials or a small design on one side. Just remember to keep decorations minimal to maintain comfort.
You can also attach small loops or buttons to your pillow for convenience. A loop can help you hang it from your luggage, while a button and strap can allow you to close it around your neck.
If you love aromatherapy, consider adding a few drops of essential oil to the stuffing or a small sachet inside the pillow. Scents like lavender or eucalyptus can help you relax and sleep better while traveling.
Lastly, if you plan to make these as gifts, wrap them beautifully and add a handmade tag. A personalized neck pillow makes a thoughtful present for birthdays, holidays, or even as a get-well gift.
1. What materials are best for making a neck pillow?
Soft and breathable fabrics like cotton, fleece, or flannel are ideal. For stuffing, polyester fiberfill is the most common choice, but natural fillings can also be used.
2. Can I make a neck pillow without a sewing machine?
Yes! You can hand-sew your pillow using small, tight stitches. It may take longer, but it’s just as effective.
3. How do I wash a handmade neck pillow?
If it’s made with removable filling, take it out before washing the cover. For filled pillows, spot clean with a damp cloth and mild detergent.
4. Can I adjust the size of my neck pillow?
Absolutely. You can resize your pattern to make smaller or larger versions depending on your needs.
5. How long does it take to make a neck pillow?
For beginners, it typically takes about one to two hours, depending on your sewing speed and level of detail.
Now that you’ve learned how to make a neck pillow, you can enjoy the comfort and satisfaction of creating something useful with your own hands. This project is simple, relaxing, and allows for endless customization. You’ve seen how to choose materials, cut and sew fabric, stuff the pillow properly, and even add creative touches.
We hope this Learn how to make a neck pillow tutorial inspired you to start sewing your own version today. Try it for yourself, gift it to someone you care about, or make a few in different styles for every occasion.
PATTERN VIDEO:
If you enjoyed this guide, please leave your honest opinion and suggestions below — we’d love to hear your thoughts and see what you create next!


