
Sewing Hearts & Nine Patch

The Lone Star – TUTORIAL is one of the most iconic and breathtaking quilt patterns in the quilting world. Known for its striking design and radiant symmetry, the Lone Star quilt has captivated quilters for generations. Its bold geometric layout and vivid color combinations make it a timeless classic that never goes out of style. Whether you’re a beginner ready for a new challenge or an experienced quilter looking to refine your skills, this tutorial will guide you step by step to create your own stunning Lone Star quilt.
The Lone Star – TUTORIAL will help you understand the art of piecing diamonds together to form the eight-pointed star at the heart of this pattern. While it may seem intricate, this design becomes approachable when broken down into manageable sections. Once you learn the technique, you can use it to make a full quilt, wall hanging, or table topper.
With a little patience and attention to detail, the Lone Star pattern becomes an incredibly rewarding project. This guide will cover everything from material selection to cutting, piecing, and finishing your quilt, ensuring that your Lone Star shines as brightly as its name suggests.
Before starting your Lone Star – TUTORIAL, it’s essential to gather all the materials you’ll need. For this quilt, you’ll require a selection of fabrics in various colors or shades. Traditionally, the Lone Star features a gradient of colors that move from light to dark, creating a glowing, radiating effect.
Choose high-quality cotton fabrics for best results. Cotton is easy to work with, holds its shape well, and is perfect for both beginners and advanced quilters. You’ll also need rotary cutters, a cutting mat, quilting rulers, thread, and an iron to ensure clean, precise cuts and seams.
In addition to fabric, you’ll need batting and backing material to complete your quilt. These layers add dimension, warmth, and texture, enhancing the overall appearance of your finished project.
A sewing machine with a quarter-inch foot will help you maintain accurate seam allowances — a crucial detail in the Lone Star – TUTORIAL since precision determines how neatly your star points align.
Consider using fabric starch or spray to stabilize your fabric before cutting. This can prevent stretching and make it easier to piece your diamonds together without distortion.
Finally, organize your materials by color or section before beginning. Having a clear workspace and pre-sorted fabrics will make the quilting process smoother and more enjoyable.
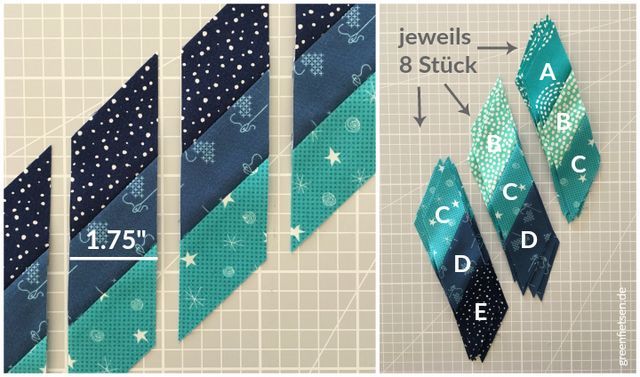
The cutting process is one of the most critical parts of the Lone Star – TUTORIAL. Accurate cutting ensures your quilt pieces fit perfectly, resulting in sharp points and clean lines. Begin by cutting your fabric into long strips of equal width, typically between 2 and 3 inches, depending on the size of your quilt.
Next, arrange the strips in your desired color order. A traditional Lone Star design often transitions from dark to light shades, creating a beautiful gradient effect that enhances the three-dimensional look of the quilt.
Sew the strips together along their long edges using a consistent quarter-inch seam. Press the seams open or to one side, depending on your preference, ensuring the fabric lays flat and even.
Once your strip sets are ready, use your rotary cutter and ruler to cut them into diamond-shaped pieces. Precision is key here — even a small misalignment can affect the symmetry of your star.
To form the star’s points, arrange eight diamond sections in a circular pattern. This will create the signature Lone Star shape that is both elegant and striking.
Before sewing the sections together, check that the color placement looks balanced. Adjust if necessary to ensure your Lone Star radiates evenly and beautifully.
Now that your diamond pieces are ready, it’s time to assemble the main block of the Lone Star – TUTORIAL. Begin by joining two diamond units together, aligning the seams carefully so that the color transitions flow smoothly. Pin or clip the pieces before sewing to maintain accuracy.
Continue adding diamond sections one by one until you complete one-half of the star. Repeat the process for the other half, making sure that each seam matches perfectly. When you join the two halves together, the eight points of the star will meet at the center.
Press your seams carefully to avoid bulk at the center of the star. You can press them open or in alternating directions to reduce thickness.
Once the star is complete, it’s time to add background pieces. Typically, quilters use solid or neutral fabrics for the background to make the star stand out. Attach the background triangles and squares around the star to form a perfect square block.
If you plan to create a large quilt, you can repeat the process and join multiple Lone Star blocks together. Alternatively, one large star can serve as the centerpiece for a single-block quilt.
Take your time with this step — accuracy is key to ensuring your Lone Star Quilt Block has crisp lines and precise points.
After assembling your star block, the next step in the Lone Star – TUTORIAL is to turn it into a complete quilt. Layer your quilt top with batting and backing fabric, ensuring all layers are smooth and free of wrinkles. Pin or baste them together to hold the layers in place.
Quilting can be done either by hand or machine. For a modern touch, you might choose straight-line or echo quilting to emphasize the star’s radiating design. If you prefer a traditional look, free-motion quilting adds texture and depth.
Once quilting is complete, trim the edges and prepare your binding. Choose a binding fabric that complements your star colors for a polished finish.
Sew the binding around the edges of the quilt, folding and mitering the corners neatly. This final touch secures the edges and gives your quilt a professional appearance.
Before displaying your finished quilt, give it a gentle press to remove any wrinkles and help the seams settle nicely.
The result will be a breathtaking Lone Star Quilt that showcases your skill, patience, and creativity — a project to be treasured for years to come.
1. Is the Lone Star pattern suitable for beginners?
While the Lone Star – TUTORIAL involves precise piecing, beginners can absolutely tackle it with patience and attention to detail. Start with a smaller version before moving to a full quilt.
2. How many fabrics should I use for the Lone Star?
Traditionally, eight colors or shades are used to create the gradient effect, but you can experiment with fewer or more depending on your desired look.
3. What is the best fabric for this quilt?
High-quality quilting cotton is ideal because it’s stable, easy to sew, and provides crisp points.
4. Can I make a Lone Star using scraps?
Yes! Scrappy Lone Star quilts can look amazing when carefully arranged to maintain color balance and visual harmony.
5. How can I avoid bulky seams in the center?
Press seams open or alternate directions when assembling the star. You can also lightly trim seam allowances where necessary.
6. What size should I make my Lone Star block?
That depends on your project. Small stars make excellent wall hangings or pillows, while large stars create dramatic full-size quilts.
The Lone Star Quilt remains one of the most loved and admired patterns in quilting history. Through this Lone Star – TUTORIAL, you’ve learned how to cut, piece, and assemble your star with precision and creativity.
Though it requires care and patience, the end result is a quilt that radiates beauty, tradition, and artistry. We hope you enjoyed this guide — share your honest opinion and suggestions below! Your feedback helps inspire more quilters to try the timeless Lone Star pattern for themselves.


