Rose Twirl Quilt - Pattern

Creating a Backpack made with scraps is one of the most creative and sustainable projects for sewing enthusiasts and quilters. Instead of throwing away small leftover pieces of fabric, you can transform them into a stylish, eco-friendly, and fully functional backpack. This not only helps reduce waste but also gives you the opportunity to design something unique that reflects your personal style.
A handmade backpack is not just an accessory; it is also a statement piece. By combining scraps in different colors, textures, and patterns, you can create a bag that no one else has. Whether you are a beginner quilter looking for a new challenge or an experienced crafter who wants to repurpose fabric, this project is rewarding in every way.
In this Backpack made with scraps tutorial, you will learn how to select materials, design patchwork panels, assemble the structure, and finish your backpack with professional-looking details. It is a project that balances creativity, functionality, and sustainability, making it an ideal choice for anyone passionate about quilting and sewing.
The first step in making a Backpack made with scraps is choosing the best fabric pieces for the project. Not all scraps are suitable, and selecting the right ones will ensure your bag is durable, practical, and attractive.
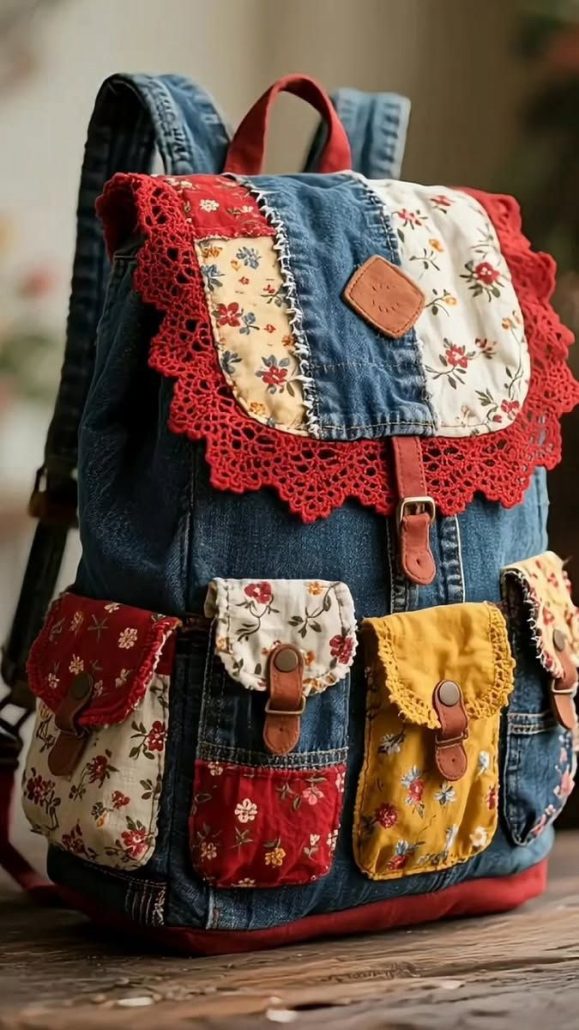
Look for medium to heavyweight fabrics such as denim, canvas, twill, or sturdy cotton. These fabrics provide structure to the backpack and can handle daily wear and tear. Lightweight scraps like thin cotton can still be used, but they work best as decorative panels when reinforced with interfacing.
Color coordination is another important factor. Think about creating a harmonious palette or go bold with contrasting shades. Scraps in different patterns—such as florals, stripes, or polka dots—can be combined into a beautiful patchwork effect.
To add more character, consider mixing textures. Pairing denim scraps with quilting cotton or adding small pieces of faux leather can give the bag a modern and stylish look.
Before cutting your scraps, iron them well to ensure accuracy when measuring and piecing them together. Wrinkled scraps can cause uneven seams and make assembly difficult.
Finally, think about functionality. Choose fabrics that can withstand washing and are easy to clean since backpacks are used daily and exposed to outdoor conditions.
Once your scraps are selected, the next step in this Backpack made with scraps project is to design the patchwork panels that will form the front, back, and sides of the bag. This is where your creativity really shines.
Start by arranging your fabric pieces on a flat surface. Experiment with different layouts—random patchwork for a fun, bohemian style or geometric patterns for a more modern and sleek look.
When you are satisfied with the arrangement, sew the scraps together in rows or blocks, pressing the seams flat as you go. This ensures that the patchwork lays smooth and even, making it easier to assemble later.
To give strength to your panels, use interfacing or quilt batting behind the patchwork. Quilting the layers together adds durability and also gives your backpack a more professional finish.
Remember to measure carefully. The patchwork panels should match the dimensions of the backpack pattern you are following. Trim any excess fabric to keep all edges even.
Adding a lining is another great way to enhance the backpack. Choose a solid fabric for the inside to provide contrast and stability. A lining not only makes the bag stronger but also gives it a neat, finished appearance.
For extra creativity, include a small pocket in your patchwork design. Pockets made from scraps are perfect for storing small items and add even more functionality to your bag.
Now that your patchwork panels are ready, it is time to assemble the Backpack made with scraps into a functional structure. This step may require patience, but the results are worth it.
Begin by sewing the front and back panels to the side panels. Use a strong stitch and reinforce the seams, as backpacks carry weight and need extra durability.
Add the bottom panel, making sure the corners align neatly. Reinforcing this area with double stitching or adding an extra layer of fabric helps the backpack support heavier items.
Once the outer shell is complete, attach the lining. Sew the lining separately and then insert it into the outer bag, securing it along the edges. This creates a clean and professional interior.
Next, focus on the straps. Straps can also be made from scraps by sewing long strips together and adding padding inside for comfort. Reinforce the attachment points to ensure they can handle regular use.
Adding a zipper or drawstring closure keeps your items safe inside the backpack. If you are using a zipper, sew it carefully between the outer fabric and lining for a polished look.
Finally, press the entire bag with a warm iron to smooth out seams and give it a finished appearance. At this stage, your Backpack made with scraps is starting to look like a real backpack ready to use.
The last part of making a Backpack made with scraps is all about personalization. This is your chance to turn the project into something truly special.
Consider adding decorative stitching to highlight certain areas of your patchwork. Contrast-colored threads can make the seams pop and add a handmade charm.
You can also add embellishments such as buttons, embroidery, or fabric appliqués. These small details give your backpack a unique personality and set it apart from mass-produced bags.
Think about functionality too. Adding exterior or interior pockets gives the backpack extra storage and practicality. Small zippered compartments are especially useful.
If you have leftover straps, consider creating a matching keychain or pouch to go with the backpack. This creates a cohesive handmade set that looks thoughtful and coordinated.
Adjust the strap length to your preference. Making adjustable straps from fabric scraps is possible by adding D-rings or buckles, which can easily be found in craft supply stores.
Lastly, label your creation. Adding a small handmade tag or your initials stitched inside the bag makes it feel even more personal and professional.
Q1: What is the best fabric for making a backpack with scraps?
Medium to heavy fabrics such as denim, canvas, or sturdy cotton work best because they provide structure and durability.
Q2: Can beginners make a backpack from scraps?
Yes, beginners can follow this project. Start with simple designs and gradually try more advanced features like zippers or multiple pockets.
Q3: Do I need a sewing machine to make a backpack with scraps?
While it is possible to hand-stitch, a sewing machine makes the process faster, stronger, and more reliable.
Q4: How can I make my backpack more durable?
Use interfacing, quilt batting, or an extra lining layer. Reinforce the straps and bottom of the backpack with double stitching.
Q5: Can I sell backpacks made from scraps?
Absolutely. Handmade backpacks are popular items at craft fairs and online marketplaces. Just ensure they are well-constructed and durable.
Q6: How do I clean a backpack made from scraps?
Most scrap backpacks can be spot-cleaned or gently washed, depending on the fabric. Always check the type of fabric before washing.
This Backpack made with scraps tutorial has shown you how to select fabric pieces, design patchwork panels, assemble the structure, and personalize your project with finishing touches. The process is not only fun but also sustainable, giving a second life to fabric scraps that might otherwise be wasted.
PATTERN VIDEO:
Now it’s time to bring your creativity to life. Try making your own backpack, experiment with colors and textures, and create something truly one-of-a-kind. Don’t forget to share your thoughts—leave your honest opinion and suggestions so we can keep improving and bring you more tutorials like this one.