Urban Constellation - PATTERN

Creating a DIY Fun Fabric Drink Caddy Sewing – Pattern is one of the most enjoyable and rewarding sewing projects for crafters of all levels. Not only does this project let you explore your creativity, but it also gives you a practical and stylish item that you can use at family gatherings, picnics, or even as a personalized gift. From choosing the right fabrics to learning how to assemble each part, this tutorial will walk you through the essential steps.
This pattern is designed to help beginners and experienced sewists alike, offering guidance that is easy to follow while still encouraging personal touches. The idea of making your own drink caddy means you can tailor it to your needs and preferences, whether that’s through bold patterns, neutral tones, or festive fabrics that match seasonal events.
The DIY Fun Fabric Drink Caddy Sewing – Pattern is also an excellent way to use up leftover fabric scraps that might otherwise go to waste. By repurposing materials, you not only save money but also practice sustainable crafting, which is becoming increasingly important in the creative world.
When starting this project, the first step is to gather all your supplies. You’ll need sturdy cotton fabric, interfacing to add structure, thread in coordinating colors, scissors or a rotary cutter, and a reliable sewing machine. Having a cutting mat and ruler will also make measuring and cutting more precise.
Once your supplies are ready, it’s important to pre-wash your fabrics. Pre-washing ensures that the fabric will not shrink after the caddy is assembled, which helps keep your finished project looking neat and professional. Ironing the fabric before cutting is equally important for clean lines.
Cutting your pieces according to the measurements in the DIY Fun Fabric Drink Caddy Sewing – Pattern will give you the foundation of your project. Most patterns will include panels for the sides, base, dividers, and straps, each contributing to the caddy’s structure. Accuracy in cutting will save time and frustration during assembly.
Another step to consider at the beginning is choosing the right interfacing. Lightweight interfacing works well if you want a softer caddy, but for stronger support—especially if you plan to carry glass bottles—a medium to heavy-weight option is better. This small choice can greatly impact durability.
Before you dive into sewing, take time to plan your fabric placement. Coordinating patterns and colors can elevate your project from simple utility to stylish accessory. Think about whether you want a cohesive look or a fun, mismatched design.
Finally, always ensure you have extra thread and a backup needle for your sewing machine. Nothing interrupts a creative flow like running out of materials mid-project, and having spares on hand helps you stay focused on enjoying the process.
The assembly of the DIY Fun Fabric Drink Caddy Sewing – Pattern begins with sewing the panels together. Start with the sides, carefully aligning edges and securing them with straight stitches. Using pins or fabric clips can help keep everything in place.
Once the sides are stitched, you can attach the base panel. This step may require patience, as sewing around corners can be tricky. Go slowly, guiding the fabric under the presser foot to ensure smooth, even seams. Reinforcing the corners with an extra stitch line adds strength.
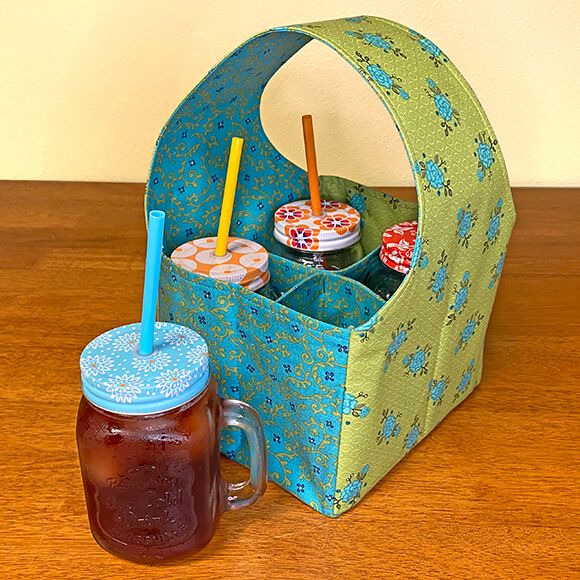
The dividers are what give the caddy its functional appeal. These fabric pieces separate the compartments, making it possible to carry multiple drinks without them knocking against each other. Attach them firmly inside the caddy, making sure each section is evenly spaced.
Adding interfacing is crucial during assembly. Place the interfacing between the outer fabric and the lining for stability. This technique ensures that your caddy can carry weight without sagging, making it both practical and professional in finish.
Handles are the next important feature. Cut long strips of fabric, reinforce them with interfacing, and sew them securely to the sides. Handles should be strong enough to support the weight of filled bottles or cans while still being comfortable to carry.
Finally, check all seams and edges. Trimming excess threads, pressing the seams with an iron, and even topstitching around the edges can enhance the overall look of your caddy. These finishing touches create a polished result that you’ll be proud to use or gift.
One of the joys of following the DIY Fun Fabric Drink Caddy Sewing – Pattern is the freedom to personalize your design. A drink caddy doesn’t have to look standard—it can reflect your personality or the occasion.
You can start by experimenting with fabric prints. For example, use bright floral patterns for summer picnics or bold geometric designs for modern appeal. Holiday-themed fabrics are also fun if you plan to gift the caddy during festive seasons.
Another creative idea is to add embellishments. Decorative buttons, ribbons, or embroidered initials can transform your caddy into a one-of-a-kind piece. If gifting, personalizing with the recipient’s initials adds a thoughtful touch.
Consider lining the interior with waterproof fabric. This small adjustment makes the caddy more practical, especially if you’re carrying cold drinks that may cause condensation. It’s a simple yet functional upgrade.
You could also include extra pockets on the outside of the caddy. Small compartments for straws, napkins, or even a bottle opener can add convenience and versatility to your project.
Lastly, think about adjusting the size. The pattern can be easily scaled up or down depending on whether you want to carry cans, large bottles, or even reusable coffee cups. Flexibility in design means you can make multiple caddies for different occasions.
When using your DIY Fun Fabric Drink Caddy Sewing – Pattern, durability is key. To ensure your project lasts, always use quality fabrics and strong thread. These small choices can significantly impact the lifespan of your caddy.
Another tip is to double-stitch stress points. The handles and corners often bear the most weight, so reinforcing these areas helps prevent wear and tear.
Proper care is also important. Spot cleaning with mild detergent is usually sufficient, especially if you’ve chosen durable cotton or canvas. Avoid harsh chemicals that could damage the fibers or fade the colors.
If you’ve lined your caddy with waterproof material, make sure to air-dry it thoroughly after each use. This prevents mildew and keeps your caddy fresh for future outings.
For long-term storage, keep the caddy in a cool, dry place. Folding it neatly or keeping it stuffed with soft fabric scraps can help maintain its shape.
Finally, don’t be afraid to make more than one caddy. The more you practice this pattern, the easier and quicker the process becomes. You’ll also discover new ways to improve your design with each project.
What fabric works best for a fabric drink caddy?
Sturdy cotton, canvas, or denim are great choices because they offer both durability and style.
Can I make this project without a sewing machine?
While hand-sewing is possible, a machine ensures stronger seams and faster completion.
How many drinks can a standard caddy hold?
Most patterns create space for 4 to 6 bottles or cans, but you can adjust the size as needed.
Is interfacing necessary?
Yes, interfacing gives the caddy structure and prevents it from collapsing under weight.
Can children use the drink caddy?
Yes, but always ensure handles are secure and that the weight is manageable for them.
Is this a beginner-friendly sewing project?
Absolutely. With patience and clear instructions, even beginners can successfully make this caddy.
The DIY Fun Fabric Drink Caddy Sewing – Pattern is a fun, practical, and creative project that combines functionality with personal style. From choosing the right materials to customizing your design, this sewing project is both beginner-friendly and rewarding. You now have the guidance needed to craft a unique piece that can serve you at home, during gatherings, or as a thoughtful handmade gift.
I’d love to hear your thoughts on this tutorial! Share your experiences, opinions, or suggestions in the comments. Your feedback can help inspire even more creative sewing projects.