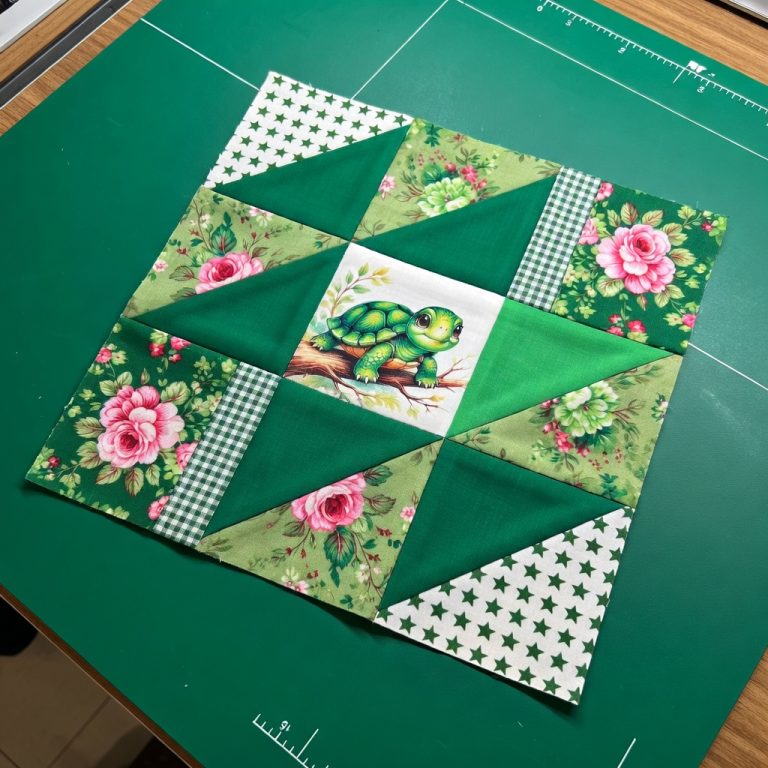
DIY - 9-Patch “Turtle Star” Quilt Block Tutorial

Bags with Zippers – Tutorial is one of the most popular searches among sewing enthusiasts because it combines practicality with creativity. Learning how to make a bag with a zipper allows you to design something functional while also expressing your unique style. Whether you are a beginner in sewing or already have some experience, working on this project will give you skills you can use for many other handmade creations.
Many people believe that sewing zippers is complicated, but with the right guidance and a step-by-step method, you will see how simple it can be. This tutorial not only teaches you how to assemble a bag but also provides tips on choosing the right fabric, selecting a strong zipper, and finishing your bag in a professional way. Creating bags with zippers is a great way to practice precision, and the finished result will be both stylish and durable.
By following this Bags with Zippers – Tutorial, you will discover how to transform fabric and zippers into practical accessories. These bags are perfect for carrying makeup, organizing small items, or even gifting to friends and family. The process may look intimidating at first, but once you understand each stage, you will gain confidence and creativity for your future sewing projects.
The first step in any sewing project is selecting the right materials. For this bags with zippers tutorial, you will need fabric, interfacing, a zipper, thread, and basic sewing tools. Choosing a strong fabric like cotton, denim, or canvas ensures that your bag is durable and can withstand daily use.
When it comes to zippers, selecting the correct size is essential. A zipper that is too short or too long can ruin the overall design of your bag. For small pouches, opt for shorter zippers, while larger bags may require heavy-duty, longer ones. Matching the zipper color to your fabric or using contrasting tones can also add an artistic touch.
Interfacing is another important material. It provides structure and prevents your bag from looking flimsy. Fusible interfacing is easy to apply and can be ironed directly onto the fabric. This step makes a huge difference in the final appearance of your bag.
Thread quality should not be overlooked. Using a strong polyester or cotton thread ensures that your stitches will hold up over time. If you want to highlight the seams, you can use thread in a contrasting color. For a subtle finish, select thread that blends with your fabric.
In addition to these basics, you can also consider adding embellishments. Decorative trims, patches, or embroidery can give your bag a unique personality. This is one of the fun aspects of following a Bags with Zippers – Tutorial—you can personalize the project to suit your taste.
Finally, having the right sewing tools, such as sharp scissors, pins, a seam ripper, and a good sewing machine, will make the process smoother. Beginners often underestimate the importance of proper tools, but they make a significant difference in the ease and quality of the final product.
The process begins by cutting the fabric pieces according to the measurements of your chosen bag size. It is essential to cut accurately, as even small mistakes can affect the final look. Use a ruler and rotary cutter if possible to achieve clean edges.
Next, prepare the zipper. Place it face down on the fabric and secure it with pins or clips. Sewing the zipper may feel intimidating at first, but using a zipper foot on your sewing machine makes this step much easier. It allows you to sew close to the zipper teeth without damaging them.
Once the zipper is attached, add the lining fabric. This step hides the zipper tape and gives the bag a professional finish. Place the lining fabric over the zipper and sew carefully, ensuring that all layers are aligned properly.
After securing the zipper and lining, stitch the sides of the bag together. Make sure to leave the zipper partially open before sewing all edges; otherwise, you may not be able to turn the bag right-side out. This is a common mistake beginners make when following a Bags with Zippers – Tutorial.
Turn the bag right-side out and press it with an iron to flatten the seams. This step may seem minor, but it makes a huge difference in the finished appearance. Pressing also helps the bag hold its shape better.
At this stage, you can test the zipper to ensure it opens and closes smoothly. If everything looks good, your bag is complete. The satisfaction of finishing your first bag will give you confidence to create more complex projects in the future.
One of the most exciting parts of this Bags with Zippers – Tutorial is experimenting with different styles. You can make small cosmetic pouches, medium-sized handbags, or even large tote bags. By changing the dimensions, you can adapt the same technique to different uses.
Color combinations can also transform the design. Using bold, contrasting fabrics makes a statement, while neutral tones provide elegance. Patchwork techniques are another creative way to use fabric scraps, resulting in a unique, eco-friendly bag.
Adding pockets inside or outside the bag increases its functionality. For example, a small inner pocket can keep items like keys or coins organized, while an exterior pocket adds style and convenience.
Handles and straps are another way to personalize your bag. A short handle makes it a handbag, while a long strap converts it into a crossbody bag. Using leather or fabric straps gives each version a distinct personality.
Decorative stitching is another fun variation. You can use embroidery or quilted designs to make your bag stand out. These details not only enhance beauty but also showcase your creativity and sewing skills.
Finally, think about your audience. If you plan to gift or sell your bags, customizing them with initials or themed fabrics makes them more attractive. The versatility of bags with zippers ensures they remain a timeless accessory.
Beginners often face challenges when working with zippers, but practice makes perfect. One common issue is fabric bunching near the zipper. To avoid this, always press the fabric flat before sewing and use clips instead of pins to keep layers aligned.
Another problem is the zipper not sliding smoothly. This may happen if the stitches are too close to the zipper teeth. Using a zipper foot and sewing slowly helps prevent this issue. Checking your zipper quality before starting also saves time.
If your bag appears uneven after sewing, double-check your cutting and seam allowance. Precise measurements are key to success in this Bags with Zippers – Tutorial. Using a ruler and marking tools ensures accuracy.
Sometimes, the lining may shift during sewing, creating wrinkles inside the bag. To prevent this, secure the lining with plenty of clips and sew carefully. Taking your time is better than rushing and needing to redo stitches.
Don’t be afraid to use a seam ripper if something goes wrong. Even experienced sewists make mistakes, and correcting them is part of the learning process. With patience, you will improve with every project.
Lastly, always finish your seams properly to prevent fraying. Zigzag stitches or a serger can reinforce the edges, making your bag more durable and professional-looking.
What type of zipper is best for making bags?
Nylon coil zippers are flexible and easy to sew, making them the best option for most bags. Metal zippers are sturdier but may be harder for beginners to work with.
Can I sew a bag with a zipper by hand?
Yes, it is possible, but it is more time-consuming. A sewing machine provides stronger stitches and a cleaner finish.
What fabric is recommended for bags with zippers?
Cotton, canvas, denim, and upholstery fabrics are excellent choices. They are durable and hold their shape well.
How do I make my bag more structured?
Adding interfacing or fusible fleece gives the bag body and prevents it from collapsing.
Why is my zipper getting stuck?
This usually happens if stitches are too close to the teeth. Using a zipper foot and sewing slowly helps prevent this issue.
Can I customize my bag design?
Absolutely! You can change the size, add pockets, straps, or decorative stitching to personalize your bag.
In this Bags with Zippers – Tutorial, we explored everything from choosing the right materials to mastering the sewing process, adding creative variations, and troubleshooting common problems. With patience and practice, anyone can create beautiful and functional bags.
PATTERN VIDEO:
We encourage you to try this project and see how rewarding it can be. Don’t forget to share your honest opinion and leave suggestions about this tutorial—we’d love to hear from you and learn about your sewing journey.