
Sewing Hearts & Nine Patch

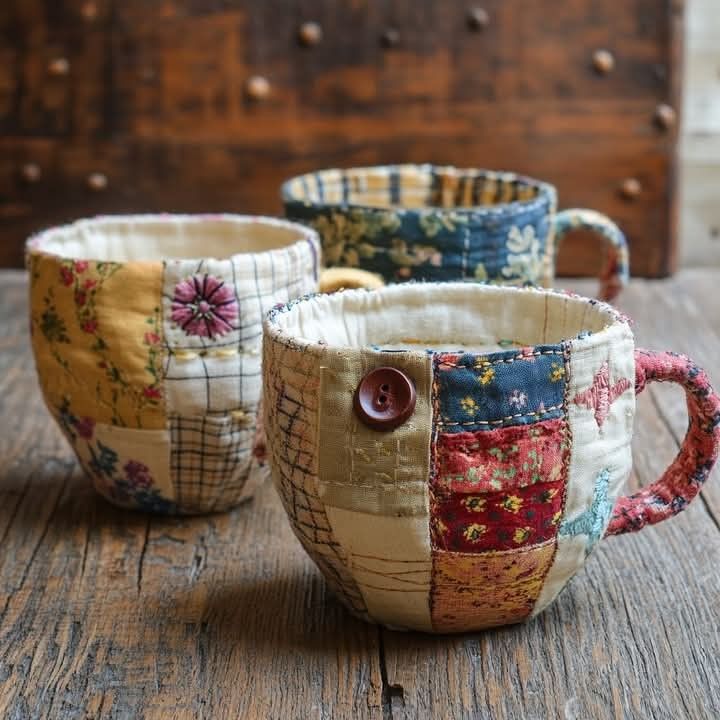
If you love quilting and upcycling, then the Cup made with scraps – TUTORIAL is the perfect project for you. This creative and eco-friendly sewing idea allows you to transform leftover fabrics into something functional, beautiful, and full of personality. Instead of letting those small pieces of fabric pile up in a drawer, this project teaches you how to make a decorative cup shape using patchwork techniques. It is an enjoyable craft that combines resourcefulness with artistry, and it can be adapted to any style you like.
The great thing about making a cup from fabric scraps is that it’s not just a sewing exercise but also a fun way to practice precision, color coordination, and patience. Many quilters often find themselves with bags of small leftover pieces that seem too small for larger quilt patterns. This tutorial turns those fragments into a piece of handmade art that can be displayed in your home, gifted to loved ones, or even used as a teaching tool to show beginners how versatile quilting can be.
Another highlight of the Cup made with scraps – TUTORIAL is its accessibility. Whether you’re a beginner learning the basics of quilting or an advanced crafter looking for a quick and meaningful project, this idea will suit your needs. With just a few steps, simple tools, and your creativity, you can create something that feels personal, sustainable, and charming.
One of the main reasons crafters love the Cup made with scraps – TUTORIAL is that it reduces fabric waste. Quilting often produces small offcuts that feel too precious to throw away but too small for big projects. By repurposing them into a decorative quilted cup design, you give those fabrics a second life.
Another reason is creativity. The small scale of the project allows you to mix bold colors, play with textures, and experiment with patterns that you might hesitate to use in a larger quilt. Because you only need scraps, there’s no fear of “ruining” expensive fabric—you are encouraged to take risks.
This tutorial is also practical for time-conscious quilters. Large quilts can take weeks or months to complete, but a small scrap project can be finished in a single afternoon. That instant gratification is motivating and makes quilting feel more accessible.
The Cup made with scraps – TUTORIAL also introduces useful techniques. Even though it’s a small project, you’ll practice piecing, pressing, and precision sewing—skills that are essential in larger quilting endeavors. It’s a low-pressure way to improve your craft.
Another important benefit is personalization. Each cup design tells a story because the scraps often come from previous projects. A strip from a baby quilt, a corner from a favorite dress, or a leftover from a holiday project can all live together in one design. This makes your finished piece unique and full of memories.
Lastly, this project encourages sustainable crafting. In a world where fast fashion and fabric waste are big issues, making use of every bit of fabric feels rewarding and responsible. It’s a wonderful way to merge creativity with eco-friendly practices.
To start the Cup made with scraps – TUTORIAL, you don’t need many supplies. The beauty of this project is its simplicity and accessibility. Gather a variety of fabric scraps—different colors, prints, and textures. Cotton quilting fabric works best, but you can mix in lightweight denim, linen, or flannel for added texture.
You will also need a basic sewing machine or hand-sewing supplies, depending on your preference. Beginners can sew this project entirely by hand, while advanced quilters may prefer the precision of a machine. Make sure your sewing needles are sharp, as scraps often include different fabric weights.
In addition to fabric, you’ll need thread that matches or contrasts with your scraps. Neutral colors like white, beige, or gray are versatile, but colorful thread can add personality and highlight the design. An iron is also essential for pressing seams and ensuring your quilted pieces lie flat.
For accuracy, gather a rotary cutter, cutting mat, and ruler. Scraps often come in irregular shapes, so trimming them into squares, rectangles, or triangles makes piecing more manageable. Having well-cut scraps also reduces frustration when aligning seams.
You may also choose to use fusible interfacing or a thin batting layer to add structure to your fabric cup. This ensures the final piece holds its shape and has a soft, quilted texture. These materials are optional but recommended if you want a sturdier result.
Lastly, prepare your workspace. Organize your scraps by color or size so you can quickly select pieces that complement each other. This step saves time and helps you focus on the creative aspect of designing your quilted cup.
The Cup made with scraps – TUTORIAL begins with choosing a base shape for your cup. You can sketch a simple cup outline on paper and use it as a template. Cut out a background fabric that will serve as the foundation for your design.
Next, arrange your scraps on the background. Play around with placement until you find a combination of colors and patterns you like. Some crafters prefer a rainbow look, while others stick to a monochrome palette. Don’t rush—this step is where your creativity shines.
Once you are satisfied with the arrangement, sew the scraps together. Work in small sections, pressing each seam flat as you go. This keeps your piece neat and avoids bulkiness. Precision is important, especially for beginners learning to keep seams straight.
After piecing your scraps, cut them into the shape of the cup using your template. Attach the cup shape to your background fabric using appliqué techniques. You can stitch it down by hand or use a zigzag stitch on your machine for durability.
If you want to add structure, sandwich a thin layer of batting between the cup and the background. Quilting lines across the cup not only hold everything together but also enhance the design. Straight lines, waves, or even free-motion quilting can all add charm.
Finally, finish the edges of your project neatly. You can bind it like a mini quilt, frame it, or leave raw edges for a rustic look. The result is a handmade fabric cup that showcases your creativity and skill.
One of the best parts of the Cup made with scraps – TUTORIAL is how adaptable it is. You can change the size, style, and function of the cup design based on your needs. For example, make a small version as a quilt block or enlarge it for a wall hanging.
Another idea is to create themed cups using specific colors. A holiday cup in red and green fabrics can be displayed during Christmas, while pastel scraps can be perfect for springtime. Themed designs make wonderful seasonal decorations.
You can also personalize your cup project with embroidery. Adding details like steam lines, flowers, or initials makes your design one-of-a-kind. Hand stitching over scraps adds extra charm and texture.
For a functional twist, turn your quilted cup design into a mug rug or coaster. By adding batting and backing, your fabric art becomes both decorative and useful. This makes a great handmade gift for family and friends.
If you’re a teacher or quilting group leader, use this project as a workshop activity. It’s quick, affordable, and teaches valuable quilting skills without overwhelming beginners. Plus, everyone leaves with a finished piece they can be proud of.
Lastly, don’t be afraid to experiment with unconventional scraps. Try metallic fabrics, lace trims, or even recycled clothing pieces. Mixing textures creates a visually striking result and proves that quilting has no boundaries.
What is the Cup made with scraps project?
It is a quilting project that uses leftover fabric pieces to create a decorative cup design.
Do I need special tools for this tutorial?
Basic sewing supplies like fabric, thread, a needle or machine, and scissors are enough. A rotary cutter and ruler make the process easier.
Can beginners make this project?
Yes, the tutorial is beginner-friendly and teaches essential quilting skills such as piecing and appliqué.
What can I do with the finished cup?
You can use it as a quilt block, a wall decoration, a coaster, or even as part of a larger quilt.
How do I choose fabric scraps that look good together?
Organize your scraps by color family or theme. Combining lights, darks, and textures adds interest to the design.
Is batting necessary for this project?
It’s optional but recommended if you want a sturdier cup with more texture.
The Cup made with scraps – TUTORIAL is a delightful way to practice quilting while reducing fabric waste and expressing your creativity. With simple materials, clear steps, and endless variations, it’s a project that can inspire quilters of all levels.
Whether you use your cup design as decoration, a gift, or a functional item, the satisfaction of transforming scraps into art is priceless. If you enjoyed this tutorial, we’d love to hear your honest opinion and suggestions in the comments—your feedback helps us bring even more inspiring quilting ideas your way.


