
Sewing Hearts & Nine Patch

The Apple Made with Scraps – Tutorial is a delightful quilting project that transforms leftover fabrics into a vibrant, eye-catching design. Quilters often accumulate small pieces of fabric that seem too precious to throw away, yet too small for larger projects. This tutorial offers the perfect solution—using scraps creatively to craft a charming apple block. Whether you are a beginner learning the basics of patchwork or an experienced quilter looking for a fun stash-busting idea, this project is versatile, eco-friendly, and rewarding.
What makes this pattern stand out is its ability to combine color, texture, and personal style in one simple quilt block. Every apple you create can be unique, depending on the scraps you choose. From bright reds and greens to whimsical prints, your apple design can reflect your mood or even seasonal themes. Beyond quilts, the block can also be used in placemats, wall hangings, tote bags, or any small sewing project where you want to add a playful touch.
By following this Apple Made with Scraps – Tutorial, you’ll not only practice your sewing and quilting skills but also embrace the sustainability aspect of quilting. Scrap-friendly projects like this help reduce waste, save money, and encourage you to think outside the box with fabric choices. In the sections below, we’ll walk through step-by-step guidance, fabric tips, sewing instructions, and creative ideas for using your apple block.
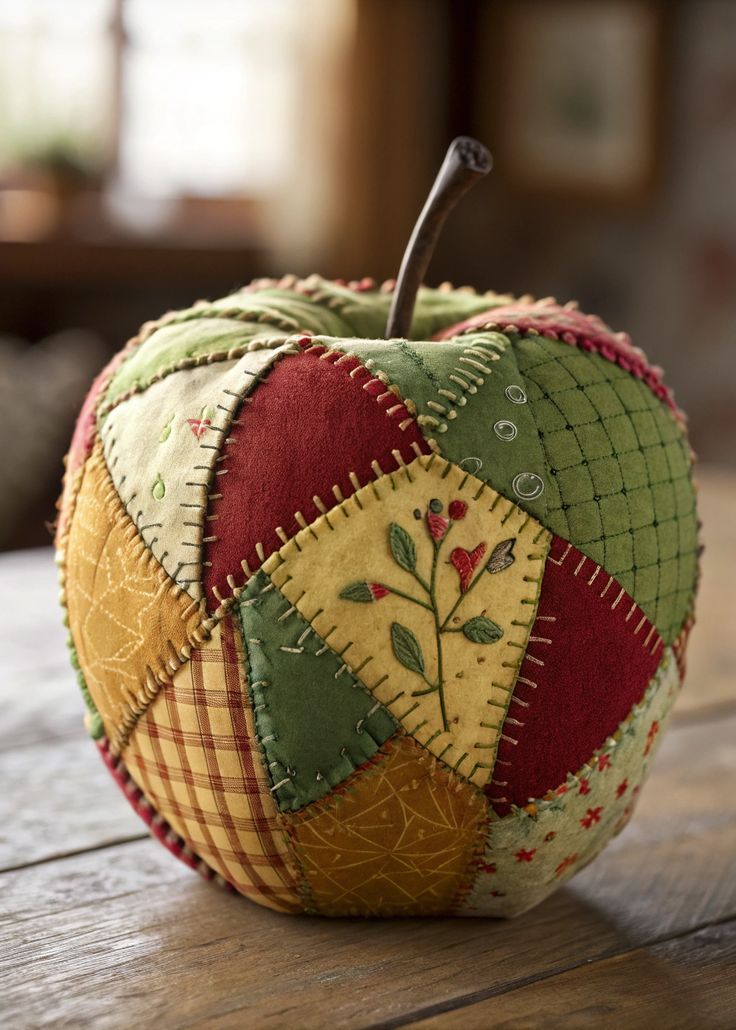
The Apple Made with Scraps block is essentially a patchwork design that uses small fabric pieces to create the shape of an apple. It combines simple geometric units such as squares, half-square triangles, and rectangles, pieced together to form a rounded fruit shape.
This design is beginner-friendly because it uses straight-line sewing and avoids complex curves or appliqué. Even so, it offers plenty of room for creativity, as each block can look completely different depending on fabric placement.
The apple block is also a great learning tool for mastering color value. Using lighter fabrics for highlights and darker ones for shadows can give your apple a dimensional, realistic look.
Quilters love this block because it can be scaled up or down. A smaller apple can be used in a mug rug, while a larger one works beautifully in a quilt centerpiece.
The Apple Made with Scraps – Tutorial ensures that even if you have limited scraps, you can still achieve a cohesive and striking design. Thoughtful fabric placement will bring out the best in your scraps.
By starting with this project, you can also experiment with organizing your fabric leftovers in a way that makes future scrap quilts easier and more fun to create.
The charm of the Apple Made with Scraps – Tutorial lies in the variety of fabrics you incorporate. To begin, gather small scraps in shades of red, green, yellow, or even pink to represent the apple. Don’t be afraid to mix prints and solids for extra texture.
Cutting accuracy is important in scrap quilting. Since you’ll be piecing together small units, make sure your fabric is pressed and trimmed neatly before sewing.
If you want a traditional look, use reds for the apple body, greens for the leaf, and brown or black for the stem. For a whimsical approach, try polka dots, florals, or even novelty prints.
Organizing scraps by color value can make the piecing process smoother. Separate light, medium, and dark fabrics so you can easily create contrast in the block.
Batiks, cottons, and even small pieces from older projects can all work well in this design. The key is harmony—choosing fabrics that complement each other while still showcasing variety.
Remember, quilting is about creativity. While this tutorial provides guidance, your personal fabric choices will give each apple block its unique character.
To begin piecing your Apple Made with Scraps block, start by arranging your cut pieces into the apple shape before sewing. This helps visualize the design and avoid mistakes.
The block usually begins with a center square, which serves as the core of the apple. Around it, add coordinating fabrics in a grid layout, using half-square triangles to shape the curves.
For the stem, a small rectangle in brown or black is stitched above the apple body. Add a green square or triangle for the leaf, positioned slightly to one side for a natural look.
Chain piecing is a time-saving technique you can use here. Sewing multiple units in one continuous line speeds up the process and keeps pieces organized.
After sewing, press seams carefully. Some quilters prefer pressing to the side for durability, while others press open for less bulk. Choose what works best for you.
Once all the pieces are joined, square up the block to ensure it fits neatly into your quilt project. Accurate trimming will make assembly with other blocks much smoother.
The beauty of the Apple Made with Scraps – Tutorial is its adaptability. Beyond quilts, you can incorporate the apple block into smaller projects like potholders, placemats, or mini wall hangings.
Teachers and parents love this design because it works perfectly in back-to-school themes. Adding a quilted apple motif to classroom décor or children’s accessories is both charming and symbolic.
You could also make a set of apple blocks in different colors—red for a classic apple, green for Granny Smith, and yellow for Golden Delicious—to create a playful quilt layout.
A tote bag with a pieced apple block on the front panel makes a practical and stylish handmade accessory. It’s a wonderful gift for teachers or fruit lovers.
Holiday projects also benefit from this block. For example, incorporating apples into fall or Thanksgiving quilts adds seasonal flair.
Ultimately, this block’s charm lies in its versatility. Whatever project you choose, the apple design will bring warmth, joy, and a handmade touch.
What size should the apple block be?
The block size can vary, but most tutorials create apples between 6” and 12”. You can resize depending on your project needs.
Can beginners make this block?
Yes, this block is beginner-friendly. With careful cutting and sewing, even new quilters can achieve great results.
Do I need specific fabrics for the apple block?
No, the block is designed to use fabric scraps. Choose reds, greens, or any colors you like. The charm comes from variety.
How do I keep my block edges straight?
Use a rotary cutter and ruler for accuracy. Squaring up the block after assembly also helps keep edges straight.
Can I use the block for non-quilt projects?
Absolutely. It works well for pillows, tote bags, table runners, or even as a framed fabric art piece.
How do I make the apple more realistic?
Play with fabric value—use lighter colors on one side and darker tones on the other to create shading.
The Apple Made with Scraps – Tutorial is a fun, sustainable, and creative way to bring quilting scraps back to life. By following the step-by-step process, experimenting with fabrics, and exploring different uses for the block, you can create a charming apple design that adds personality to your quilting projects.
PATTERN VIDEO:
Whether you are making a quilt, a tote, or a small decorative piece, this pattern is flexible and rewarding. We hope this guide inspires you to dive into your scrap basket and start sewing today. Don’t forget to share your thoughts, opinions, and suggestions—we’d love to hear how your apple creations turn out!


