Crochet Bucket Hat Tutorial

If you have ever wanted to add a touch of fun and creativity to your crochet projects, then this Crochet Ratatouille Tutorial is the perfect place to start. Inspired by the famous little chef from the beloved animated film, this design combines the joy of crochet with the magic of storytelling. By following this guide, you will learn how to create a delightful Ratatouille character that can be used as a toy, decoration, or even as part of a themed gift set.
The beauty of this crochet pattern lies in its versatility. Whether you are a beginner or an advanced crafter, you can adapt the tutorial to your own pace and style. Each stitch you make brings the project closer to life, and the end result is sure to charm anyone who sees it. Using basic crochet techniques and a step-by-step approach, you will be surprised by how approachable and enjoyable this project really is.
In this article, we will take you through everything you need to know to succeed with the Crochet Ratatouille Tutorial. From materials and tools to shaping techniques and finishing touches, we will cover it all in detail. By the end, you will feel confident and excited to bring your own handmade Ratatouille-inspired creation to life. Let’s dive into the fun world of crochet and discover how this adorable project can spark both creativity and joy.
The first step in successfully completing the Crochet Ratatouille Tutorial is gathering the right materials. A good project always begins with proper preparation, and in crochet, the right yarn and tools make all the difference. Choosing yarn that is both soft and durable ensures that your finished Ratatouille character will last for years while remaining cuddly and appealing.
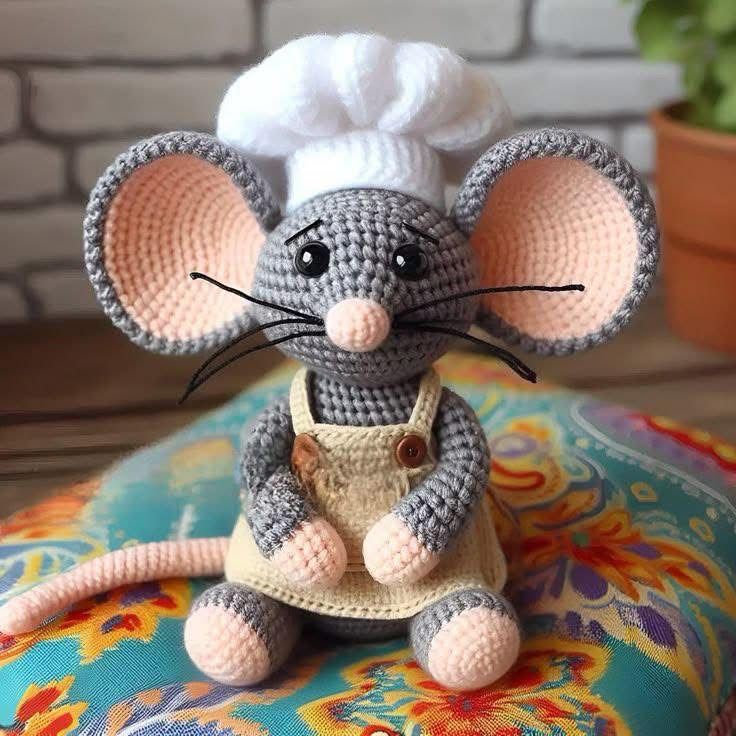
You will typically need cotton or acrylic yarn in colors that represent the character—gray or blue for the body, pink for the nose and ears, and perhaps some black or white for details. Opting for medium-weight yarn is often best for beginners since it allows you to see stitches clearly and makes handling easier. If you want your creation to be smaller or larger, adjusting the yarn weight and hook size will achieve the desired effect.
A crochet hook size suitable for your yarn choice is also essential. For most medium-weight yarns, a 3.5mm to 4mm hook works well. Always check the yarn label for recommendations, but remember that using a smaller hook can create tighter stitches, which is ideal for stuffed toys to prevent filling from escaping.
In addition to yarn and hooks, you’ll need stuffing material, such as polyester fiberfill, to give your Ratatouille shape and structure. Safety eyes or embroidery thread can be used to make expressive features that bring the character to life. A tapestry needle is also necessary for sewing pieces together and weaving in ends.
Scissors are another simple but essential tool in your crochet kit. Keeping them sharp makes cutting yarn easier and prevents frayed edges. A stitch marker is also helpful for keeping track of rounds, especially when working on amigurumi-style projects like this one.
By ensuring you have all the required materials and tools ready before you begin, you will save time and avoid interruptions. This level of preparation makes the Crochet Ratatouille Tutorial a smoother and more enjoyable experience from start to finish.
Now that you have your materials, let’s move on to the exciting part: creating the Ratatouille design. The Crochet Ratatouille Tutorial follows a step-by-step approach, which makes it easier for beginners and experienced crocheters alike to keep up with the process.
The project usually starts with crocheting the body using a series of rounds in the amigurumi style. This technique is perfect for creating smooth, seamless shapes that give your Ratatouille character its characteristic look. By increasing and decreasing stitches, you can shape the body into a firm yet flexible structure.
Once the body is complete, you will move on to crocheting the head. The head is an essential feature since it captures the personality of the Ratatouille character. Using careful stitching for the nose, ears, and mouth ensures that the face looks charming and true to the inspiration. Safety eyes or embroidered eyes will bring warmth and expression.
Next, you will crochet the smaller details, such as arms, legs, and a long tail. These features add personality and make your creation instantly recognizable. Small parts can be a bit challenging, but with patience and the right stitch markers, they become easier to manage.
Assembly is the next important step. Using a tapestry needle, you will sew the head, body, arms, legs, and tail together. This stage is crucial for stability, so take your time to align the pieces correctly and make secure stitches. Stuffing should be evenly distributed to avoid lumps.
Finally, add the finishing touches, such as embroidering a smile or adding accessories like a little chef’s hat. These details personalize your Ratatouille and make it unique to you. The Crochet Ratatouille Tutorial is not just about following instructions—it is also about letting your imagination guide you.
Even though the Crochet Ratatouille Tutorial is beginner-friendly, a few tips can make your experience smoother. One of the most important things is to maintain consistent tension in your stitches. Uneven tension can lead to a misshapen project, so practice keeping your yarn at a steady tightness.
Another helpful tip is to work in good lighting. Since you will often be dealing with small details and dark yarn colors, clear visibility is essential to avoid mistakes. Good lighting also reduces eye strain and makes the whole process more enjoyable.
Taking breaks is another valuable practice. Crochet can be relaxing, but working for long periods without rest may cause hand fatigue. Short breaks help keep your hands flexible and your focus sharp, which leads to better results.
If you are new to amigurumi, start slowly and don’t rush. The process may seem overwhelming at first, but by breaking it down into small steps, you will find it more approachable. Patience is the key to building confidence and improving your technique.
It is also worth experimenting with variations. You can customize your Ratatouille by using different yarn colors, adding clothing, or even crocheting miniature food items to accompany the character. Creativity is what makes handmade projects truly special.
Lastly, keep practicing. The more amigurumi projects you complete, the more skilled you will become. Each stitch adds to your experience, and over time, you will find the Crochet Ratatouille Tutorial and similar projects easier and more rewarding.
One of the greatest joys of following the Crochet Ratatouille Tutorial is the sense of accomplishment it provides. Creating a character from yarn with your own two hands is incredibly rewarding. Every stitch tells a story of patience, creativity, and dedication.
Crochet projects like this also make thoughtful gifts. A handmade Ratatouille character can be a cherished present for children, fans of the movie, or anyone who appreciates unique handmade items. It’s a way to share your creativity and love with others.
Another benefit is stress relief. Crochet has long been recognized as a calming activity that promotes mindfulness. As you work on your Ratatouille, you will find yourself focused on each stitch, which helps clear your mind and reduce anxiety.
The tutorial also offers an excellent opportunity to develop new skills. Even experienced crocheters can learn new techniques, whether it’s working with amigurumi, shaping characters, or perfecting assembly. Each project adds something valuable to your crafting journey.
Additionally, making a Ratatouille character can inspire younger generations. Teaching kids to crochet this character can spark their interest in crafting and storytelling. It becomes not only a fun project but also a way to pass on traditions.
Finally, the Crochet Ratatouille Tutorial is a great way to connect with a community of fellow crafters. Sharing your finished piece online or in crochet groups allows you to exchange ideas, tips, and encouragement, making the experience even more fulfilling.
Q1: Is the Crochet Ratatouille Tutorial suitable for beginners?
Yes, it is beginner-friendly. The step-by-step instructions are easy to follow, and even if you are new to amigurumi, you can achieve great results.
Q2: How long does it take to complete this project?
On average, it takes between 6 to 10 hours depending on your skill level and the pace you work at.
Q3: What type of yarn works best for this project?
Medium-weight cotton or acrylic yarn works best. It provides durability while keeping the character soft and huggable.
Q4: Can I customize the character’s appearance?
Absolutely! You can change yarn colors, add accessories like a chef’s hat, or embroider different facial expressions to make it unique.
Q5: Do I need special tools for this project?
No special tools are required beyond standard crochet supplies: yarn, hook, stuffing, safety eyes, scissors, and a tapestry needle.
Q6: Is this project safe for children?
Yes, but if making it for very young children, avoid using small safety eyes and instead embroider the eyes to prevent choking hazards.
The Crochet Ratatouille Tutorial is a wonderful project that blends creativity, skill, and fun. From gathering materials to adding the finishing touches, each step offers both learning and enjoyment. Whether you’re making it as a gift or for your own collection, this project is sure to bring smiles and satisfaction.
PATTERN VIDEO:
We hope this guide has inspired you to try this adorable crochet pattern and enjoy every stitch of the process. Don’t forget to share your thoughts—leave us your honest opinion and suggestions about this tutorial. Your feedback helps us grow and bring you even more exciting crochet projects in the future.