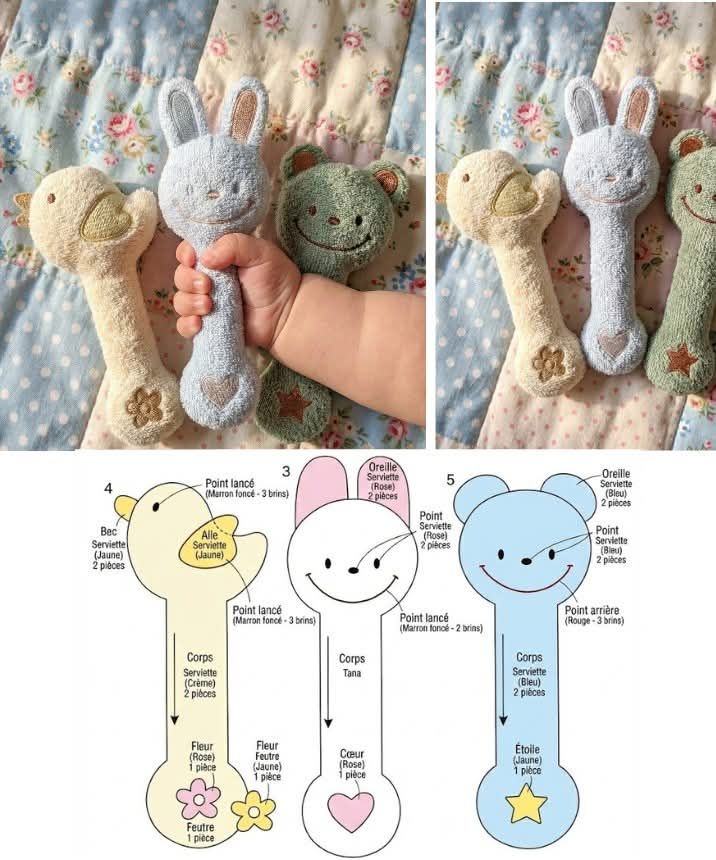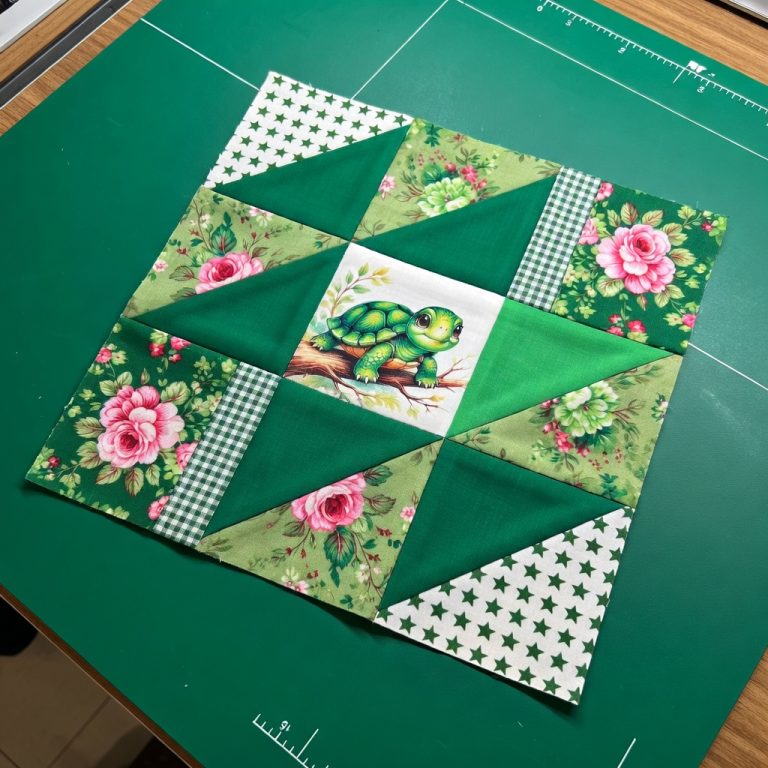
DIY - 9-Patch “Turtle Star” Quilt Block Tutorial

The staircase block – tutorial is one of the most exciting and versatile quilt patterns you can learn, especially if you are just starting your quilting journey. This block pattern is not only visually appealing but also surprisingly simple once you understand the basic steps. Quilters love it because the design mimics the look of ascending stairs, creating movement and depth in your quilt. Whether you are a beginner or an experienced quilter, mastering this block will expand your skills and open new possibilities for your quilt projects.
In this article, we will go through everything you need to know about the staircase block – tutorial, from understanding the basics, gathering the right materials, learning the step-by-step process, and adding creative touches. The goal is to give you both a practical guide and creative inspiration. With careful attention to cutting, piecing, and alignment, you will see how quickly this quilt block can come together.
Quilting has always been about creativity, patience, and attention to detail. The staircase block embodies all these values while offering a timeless design that looks stunning in both traditional and modern quilts. Before diving into the step-by-step instructions, let’s look at why this block is so popular and why it deserves a place in your quilting projects.
The staircase block – tutorial is based on a simple concept of arranging square or rectangular pieces in a way that creates the illusion of steps. This block is often used to bring structure and rhythm to a quilt design. Many quilters love this pattern because it looks complex, but the sewing process is straightforward and very beginner-friendly.
One of the key features of this block is its ability to showcase fabrics. Whether you are using solid colors, contrasting prints, or scrap fabrics, the staircase design highlights each choice beautifully. This makes it ideal for using leftover fabric pieces in a meaningful way.
The staircase block is also highly adaptable. You can make it larger or smaller depending on your project, which makes it a favorite for quilts, table runners, or even wall hangings. This flexibility gives quilters plenty of room to experiment.
Another reason quilters adore this block is because of its balance between simplicity and impact. Even when made with basic fabrics, the block creates a bold visual effect. It’s one of those patterns where less really becomes more.
The name “staircase” comes from the repeating step-like arrangement that gives the quilt movement and flow. This effect can be subtle or dramatic, depending on fabric choice and color placement.
Finally, the staircase block is beginner-friendly while still satisfying for advanced quilters. Its straightforward construction makes it an excellent teaching block, and yet, it never loses its charm even in complex quilt layouts.
To start the staircase block – tutorial, the first step is gathering the right materials. The basic supplies include quilting cotton fabric, a rotary cutter, a cutting mat, quilting rulers, thread, and a sewing machine. Hand-sewing enthusiasts can also create this block with patience and precision.
Fabric selection plays an important role in the staircase block design. Bold contrasting colors will emphasize the step effect, while softer tones create a more subtle and traditional appearance. Many quilters enjoy mixing prints and solids to give the block character.
Accurate cutting is key to success in this block. Using a rotary cutter and ruler ensures precise edges and consistent sizing. Each piece must fit together seamlessly to maintain the staircase effect once the block is assembled.
Before cutting, it’s always a good idea to press your fabric. Flat, smooth fabric makes it easier to cut and sew accurately, reducing mistakes later on. This is a simple step but one that makes a huge difference in the final result.
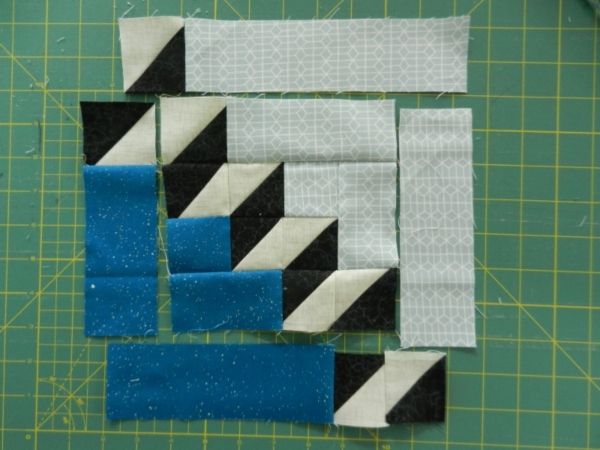
Organizing your fabric pieces before sewing is another useful tip. Lay them out in the staircase formation on your cutting mat or design board. This preview helps you visualize the finished block and ensures that no pieces are accidentally reversed or misplaced.
Lastly, make sure your sewing machine is properly set up with the right tension, thread, and needle. Even stitches will keep your quilt block strong and professional-looking. A quarter-inch seam allowance is the quilting standard and is especially important for staircase blocks to align correctly.
Now comes the exciting part of the staircase block – tutorial: piecing the block together. Start by taking the first two fabric strips or squares and sewing them with a quarter-inch seam allowance. Press the seam flat before moving to the next piece.
Continue sewing each piece to the next, following the staircase layout you arranged earlier. Take your time to align the edges carefully so the steps look even and balanced in the final block. Accuracy here makes all the difference.
After sewing a few pieces, press the seams open or to one side, depending on your preference. Pressing is crucial because it reduces bulk and helps the block lie flat. This step ensures that your quilt top will be smooth once all the blocks are joined.
Once your first row is completed, move on to the next row and repeat the process. Sewing row by row helps keep the design structured. It also makes it easier to catch mistakes early before the block becomes too complex.
As you continue piecing the staircase block, always check alignment. The beauty of the pattern lies in the straight, stair-like edges. If a piece seems slightly off, correct it immediately to avoid noticeable gaps or uneven steps.
When the block is complete, give it one final press. This last press locks the seams in place and prepares the block for assembly into your quilt project. At this stage, you should see the beautiful staircase design come to life.
The versatility of the staircase block – tutorial means you can adapt it for many quilting projects. One creative variation is using a gradient of colors, which gives the illusion of a staircase fading or transitioning smoothly. This adds depth and movement to your quilt.
Scrap quilting is another wonderful option. The staircase block works beautifully with mixed scraps, giving each step a unique look. This is a sustainable and cost-effective way to quilt while also creating something meaningful.
For a modern twist, try making oversized staircase blocks. Large blocks create bold designs that look fantastic as statement quilts, bedspreads, or wall art. They also come together faster, making them perfect for time-sensitive projects.
You can also experiment with background fabrics. Using dark backgrounds makes light staircase steps pop, while light backgrounds give a fresh and airy feel. Playing with background contrast changes the mood of the entire quilt.
Another fun variation is rotating the staircase block within a quilt. Instead of all blocks facing the same direction, rotate them to create new patterns like zigzags, diamonds, or even maze-like designs. This adds extra interest and creativity.
Finally, don’t forget that the staircase block can be adapted for small items too. From quilted pillow covers to table runners, tote bags, or even mini quilts, this block is versatile enough to fit into almost any sewing project.
What is the staircase block in quilting?
The staircase block is a quilt pattern that arranges squares or rectangles in a step-like formation, creating the illusion of stairs within the design.
Is the staircase block good for beginners?
Yes, it’s perfect for beginners because the sewing process is simple, yet the finished design looks impressive and polished.
What fabrics work best for the staircase block?
Quilting cotton works best. You can use solid colors, prints, or even scraps depending on the effect you want to achieve.
Do I need special tools for this block?
A rotary cutter, ruler, and cutting mat are very helpful, but basic scissors can also work with careful cutting.
How can I make my staircase block unique?
Experiment with color placement, fabric choices, block sizes, and layout variations to make your quilt one of a kind.
Can I hand sew the staircase block instead of using a machine?
Yes, hand sewing is possible, though it will take more time. The block is still achievable with patience and precise stitching.
The staircase block – tutorial is a must-learn pattern for every quilter, combining simplicity with striking results. In this article, you discovered how to understand the design, prepare materials, sew the block step by step, and explore creative variations. This block’s flexibility makes it suitable for everything from large quilts to small handmade items.
If you found this guide helpful, I encourage you to try making your own staircase block and see the magic unfold in your quilt projects. Don’t forget to leave your honest opinion and suggestions below. Your feedback helps keep the quilting community vibrant and full of shared creativity!