DIY - 9-Patch “Turtle Star” Quilt Block Tutorial

Coin Purse Sewing – TUTORIAL is the perfect project for sewing lovers who enjoy creating something useful, charming, and handmade. A coin purse may be a small item, but it carries a lot of potential. It can be a beginner-friendly sewing project, a thoughtful gift, or even a practical accessory to keep your bag organized. With just a few pieces of fabric, a zipper, and some sewing basics, you can craft a beautiful coin purse that reflects your style and creativity.
This coin purse sewing tutorial is designed to guide you step by step, whether you’re a complete beginner or already have some experience with sewing. It’s not just about stitching fabric together; it’s about learning techniques that you can apply to other sewing projects in the future. Plus, a handmade coin purse is versatile—you can use it for coins, small accessories, or even as a mini gift bag.
The best part of making your own coin purse is that it allows you to be creative. You can choose fabrics that match your personality, add embellishments like buttons or embroidery, and even play with different shapes and sizes. Through this tutorial, you’ll see how easy it is to transform a simple piece of fabric into a functional and stylish accessory.
To start this Coin Purse Sewing – TUTORIAL, you don’t need much. A few basic materials and tools are enough to bring your idea to life. First, you’ll need fabric—cotton is a popular choice because it’s easy to sew and comes in endless patterns and colors. Choose one piece for the outer layer and another for the lining.
Next, you’ll need a zipper. The zipper gives your coin purse both function and style, so pick one that complements your fabric design. If you’re a beginner, don’t worry—installing a zipper is easier than it looks when you follow the steps carefully.
A sewing machine will make the process faster, but you can also sew by hand if you prefer. Other essential tools include scissors, pins or clips, and an iron to press the fabric for a neat finish. Interfacing is optional but highly recommended, as it adds structure and durability to your coin purse.
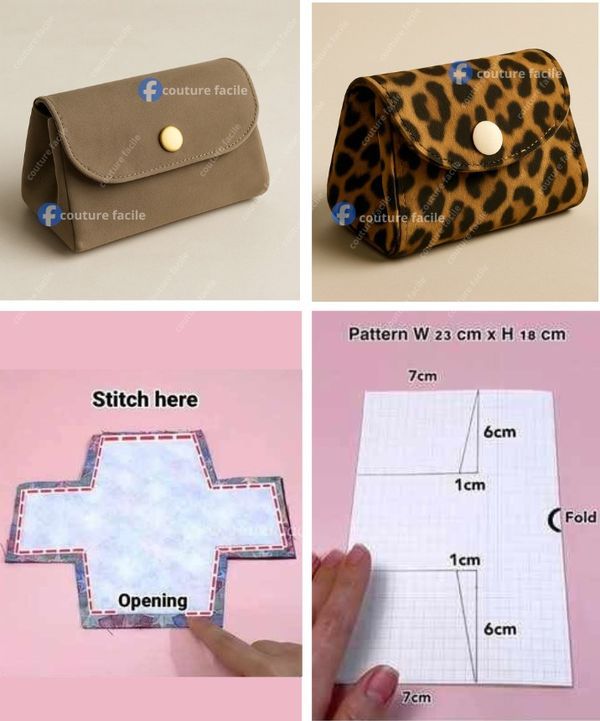
Once you’ve gathered your materials, it’s time to cut your fabric pieces according to the size you want your coin purse to be. Make sure the outer fabric, lining, and interfacing (if used) are all cut evenly to ensure professional results.
Preparing everything before sewing helps you work more efficiently. Having all your tools and materials ready makes the process smoother and more enjoyable.
With these basic supplies, you’ll be set to move on to the fun part—sewing your very own coin purse.
The Coin Purse Sewing – TUTORIAL begins with preparing the fabric. Place the outer fabric and lining fabric pieces together with the zipper sandwiched in between. This step might feel tricky at first, but once you pin everything in place, it becomes straightforward.
Use your sewing machine’s zipper foot to stitch along the zipper edge. If sewing by hand, take your time with small, even stitches to secure the zipper neatly. After sewing one side, repeat the process for the other side of the zipper with the remaining fabric pieces.
Once both sides of the zipper are attached, press the fabric flat with an iron to give it a clean look. This step is important for keeping your project tidy and professional-looking.
Next, fold the coin purse so that the outer fabrics are facing each other, and the linings are also facing each other. Pin or clip around the edges, leaving a small gap in the lining for turning the purse right side out.
Sew around the edges with a straight stitch, making sure to backstitch at the beginning and end for durability. Trim the corners slightly to reduce bulk when turning.
Finally, turn your coin purse right side out through the gap in the lining, press it flat, and sew the opening closed. Your coin purse is now complete and ready to use.
One of the best things about this Coin Purse Sewing – TUTORIAL is how customizable it is. With just a few tweaks, you can make each coin purse unique and personal.
Consider using patchwork or quilting techniques to create a colorful design. Mixing small fabric scraps together can result in a beautiful and eco-friendly accessory.
You can also add embellishments like embroidery, fabric paint, or iron-on patches to give your coin purse extra character. If you’re making it as a gift, personalizing it with initials or a small embroidered design makes it even more special.
Experiment with different shapes and sizes. While the classic coin purse is rectangular or square, you can try round, triangular, or even heart-shaped versions for a playful touch.
The choice of fabric also makes a big difference. For a chic look, try faux leather or denim. For a fun and playful style, go with bright prints or novelty fabrics.
Adding a wrist strap or keyring loop can transform your coin purse into a multifunctional accessory. It becomes not only a place to store coins but also a mini bag you can carry anywhere.
With creativity, no two coin purses have to be the same, and that’s what makes this project so enjoyable.
If you’re new to sewing, don’t feel intimidated by this project. This Coin Purse Sewing – TUTORIAL is a great way to start building your skills.
Take your time when installing the zipper. It might seem challenging at first, but practice makes it much easier. Watching how the fabric aligns with the zipper teeth will help you sew straight and clean.
Always press your fabric before and during the project. Ironing might seem like an extra step, but it makes sewing smoother and helps your coin purse look more polished.
Don’t be afraid of mistakes. If you stitch something wrong, a seam ripper is your best friend. Undo the stitch and try again—it’s all part of the learning process.
Choose simple fabrics for your first project. Solid colors or small prints are easier to work with than slippery or stretchy fabrics.
Start with a small, straightforward coin purse before moving on to more advanced shapes and designs. Once you’ve mastered the basics, you’ll feel confident to try new variations.
Most importantly, enjoy the process. Sewing is as much about creativity and relaxation as it is about making something useful.
1. Do I need a sewing machine for this project?
No, while a sewing machine makes the process faster, you can hand sew your coin purse. It just takes more time and patience.
2. What type of fabric works best for a coin purse?
Cotton is the most recommended fabric for beginners because it’s easy to handle. However, you can also use denim, linen, or faux leather for different looks.
3. How do I install a zipper if I’m a beginner?
Use pins or clips to keep the fabric aligned with the zipper and sew slowly. A zipper foot attachment on your sewing machine makes it easier, but you can also hand stitch carefully.
4. Can I make the coin purse without a zipper?
Yes, you can use alternatives like snaps, buttons, or Velcro, but a zipper adds durability and security.
5. How can I make my coin purse sturdier?
Adding interfacing between the outer fabric and lining gives structure and durability to your coin purse.
6. Is this project suitable for kids learning to sew?
Yes, with supervision. A simple version without a zipper is a great beginner sewing project for children.
The Coin Purse Sewing – TUTORIAL is a fun, practical, and beginner-friendly project that allows you to create something both stylish and functional. From learning to sew a zipper to experimenting with different fabrics and decorations, this tutorial gives you the tools to make a unique accessory you’ll love to use or gift.
PATTERN VIDEO:
Sewing your own coin purse not only improves your skills but also gives you the joy of handmade creativity. If you try this project, we’d love to hear your honest opinion and suggestions. Share your thoughts and let us know how your coin purse turned out!