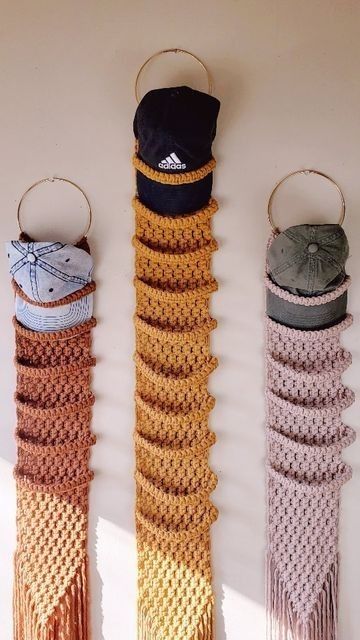
Crochet Hat Display – TUTORIAL

The Hello Kitty Bag – Free Pattern is a delightful project that combines creativity, practicality, and charm in one piece. For crochet enthusiasts, making themed accessories is always a fun adventure, and few designs are as iconic and beloved as Hello Kitty. This crochet project allows you to create a functional yet stylish bag that will impress children, teens, and adults alike. Not only does it make a wonderful gift, but it can also be a beautiful addition to your own accessory collection.
Crochet bags have become increasingly popular for their versatility, durability, and unique handmade aesthetic. The Hello Kitty Bag – Free Pattern adds a playful twist to traditional bag-making by incorporating recognizable features like the famous bow and sweet face of Hello Kitty. By following this tutorial, crafters can customize colors, sizes, and embellishments to match personal preferences, making each finished piece truly one-of-a-kind.
Another reason why this project is a favorite is its accessibility for different skill levels. Beginners can practice essential stitches while creating something practical, and advanced crocheters can refine techniques or even experiment with new textures. The Hello Kitty Bag – Free Pattern demonstrates how crochet can transform yarn into a whimsical fashion statement that spreads joy and nostalgia.
One of the key reasons this bag pattern is so appealing is its ability to merge function with character design. Hello Kitty has been a cultural icon for decades, adored worldwide for her simplicity and cuteness. By incorporating her likeness into a crochet bag, you not only create a useful accessory but also carry a piece of pop culture with you wherever you go.
Additionally, this project serves as a fantastic introduction to crochet bag-making techniques. The base construction of the bag provides practice in building a sturdy shape that can hold personal items without losing form. It also helps crafters learn about balancing structure and decoration in their crochet projects.
The Hello Kitty Bag – Free Pattern is versatile, allowing crocheters to adapt the design for different occasions. For instance, smaller versions make adorable handbags for children, while larger ones can be used as tote bags for daily errands or even as fun statement pieces for adults.
Another reason to try this pattern is the opportunity to work with a variety of yarns and color combinations. While the classic Hello Kitty design typically uses white, red, and black, nothing stops you from experimenting with pastel shades, metallic yarns, or even multicolored threads.
The tutorial also provides room for personalization. You can add lining, zippers, or magnetic snaps for extra functionality. For decorative flair, you might consider embellishing the bag with appliqués, beads, or additional crocheted motifs.
Finally, completing this project brings a sense of accomplishment. Not only do you end up with a practical handmade item, but you also get to showcase a design beloved by millions around the globe.
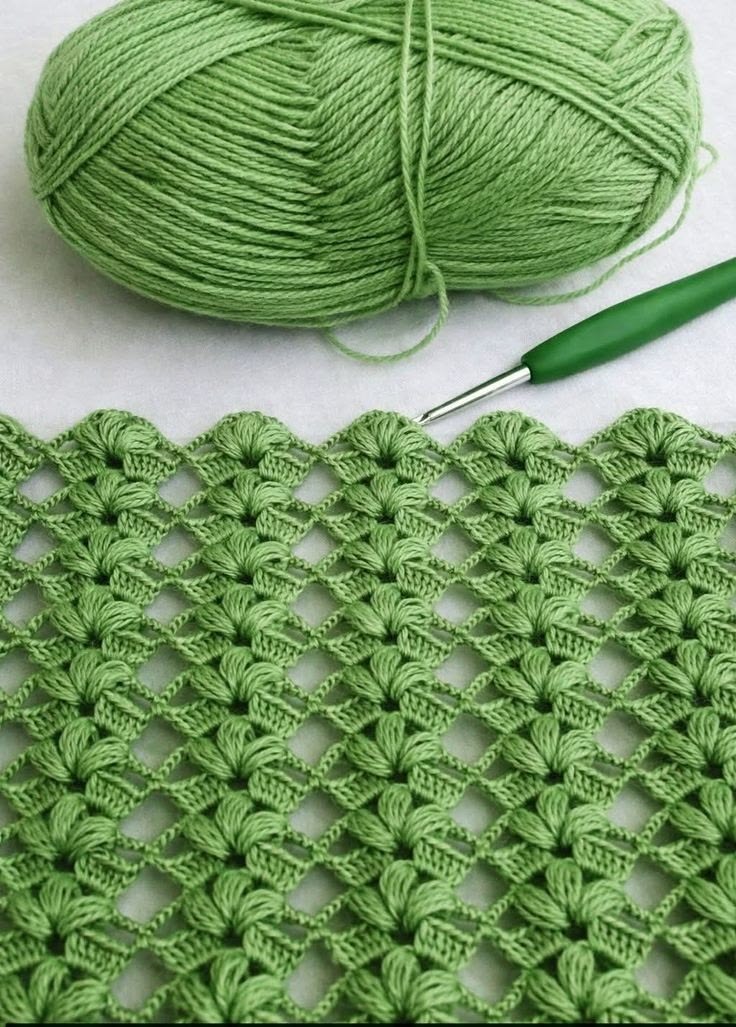
Before diving into the stitches, having the right materials ready is essential. The primary material for this project is yarn, and the type you choose can significantly affect the final look of your bag. A medium-weight cotton yarn is usually recommended because it offers durability and structure while keeping the design lightweight.
Next, selecting the correct hook size is vital. Typically, a 3.5 mm to 4 mm crochet hook works well for this type of bag, but the choice depends on the yarn thickness. Using a smaller hook with thicker yarn creates a tighter, sturdier fabric, which is ideal for bag-making.
Stitch markers are also helpful in keeping track of rounds, especially when creating the circular base or facial features of Hello Kitty. Scissors and a yarn needle are indispensable for finishing off threads and sewing on details.
For the embellishments, you’ll need additional yarn colors for Hello Kitty’s facial features. Classic black is used for the eyes and whiskers, while yellow is typically chosen for the nose. The iconic red bow requires a bright, bold color, though as mentioned earlier, you can experiment with alternatives.
Adding a lining to the bag is optional but highly recommended if you want extra durability. A simple cotton fabric lining prevents stretching and provides a polished interior finish. You’ll also need basic sewing supplies like a needle and thread or a sewing machine for this step.
Finally, consider whether you want to include closures or handles. Wooden handles give a classic look, while crocheted straps offer a soft, seamless design. Zippers or magnetic snaps can make the bag more secure.
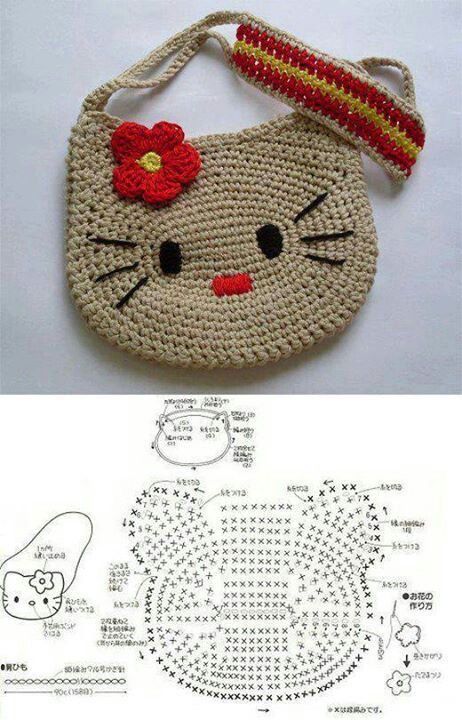
The first step in creating the Hello Kitty Bag is to crochet the base of the bag. Most patterns start with a circular or rectangular bottom worked in rounds, gradually building up the sides. This step ensures the bag has a sturdy structure to carry everyday items.
Once the base and body are complete, you can focus on shaping the bag. Simple single crochet or half double crochet stitches are commonly used to maintain density and durability. These stitches also make the bag resistant to stretching, ensuring it maintains its form over time.
The next step involves crafting the iconic Hello Kitty face. This is typically done by crocheting separate facial features and then sewing them onto the bag. For example, the eyes can be made using small oval motifs in black yarn, while the nose is a simple yellow oval. Whiskers can be embroidered directly with yarn or black embroidery thread.
The bow is another essential part of the design. It is often created separately as a crocheted piece and then sewn securely onto one side of the bag’s top edge. This instantly transforms the bag into the recognizable Hello Kitty style.
Handles or straps are then added depending on the chosen design. Long straps can make the bag wearable as a crossbody, while short ones keep it as a handheld accessory. The choice of handles significantly affects the final look, so select a style that matches your personal needs.
Finally, finish the bag by weaving in loose ends, adding optional lining, and attaching closures if desired. At this stage, the bag is complete and ready to be used or gifted.
The Hello Kitty Bag – Free Pattern is more than just a craft project—it’s a fashion statement. Whether you’re gifting it to a child or using it yourself, this bag adds an element of playfulness to any outfit.
For children, the bag can be used as a school accessory, small toy carrier, or even as a birthday party gift bag. Its size can easily be adjusted to fit different purposes.
Teenagers and adults who love Hello Kitty can use the bag as a casual accessory. It pairs wonderfully with everyday outfits and can even be styled with themed apparel for a coordinated look.
Crocheters who enjoy selling their handmade creations will also find this pattern profitable. Fans of Hello Kitty often seek unique, handmade merchandise, and a crocheted bag with this iconic design is sure to attract attention.
Another creative way to use the bag is as a decorative storage item. For example, you can keep craft supplies, makeup, or small accessories inside it while displaying the bag in your room as part of your decor.
Ultimately, the Hello Kitty Bag demonstrates how crochet allows endless customization. From changing the size and colors to adding embellishments, every crafter can tailor this bag to suit their own vision.
1. Is the Hello Kitty Bag beginner-friendly?
Yes, this project is suitable for beginners, as it primarily uses simple stitches like single crochet and half double crochet. The facial details may require patience but are not overly complex.
2. How long does it take to make the Hello Kitty Bag?
The time varies depending on skill level and bag size. On average, it can take anywhere from 6 to 12 hours to complete.
3. What yarn is best for this bag?
A medium-weight cotton yarn is recommended because it provides durability and structure. Acrylic yarn can also be used but may result in a softer, less sturdy bag.
4. Can I customize the colors of the Hello Kitty Bag?
Absolutely! While the traditional design uses white, black, red, and yellow, you can experiment with pastels, neons, or even variegated yarns.
5. Do I need to line the bag?
Lining is optional but highly recommended for added durability and to prevent stretching.
6. Can I sell bags made from this pattern?
Yes, as long as the pattern source allows it. Handmade Hello Kitty bags are very popular among fans and can be a profitable product.
The Hello Kitty Bag – Free Pattern is a perfect combination of practicality and creativity, making it a rewarding project for crochet lovers of all skill levels. It offers an opportunity to practice essential techniques, experiment with colors, and create a playful accessory that appeals to people of all ages.
VIDEO TUTORIAL:
With the step-by-step process, styling ideas, and customization options, this tutorial equips you with everything you need to bring Hello Kitty to life in crochet form. Try this pattern, share it with friends, and don’t forget to leave your honest opinion and suggestions—we’d love to hear your experiences and ideas!