Urban Constellation - PATTERN

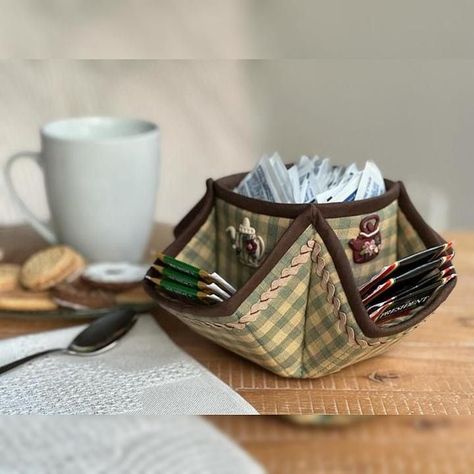
If you love keeping your sewing room tidy, your bathroom organized, or your kids’ toys neatly stored, this Organizer Basket – Tutorial is exactly what you need. This beginner-friendly quilting project combines function and style, helping you create beautiful fabric baskets that are sturdy, versatile, and 100% handmade.
One of the best things about this organizer basket is its flexibility. Whether you use it to hold fabric scraps, yarn, toiletries, or even snacks, it adapts to your needs while adding a lovely handmade touch to your space. And because it’s made of fabric, it’s washable, lightweight, and easy to store when not in use.
In this Organizer Basket – Tutorial, we’ll walk you through every step to create your own quilted fabric basket—from choosing the right materials to assembling, quilting, and finishing with clean, crisp edges. Let’s turn your fabric stash into stylish storage!
The Organizer Basket – Tutorial is more than just a guide for a practical item—it’s a gateway into creative fabric play and functional home crafting.
First of all, these baskets are versatile. You can make them in various sizes to suit any space. Use a small one to hold keys at your entryway or a larger version for diapers and baby supplies. They’re useful in the bathroom, kitchen, sewing room, or car.
Second, the project is scrap-friendly. You can mix and match different prints and solids, repurpose old linens, or use leftover quilt blocks to personalize your basket.
Third, this is a great skill-builder for quilters and sewists. You’ll learn how to quilt basic panels, sew boxed corners, add lining, and insert stabilizers—all in one project.
You’ll also love that these baskets are eco-friendly. Ditch plastic containers and create beautiful, washable fabric bins that last.
Lastly, the baskets are ideal for gifting or selling. Personalize them with names, fill them with goodies, and gift them for holidays, birthdays, or baby showers. They’re fast sellers at craft fairs, too!
Before you begin this Organizer Basket – Tutorial, gather the necessary materials and tools. Don’t worry—this project doesn’t require any special equipment and is totally beginner-friendly.
Materials:
Tools:
Fabric suggestions:
Heavier-weight cotton or canvas works best for the outer fabric to provide stability. If using lighter quilting cotton, add extra stabilizer to help the basket stand upright.
Sizing tip:
A basic medium-size organizer basket measures around 10″ long, 6″ wide, and 5″ tall. But you can easily adjust the dimensions to fit your needs—just keep your proportions consistent.
With everything prepared, you’re ready to quilt and construct your own stylish storage basket!
Now let’s dive into the fun part—the actual sewing! This Organizer Basket – Tutorial is broken into clear, easy steps for smooth construction.
Step 1: Cut your pieces
Step 2: Fuse the stabilizer
Iron the fusible fleece or foam to the wrong side of each exterior panel. This will give your basket structure and help it stand upright.
Step 3: Quilt the exterior panels
Use your sewing machine to quilt simple straight lines, a diamond pattern, or freestyle waves onto the exterior panels. This step is optional but adds visual interest and texture.
Step 4: Sew the basket body
With right sides together, sew the two exterior panels together along the sides and bottom (leave the top open). Repeat with the lining panels but leave a 3-inch gap in the bottom for turning later.
Step 5: Box the corners
Flatten one bottom corner so that the side seam lines up with the bottom seam, forming a triangle. Mark and sew a line across the triangle about 2″ from the tip. Trim the excess. Repeat for all corners.
Step 6: Assemble and finish
Insert the lining into the exterior basket, right sides together. Match up seams and pin around the top. Sew around the entire top edge. Then turn the basket right side out through the hole left in the lining. Stitch the opening closed, tuck the lining inside, and press the top edge.
Your Organizer Basket is ready to fill with all your essentials!
Once you’ve mastered the basic Organizer Basket – Tutorial, the sky’s the limit when it comes to personalizing and adapting the design.
Add handles:
Use fabric strips, leather, or ribbon to add side handles. Sew them in between the lining and exterior layers during assembly.
Label it:
Sew or iron on a label for categories like “Toys,” “Mail,” or “Snacks.” You can even use chalkboard labels for reusability.
Go patchwork style:
Use leftover quilt blocks, orphan blocks, or improv-pieced panels for a one-of-a-kind look that adds character and charm.
Make nesting sets:
Sew baskets in various sizes that fit inside one another. This is perfect for organizing drawers or giving as stackable gifts.
Add inner pockets:
Include small fabric pockets on the lining side to store tiny items like safety pins, measuring tape, or hair ties.
Create themed baskets:
Make baskets for holidays, baby showers, or room-specific themes like sewing, bath time, or school supplies. Use coordinating fabrics for a cohesive look.
Your organizer baskets can be as simple or as embellished as you like—they’re a reflection of your personality and practical needs.
Can beginners make the Organizer Basket?
Absolutely! This is one of the best sewing or quilting projects for beginners. It involves basic straight-line sewing and simple techniques.
What kind of stabilizer should I use?
Fusible fleece works well for a soft structure. For a stiffer basket, try foam stabilizer like ByAnnie’s Soft and Stable. Even thick interfacing can help if you’re using lighter fabrics.
Can I make it without quilting the panels?
Yes, quilting is optional. If your exterior fabric is already thick or structured, you can skip the quilting and go straight to assembly.
How do I adjust the size?
Simply scale the initial rectangles larger or smaller. Remember to adjust all components equally (exterior, lining, stabilizer) and keep corners proportionate when boxing.
Are fabric baskets washable?
Yes! If you use cotton fabrics and avoid interfacing that distorts in water, your baskets are washable. Air drying is best to maintain their shape.
Can I sell baskets made from this pattern?
Yes! Handmade fabric baskets are popular items at craft markets and online shops. Feel free to sell what you make using this tutorial—just don’t resell the tutorial itself.
The Organizer Basket – Tutorial is a fun, quick, and incredibly useful quilting project that anyone can enjoy. It’s the perfect blend of style and practicality, allowing you to turn fabric scraps into beautiful storage solutions that match your home and personality.
From sewing rooms to bathrooms, nurseries to craft fairs, these baskets prove that handmade can be both beautiful and functional. You’ll practice valuable quilting skills, reduce fabric waste, and create something you’ll use every day.
PATTERN VIDEO:
Have you tried this tutorial? We’d love to hear what you thought, see your finished baskets, and read your suggestions for future projects. Drop your honest opinion and let’s keep inspiring each other with creativity and fabric! 🧺✨🧵