Crochet Flower Bouquet Tutorial

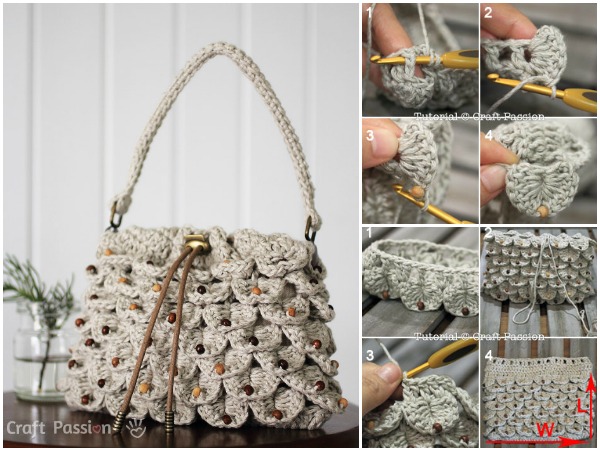
The Crochet Crocodile Bag – TUTORIAL is the perfect project for crafters who love texture, uniqueness, and handmade style. With its eye-catching scale-like stitch and trendy shape, this bag makes a bold fashion statement while showcasing your crochet skills.
The “crocodile stitch” gives this bag its name and beauty, forming layered scales that resemble a crocodile’s hide. Although it looks intricate, with the right instructions and a little patience, even an ambitious beginner can tackle this project with confidence.
In this tutorial, you’ll learn step-by-step how to make a stunning Crochet Crocodile Bag, from selecting the right yarn to adding the final finishing touches. By the end, you’ll have a gorgeous accessory that’s as functional as it is stylish.
To begin your crochet crocodile bag – tutorial, it’s important to start with the right supplies. The crocodile stitch creates a dense fabric, so choosing the proper yarn weight and texture will impact the final look and usability of your bag.
Worsted weight or aran weight yarns are ideal, as they offer enough structure to hold the stitch’s shape. Cotton or cotton-blend yarns are highly recommended for durability, especially if you plan to use your bag frequently.
Choose a hook size that complements your yarn—usually one size smaller than recommended on the yarn label to ensure a tighter, more structured stitch. For most worsted weight yarns, a 4.0mm to 5.0mm hook will work well.
You’ll also need scissors, a tapestry needle for weaving in ends, and stitch markers to help you count rows. For the finishing, consider adding a lining, magnetic snap closure, or decorative button.
If you want to personalize your crochet crocodile bag, consider adding a leather strap or crochet handles. You may also want to include a fabric lining to protect the bag’s interior and make it more functional.
Don’t forget to check your yarn stash! The crocodile stitch is a great way to use variegated yarns, ombré shades, or even leftover skeins for a colorful, scaled effect.
The highlight of this crochet crocodile bag – tutorial is the crocodile stitch. Though it may appear advanced, it’s made up of basic crochet techniques like double crochets, worked in a unique way.
The stitch is worked over a two-row repeat. The first row consists of V-stitches (two double crochets in the same stitch), and the second row involves working around these V-stitches to form the “scales.”
To make a scale, you’ll crochet down one post of the V-stitch and back up the other, creating a fan-shaped texture that stands out beautifully. It’s important to maintain consistent tension and to count stitches carefully.
Practice the crocodile stitch on a small swatch before starting the bag. This will help you get comfortable with the motion and see how the scales form in layers.
The scales naturally curl and overlap, so don’t be alarmed if your project doesn’t lay perfectly flat—this is part of the texture and charm of the stitch.
Be mindful of your yarn usage; the crocodile stitch uses more yarn than basic crochet patterns due to the overlapping layers. Make sure you have enough yardage to complete the project.
Take breaks as needed, especially if you’re new to textured stitches. Once you master the flow of the crocodile stitch, it becomes rhythmic and fun to work with.
Now that you’ve mastered the stitch, it’s time to build the actual crochet crocodile bag. The construction usually starts from the base and works upward, transitioning into the textured stitch after the foundation is set.
Begin by creating a strong, flat base—usually with single or half double crochet worked in the round. This ensures your bag has stability and structure, especially if you plan to carry heavier items.
Once your base is wide enough (typically 20–30 stitches across), transition into rounds of crocodile stitch. Be careful with your stitch count here, as the stitch needs an even number of V-stitch pairs for the scales to line up properly.
Continue building the body of the bag row by row. The scales will naturally start stacking and overlapping, creating the signature texture of the crochet crocodile bag.
You can adjust the height of your bag by adding or removing rows of scales. Typically, a medium-sized bag will have 6–10 rows of scales for a dramatic effect.
If you’d like a rounded or more shaped top, consider tapering the number of stitches or switching to a different stitch pattern near the top opening, such as single crochet for a tighter closure.
Always finish the last row cleanly, ensuring it aligns well with the rest of the bag to make the final construction easier and more polished.
The final stage of the crochet crocodile bag – tutorial involves transforming your bag from a beautiful shell into a fully functional accessory.
Start by creating or attaching handles. You can crochet sturdy straps using single or half double crochet, or opt for leather or corded handles for a more professional look. Make sure they’re well secured on each side of the bag.
For added function, sew in a lining. Cut fabric to fit the inside of your bag, hem the edges, and hand-sew or machine-stitch it inside. This helps prevent small items from falling through and protects the crocheted fabric from stretching.
Add a closure to keep your belongings safe. Magnetic snaps are easy to install, or you can crochet a button loop and use a decorative button that matches your aesthetic.
Consider decorating the flap or front with accents—like tassels, wooden beads, or metal charms. These give your crochet crocodile bag a unique, personal touch.
Give the bag a final steam block to shape it and relax any uneven stitches. Be cautious with the heat if you’re using synthetic yarns—use a pressing cloth if needed.
Once everything is assembled and tidy, your bag is ready to be worn, gifted, or displayed proudly. It’s not just a bag—it’s wearable art made by your own hands.
Is the crocodile stitch hard to learn for beginners?
It may look complicated, but with some practice, most adventurous beginners can learn it. Starting with a small swatch helps build confidence before tackling the full project.
What type of yarn works best for the crocodile stitch?
Medium-weight yarns like worsted or aran weight work best. Cotton or cotton blends offer durability and help define the texture of the scales.
Can I make the bag larger or smaller?
Yes! You can easily adjust the size by modifying the base dimensions and the number of crocodile stitch rows. Keep the stitch count in even multiples to preserve the scale pattern.
Do I need to line the bag?
Lining is optional but recommended. It strengthens the bag, protects your items, and gives the finished piece a more professional look.
How much yarn do I need for this project?
Most medium-sized bags require 300–500 yards of worsted weight yarn, depending on the strap length and number of rows. Always buy a little extra, just in case.
Can I wash the finished bag?
Hand washing is best to preserve the texture and shape. Use cold water and mild detergent, and lay flat to dry.
Through this crochet crocodile bag – tutorial, you’ve explored how to bring together texture, creativity, and functionality into one unforgettable handmade accessory. From learning the crocodile stitch to assembling the bag and adding final touches, every step is an opportunity to enjoy the art of crochet.
This project is as rewarding as it is beautiful—and now, it’s your turn to try it out. If this guide helped you, please leave your honest feedback and share your suggestions for future crochet tutorials. We’d love to hear from you and see your finished work!