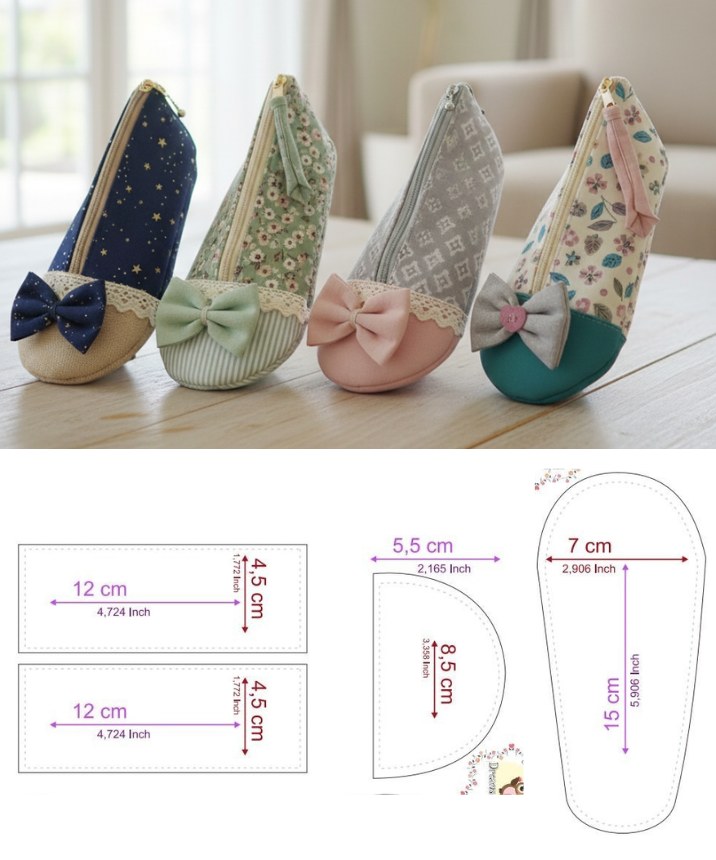
Ballerina Pencil Case with Zipper – Tutorial


The Sunflower Quilt Pattern – TUTORIAL brings to life one of nature’s most cheerful and iconic flowers in the form of a stunning handmade quilt. With their bright petals and bold centers, sunflowers symbolize warmth, positivity, and joy—perfect qualities to infuse into your next quilting project.
This tutorial will walk you through the process of making a vibrant sunflower quilt, whether you want to create a single block as a wall hanging or assemble multiple blocks into a full-sized quilt. The design is surprisingly versatile, with variations that range from traditional to modern, and it’s a great project for both intermediate and experienced quilters.
From choosing the right fabric shades to assembling your sunflower blocks with precision, this Sunflower Quilt Pattern – TUTORIAL will help you craft a quilt that radiates handmade beauty and seasonal charm.

Choosing the right materials is the foundation of a successful sunflower quilt pattern – tutorial. Begin with a warm, sunny palette: think golds, yellows, oranges, and deep browns for the petals and centers of your sunflower blocks.
You’ll also need background fabric—typically soft greens, blues, or neutral tones work best to help the sunflower design stand out. For added depth and realism, use a mix of solids, batiks, and subtle prints within your color selections.
You’ll need 100% cotton quilting fabric, a rotary cutter, cutting mat, quilting ruler, iron, sewing machine (or needle for hand-piecing), and high-quality thread. Also, make sure you have access to a sunflower block template or a foundation paper piecing pattern, depending on the method you choose.
Before cutting, wash and press your fabrics to avoid shrinkage or color bleeding later. This is especially important when working with rich yellows and browns, which can sometimes run in the wash.
If you plan to applique sunflower shapes onto a background block, gather fusible web or interfacing, along with fabric scissors and a pressing cloth for neat and safe ironing.
Organize your work area to keep pieces sorted by color and shape. Labeling parts of the flower—like petals, centers, and leaves—helps avoid confusion and makes assembly easier and faster.
The heart of this sunflower quilt pattern – tutorial lies in crafting the individual sunflower quilt block. This design can be done using traditional piecing, foundation paper piecing, or even applique.
Start with the center of the flower, typically a dark brown or black circle or octagon. Depending on the design, you may piece it with curved seams or attach it via applique.
The petals can be made from triangle or wedge-shaped units. You’ll need at least 8 to 12 petals to form a full circle around the center. Arrange them evenly to ensure balance and symmetry.
If piecing, sew the petals together in a ring before attaching to the center. Press seams consistently and gently curve them around the flower center. Foundation paper piecing may offer more accuracy for intricate designs.
Attach the assembled sunflower to a background square, ensuring it’s centered. This can be sewn directly or appliqued with a machine satin stitch or hand needle-turn technique.
Some quilters like to add green leaves or a small stem below the flower for extra detail. These can be pieced in or appliqued depending on your skill level and design preference.
Repeat the process to create multiple blocks if you’re building a full quilt. Keep your seam allowances consistent to ensure all blocks line up evenly when joined together.
Now that you’ve crafted your sunflower blocks, the next stage in the sunflower quilt pattern – tutorial is piecing them into a cohesive quilt top.
Decide on the layout. Common options include straight set (blocks in neat rows), on-point (blocks rotated 45 degrees), or with sashing and cornerstones between blocks for spacing and framing.
Measure each block to ensure uniformity. Trimming slightly may be necessary to make them match in size. Use a large cutting mat and square ruler for precision.
Sew blocks together row by row, pressing seams as you go. Alternate seam pressing direction between rows to help intersections nest tightly and create a flatter quilt top.
Add sashing strips between rows if desired, using a neutral or complementary color that enhances the sunflower motif. Cornerstones (small squares between sashing strips) can add extra interest.
Once the quilt top is assembled, you can add borders to increase size or frame the quilt visually. Try a border fabric with sunflower prints or coordinating tones from your main palette.
Give your quilt top a final press, smoothing seams and checking for any loose threads or misaligned edges before proceeding to the quilting stage.
The final step in the sunflower quilt pattern – tutorial is quilting and binding your finished piece. This step not only secures the layers but enhances the overall texture and design.
Begin by creating a quilt sandwich: backing fabric (right side down), batting in the middle, and your quilt top (right side up) on top. Use basting spray, safety pins, or thread to hold layers together.
For quilting, you can use a simple straight-line or stitch-in-the-ditch method to keep the focus on the sunflower design. Or, try free-motion quilting to add custom flourishes like swirling winds, sunbursts, or leaf patterns.
Highlight the sunflower center with concentric circles, or quilt each petal separately for definition. Echo quilting around the flower shapes adds dimension and makes them stand out.
Once quilting is complete, trim the edges evenly and prepare your binding strips. Binding can be a bold frame or a subtle finish, depending on your style.
Attach binding using your preferred method—either machine or hand-binding. Be sure to miter corners for a clean, professional look.
Label your quilt with your name, the date, and perhaps a title. It’s a lovely way to commemorate the time and creativity poured into your sunflower quilt pattern masterpiece.
Is the sunflower quilt suitable for beginners?
The pattern is best suited for confident beginners or intermediate quilters, especially if using curved seams or foundation paper piecing. Simple applique versions can be adapted for newer quilters.
What size should a sunflower block be?
Blocks are often 12” square but can be adjusted depending on the project. Smaller blocks are great for wall hangings, while larger blocks work well in bed quilts.
Can I use pre-cuts for this pattern?
Yes! Fat quarters and charm packs are ideal for sunflower quilts, as they provide a variety of colors and prints perfect for petals and centers.
How do I make my petals look even and symmetrical?
Careful cutting and layout planning are key. Using templates or foundation paper piecing ensures precision and consistency in petal shape and spacing.
What quilting design works best with this pattern?
Free-motion quilting can highlight the sunflower shapes beautifully, while straight-line quilting provides a clean and modern finish.
Can I turn a single sunflower block into a wall hanging or pillow?
Absolutely! One block makes a striking mini quilt, pillow cover, or table topper—perfect for seasonal home décor.
With this sunflower quilt pattern – tutorial, you’ve learned how to bring the radiant beauty of sunflowers into a stunning quilt project. From fabric selection to quilting and binding, every step offers an opportunity to express your creativity while honing your quilting skills.
Whether you create one block or an entire quilt, your finished piece is sure to spread warmth, cheer, and handmade charm. If you found this guide helpful, please leave your honest feedback and share your suggestions for future tutorials—we’d love to hear from you!

