Lake Cabin Quilt Pattern – Tutorial

The Heart Block is a timeless pattern that adds a touch of love and warmth to any quilt. This simple yet striking block design can be used to create beautiful quilts for any occasion—whether it’s for a Valentine’s Day project, a wedding gift, or simply to add a little charm to your home decor. In this tutorial, we’ll guide you through the process of creating a Heart Block, including the materials you’ll need, step-by-step instructions, and tips for making your blocks perfect every time. Whether you’re a beginner or an experienced quilter, you’ll find this pattern easy to follow and fun to make.
The Heart Block pattern consists of geometric shapes that come together to form a heart in the center of the block. It’s a great way to practice your piecing skills while creating a beautiful design. Let’s dive into the tutorial and learn how to make this adorable quilt block.
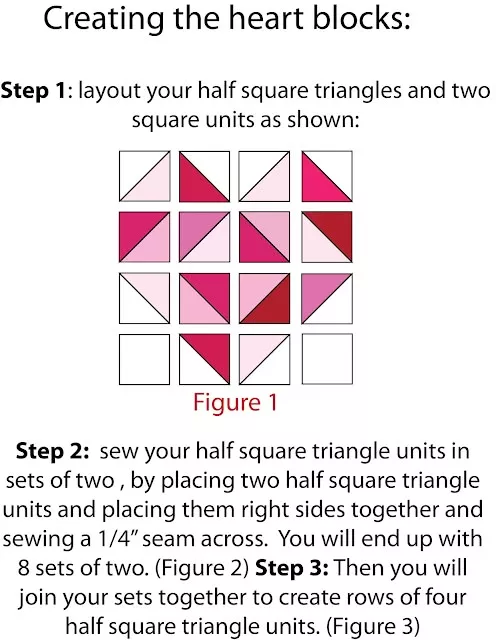
Image From Pinterest
Before you begin, gather all the materials you’ll need to make your Heart Block. Having everything ready will ensure a smooth sewing process and help you achieve the best results. Here’s what you’ll need:
Once you’ve gathered everything you need, let’s start by cutting the fabric for your Heart Block.
Accurate cutting is the key to assembling the perfect Heart Block. Here’s how to prepare your fabric pieces:
Now that all your fabric pieces are cut, it’s time to start assembling the Heart Block.
Assembling the Heart Block is straightforward. It involves piecing together the fabric shapes to form the heart and its surrounding background. Follow these steps for a perfect result:
Once the pieces are sewn together, press all the seams to ensure they lay flat and create a crisp, clean block. Your Heart Block should now be coming together!
After you’ve pieced together the heart and background fabric, you’re almost done with your Heart Block. Here’s how to finish it:
Once you have your Heart Block completed, it’s ready to be incorporated into your larger quilt or project!
1. How do I make a larger Heart Block?
To make a larger Heart Block, simply increase the size of your fabric pieces. Adjust the measurements of the heart fabric and background fabric accordingly, and follow the same assembly steps. Keep in mind that you may need to adjust the size of the block to match the other blocks in your quilt.
2. Can I use different shapes to form the heart?
Yes, you can modify the heart design by using different shapes, such as circles or appliqué. This will create a unique variation of the Heart Block while still maintaining its overall look.
3. What type of fabric should I use for the Heart Block?
The type of fabric you choose depends on the overall look you want for your quilt. Quilting cotton is the most common choice, but you can use other fabrics like flannel or linen for a different texture or appearance. Make sure to pre-wash your fabrics before you begin sewing.
4. How do I join multiple Heart Blocks together?
Once you have several Heart Blocks, you can join them together using your preferred quilting technique. You can join the blocks using a whip stitch, a slip stitch, or even a join-as-you-go method. Be sure to align the edges of the blocks carefully to ensure a neat and seamless finish.
5. Can I add more colors to the Heart Block?
Absolutely! You can experiment with different color combinations to create a more vibrant or unique Heart Block. Adding borders or even using multiple fabrics for the heart design can make your block stand out even more.
6. Can I make the Heart Block by hand?
Yes, the Heart Block can be made by hand. If you prefer hand-piecing, use a running stitch to sew the pieces together. The process may take a bit longer than machine sewing, but the results will still be beautiful.
In this tutorial, we’ve walked through the steps to create a beautiful Heart Block for your quilting projects. Whether you’re using it for a romantic quilt, a special gift, or simply adding a bit of charm to your creations, this heart design is sure to make a statement. By following the materials list, cutting instructions, and assembly steps, you’ll be able to create a stunning heart block that will elevate your quilting skills. We hope you enjoyed this guide and found it helpful. If you have any suggestions or want to share your experience, please leave a comment below. Happy quilting!