Hope Chest Block – TUTORIAL

Advertising

Quilting is a timeless craft that combines creativity, tradition, and a sense of accomplishment. If you’re looking to expand your quilting skills, the Hope Chest Block is a perfect choice. This quilt block not only features a stunning design but also holds symbolic meaning, often representing hope and love. Whether you’re a beginner or an experienced quilter, this tutorial will guide you through the process of creating the Hope Chest Block from start to finish.

In this detailed guide, we will explain each step of the process, from selecting the right fabrics to assembling the block. We will also offer tips for sewing and piecing the block to achieve perfect results. The tutorial is structured to be both informative and easy to follow, ensuring that quilters of all skill levels can enjoy creating this beautiful quilt block.

Advertising

The Hope Chest Block is a versatile pattern that can be used in many types of quilts, from traditional to modern designs. It can be the focal point of a quilt or incorporated into a larger project. Follow along as we explore the materials, cutting techniques, and sewing steps needed to create this elegant quilt block.

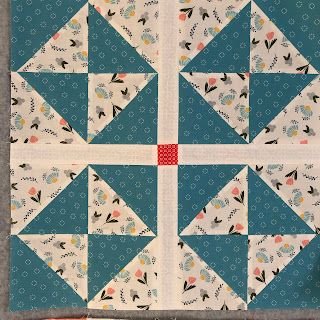
Image From Pinterest

1. Materials You Will Need for the Hope Chest Block

Before you begin creating your Hope Chest Block, it’s essential to gather the necessary materials. The right supplies will ensure that your block turns out as beautifully as possible. Here’s a list of everything you’ll need:

SEE OTHER FACE PATTERNS HERE!

  1. Fabric – Choose fabrics in contrasting colors to make the block stand out. You will need at least two different fabrics for the block’s background and the central pattern. For the Hope Chest Block, traditional choices include floral or solid fabrics.
  2. Quilt Batting – For a more substantial feel, some quilters like to use batting inside the block. However, it’s not necessary if you plan to use the block in a larger quilt later on.
  3. Rotary Cutter and Mat – A rotary cutter, paired with a cutting mat, allows for more accurate and clean cuts, making it easier to piece the block together.
  4. Ruler – A quilting ruler is essential for measuring and cutting fabric accurately.
  5. Needles and Thread – Use a sturdy quilting needle and matching thread for sewing your quilt pieces together. Opt for high-quality thread to ensure long-lasting seams.
  6. Pins – Pins will help you keep your fabric pieces in place while you sew them together.
  7. Iron – Pressing the fabric pieces between each step is crucial to keep seams crisp and help with precise piecing.

Once you have your materials ready, you can begin cutting your fabric for the quilt block.

2. Cutting the Fabric for the Hope Chest Block

Properly cutting your fabric is the first step toward creating a beautiful Hope Chest Block. Accuracy in this stage will result in cleaner seams and a more precise finished block. Here’s how to cut your fabric:

Advertising
  1. Cut the Background Fabric – Start by cutting the fabric for the background of the block. You will need a square piece for the block’s base, typically 12½ inches (or whatever size you choose based on your quilt’s design).
  2. Cut the Triangle Pieces – The Hope Chest Block features triangle shapes at the center of the design. Cut four triangle pieces from a contrasting fabric. These should be cut using the half-square triangle method, which means you’ll need two squares of fabric that are each 5 inches in size. Once sewn together, these squares will form your triangle pieces.
  3. Cut the Smaller Squares – For the outer corner pieces of the block, cut smaller squares, typically around 3½ inches. These will form the decorative corners of the block.
  4. Mark the Fabric – To help with accurate sewing, you can mark the diagonal lines on the back of the squares that will form your triangles. This will guide your sewing and ensure that the pieces are aligned correctly.

Now that you have your fabric cut, it’s time to start piecing together the block.

3. Piecing the Hope Chest Block Together

Once your fabric pieces are cut, it’s time to sew them into the Hope Chest Block design. This step involves carefully piecing together the triangles and squares to create the signature shape of the block. Follow these instructions carefully:

  1. Make the Half-Square Triangles – Take the two 5-inch squares for each triangle, place them right sides together, and sew along the diagonal line. After sewing, cut along the line, press the seams open, and trim any excess fabric. You should now have two triangle pieces from these squares.
  2. Attach the Triangle Pieces to the Center – Place the triangle pieces in the center of the background fabric. Position them to form a diamond shape. Sew them in place, making sure the edges align neatly with the center of the background square.
  3. Add the Corner Squares – Next, take the smaller 3½-inch squares and place them in the outer corners of the block. These will create a decorative border around the center diamond shape. Attach each square, one at a time, and press the seams open to keep everything flat.
  4. Assemble the Entire Block – Once all the pieces are sewn together, you should have the full Hope Chest Block. Take a moment to inspect your work and ensure everything aligns correctly. Trim any excess fabric from the edges to ensure the block is even and square.

Now your quilt block is ready for the next step in the quilting process.

4. Finishing the Hope Chest Block

To finish off your Hope Chest Block, you will need to add any final details and ensure it’s ready for assembly into a quilt. Here’s how to complete the block:

  1. Press the Seams – Use an iron to press all the seams flat. This will help remove any puckers or wrinkles and create a crisp, professional finish.
  2. Trim the Block – Check the block to make sure it measures the correct dimensions (typically 12½ inches by 12½ inches for a standard quilt). If necessary, trim the edges to square up the block and make it uniform with the rest of the quilt blocks.
  3. Add a Border (Optional) – Some quilters choose to add a small border around the Hope Chest Block to make it stand out more or to frame it neatly. This step is entirely optional but can be a nice touch if you want to add extra visual interest to the block.
  4. Check for Quality – Before moving forward with piecing the block into a larger quilt, double-check your work to ensure that the block is sturdy, symmetrical, and free from any defects.

With these steps completed, your Hope Chest Block is now ready to be added to your quilt or used as part of a larger design!

Join Now!!

🌟Join our exclusive Quilt broadcast list on Messenger! Receive the best patterns, tips, and updates directly in your inbox. Our team is ready to send you delightful content that will inspire your projects. Don’t miss this opportunity to stay updated and create amazing pieces. Join now and be part of this passionate quilt community!✨📩

FAQ – Common Questions About the Hope Chest Block

1. What is the symbolism behind the Hope Chest Block?

The Hope Chest Block is often used to represent hope, love, and the anticipation of new beginnings. It is traditionally associated with quilts made for weddings, anniversaries, or other meaningful occasions.

2. How do I choose fabrics for the Hope Chest Block?

Select fabrics that contrast well with each other to make the block stand out. You can use floral prints, solid colors, or even batiks, depending on the look you want. Consider the theme of the quilt when choosing your fabrics.

3. Can I make a larger version of the Hope Chest Block?

Yes, you can adjust the size of the block by increasing the size of the fabric pieces. Be sure to adjust the measurements of the squares and triangles accordingly to maintain the proportions of the block.

4. How many Hope Chest Blocks do I need to make a full quilt?

The number of blocks you’ll need depends on the size of the quilt you want to create. A typical lap quilt might require 12-20 blocks, while a larger bed quilt could require 50 or more.

5. Can I use this block in other quilt patterns?

Absolutely! The Hope Chest Block is versatile and can be used in many quilt designs. It can be the focal point of a quilt or used as part of a sampler quilt with other blocks.

6. How do I assemble the blocks into a quilt?

Once you’ve made enough Hope Chest Blocks, you can sew them together in rows, making sure to match the seams carefully. After the rows are pieced, join them to create the full quilt top. Then, add a quilt backing, batting, and quilting stitches.

PATTERN HERE

Conclusion

In this tutorial, we’ve walked through the process of creating a beautiful Hope Chest Block, from selecting fabrics to piecing and finishing the block. Whether you’re making a single block for a special occasion or creating a full quilt, this design is both meaningful and visually appealing. We hope you found this guide helpful and inspiring for your next quilting project. If you have any suggestions or want to share your experience, please leave a comment below. We’d love to hear from you! Happy quilting!

Advertising

0