The Whimsical Woodland Wonders Blanket is the perfect project for anyone who loves nature, animals, and cozy, intricate designs. This blanket is inspired by the beauty and mystery of woodland creatures, trees, and the overall enchanting atmosphere of the forest.
Whether you’re curling up on a chilly evening or looking for a beautiful gift for someone special, this crochet pattern brings the magic of the forest into your home.
In this article, we’ll guide you through the steps to make your own Whimsical Woodland Wonders Blanket, with detailed instructions, helpful tips, and advice on how to customize it for your style. Ready to embark on this nature-inspired crochet adventure? Let’s get started!
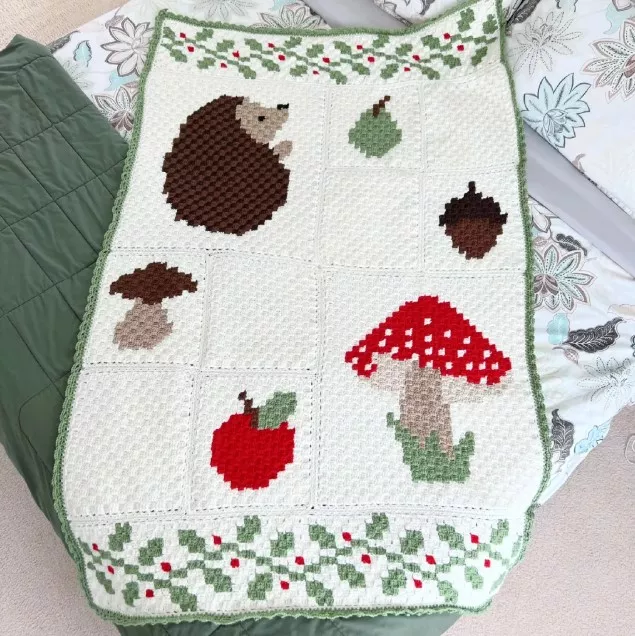
Image From Pinterest
1. Materials Needed for Whimsical Woodland Wonders Blanket
Before you start crocheting the Whimsical Woodland Wonders Blanket, it’s important to gather all the necessary materials. Below is a list of the items you’ll need:
DISCOVER MORE FREE PATTERNS HERE!
- Yarn:
- For a cozy and warm blanket, choose medium-weight yarn (worsted weight). Earthy tones like greens, browns, soft yellows, and grays work beautifully to represent the forest theme.
- You’ll need about 2000-2500 yards of yarn, depending on the size of the blanket and the type of yarn you choose.
- If you’d like to make the blanket colorful with whimsical accents, consider adding shades of blue, purple, or red to create contrast and interest.
- Crochet Hook:
- A 5mm (H-8) crochet hook works well for worsted-weight yarn. Adjust the hook size depending on your tension and yarn choice, but this size is ideal for creating a soft, drapey fabric.
- Yarn Needle:
- A yarn needle is necessary for weaving in the ends once your blanket is finished. This helps ensure a clean, professional look and keeps your project neat.
- Scissors:
- A sharp pair of scissors will help you trim your yarn ends as you move through your project.
- Measuring Tape:
- A measuring tape will help you keep track of the dimensions of your blanket as you go along. It ensures that the finished product reaches your desired size.
- Stitch Markers (Optional):
- Stitch markers can be useful for keeping track of your starting stitches, especially when working on motifs or patterns in sections.
2. Step-by-Step Instructions for Whimsical Woodland Wonders Blanket
The Whimsical Woodland Wonders Blanket features a combination of simple stitches, textured patterns, and motifs inspired by woodland creatures. Here’s how to make your own magical blanket:
2.1. Creating the Base of the Blanket
- Start with the Foundation Chain:
- Begin by making a foundation chain of 150 chains (or the desired width of your blanket). You can adjust this number to suit the size of your blanket, but be sure to use a multiple of 2 for even stitching.
- First Row – Half Double Crochet:
- Yarn over and insert your hook into the third chain from your hook. Yarn over again, pulling through, and then yarn over one last time to pull through all three loops on the hook (this completes a half double crochet).
- Continue this process across the foundation chain, working half double crochet stitches into each chain. When you reach the end of the row, chain 2 and turn your work.
- Subsequent Rows – Half Double Crochet:
- Continue working half double crochet across each row. The number of stitches in each row should be the same as in the previous row. Continue until the base of your blanket is the desired height, typically about 40 inches (100 cm) long.
2.2. Adding the Woodland Motifs
Now that you have the basic foundation, it’s time to add whimsical woodland motifs, such as trees, leaves, and animals. These motifs will be crocheted separately and then joined to the main body of the blanket.
- Crochet a Tree Motif:
- Start with a Magic Circle: Create a magic circle, and then crochet 6 double crochets into the ring.
- Building the Tree: After you’ve completed the circle, chain 3 and then work 2 double crochets into the first stitch of the circle. This creates the base of the tree trunk.
- Continue crocheting double crochets to form the tree shape, adding a series of increases to shape the trunk and branches.
- Adding Leaves: After completing the trunk, crochet green leaves in a circular motion, adding more increases until you reach the desired width.
- Create Forest Animals:
- For animals like foxes, owls, or deer, you can create small motifs using basic stitches like single crochet and double crochet. Use a combination of earthy tones for a natural look, and be sure to add facial details using embroidery or small stitches.
- Attach these animal motifs to the body of the blanket after the main pattern is completed.
2.3. Joining the Motifs
Once you’ve crocheted all the woodland motifs, it’s time to join them together on the base of your blanket.
- Layout the Motifs:
- Arrange your crocheted motifs across the body of the blanket, spacing them evenly. You can position the motifs however you like, whether scattered randomly or in a grid pattern.
- Join the Motifs:
- Using a whip stitch, attach the motifs to the blanket. Work carefully around the edges of each motif to secure them, and ensure they lie flat.
- Finish the Blanket:
- Once all motifs are attached, add a border around the entire blanket to give it a finished look. A simple single crochet border works beautifully, but you can experiment with other types of borders, like scalloped edges or picot stitches.
2.4. Adding a Woodland Border (Optional)
If you want to add even more woodland charm to your blanket, consider adding a border with additional leaves, acorns, or small flowers. Here’s how to do it:
- Crochet Leaves Around the Border:
- Use green yarn and crochet small leaf shapes by working into the single crochet stitches around the blanket’s edge.
- Attach the leaves using slip stitches to create a natural, flowing border.
- Add Small Accents:
- You can also crochet small acorn shapes or tiny mushrooms using a few basic stitches. Attach these accents along the border for a whimsical touch.
3. Tips for Creating Your Whimsical Woodland Wonders Blanket
Here are some helpful tips to make your Whimsical Woodland Wonders Blanket even more special:
- Choose the Right Yarn:
- Soft, warm yarn like cotton-blend or acrylic works best for this project. Select colors that evoke the feeling of the forest, such as greens, browns, and soft yellows. You can also add pops of color, like a vibrant red for the fox or owl details.
- Be Creative with Motifs:
- While trees, animals, and leaves are the classic woodland motifs, feel free to get creative and add your own designs. You could create mushrooms, flowers, or even forest fairies to personalize the blanket.
- Add Texture:
- Adding texture through different crochet stitches (such as puff stitches, popcorn stitches, or bobble stitches) can help make the woodland motifs and the blanket itself stand out. Textured stitches are also great for creating visual interest.
- Use a Color Palette:
- Choose a color palette that evokes the magic of the forest. For example, muted tones for the forest floor, brighter greens for trees, and a mix of neutral colors for woodland creatures.
- Customize the Size:
- You can easily customize the size of your blanket by adding or subtracting rows and motifs. If you’d like a larger blanket, simply increase the foundation chain and work more rows before adding the motifs.
4. FAQ
1. How big will the finished Whimsical Woodland Wonders Blanket be?
The finished blanket size depends on how many rows and motifs you include. For a lap blanket, the dimensions will be around 40 inches by 60 inches, but you can adjust this by adding or removing rows and motifs.
2. Can I use different yarn weights for this pattern?
Yes, you can use different yarn weights, but make sure to adjust your hook size accordingly. Lighter yarn weights like DK will result in a thinner blanket, while bulky yarn will make a thicker, cozier option.
3. What other woodland motifs can I add?
Aside from trees, leaves, and animals, you could add mushrooms, flowers, acorns, or even fairies and woodland creatures of your own design. The possibilities are endless!
4. How do I make sure the motifs are evenly spaced?
Use a measuring tape to space your motifs evenly, or you can arrange them on the blanket first before attaching them. You can create a grid layout or position them randomly for a more natural effect.
5. How long will it take to complete the Whimsical Woodland Wonders Blanket?
The time it takes depends on the complexity of your motifs and your crochet speed. It may take anywhere from a week to several weeks to complete, depending on how much time you dedicate to the project.
PATTERN HERE
Conclusion
The Whimsical Woodland Wonders Blanket is a fun and creative crochet project that captures the enchanting beauty of the forest. With its heartwarming woodland motifs and cozy design, it’s a great way to showcase your crochet skills and bring a touch of magic to your home. Whether you’re making it for yourself or as a gift, this blanket will surely be cherished for years to come. Enjoy crocheting, and don’t forget to share your finished projects and thoughts in the comments! Happy crocheting!