Creating Shabby Fabric Scrap Bookmarks is a wonderful way to use up fabric scraps while making something functional and beautiful. Whether you’re an avid reader or just love making handmade gifts, these bookmarks are a perfect project to add a touch of creativity to your book collection. The best part? They’re easy to make, budget-friendly, and customizable to fit your style.
In this tutorial, we’ll guide you through the process of creating your own Shabby Fabric Scrap Bookmarks from start to finish. You can use these bookmarks to mark your favorite pages, give them as thoughtful gifts, or even sell them at craft fairs.
These bookmarks also make great party favors for book lovers or baby showers, and they’re a perfect way to repurpose fabric scraps.
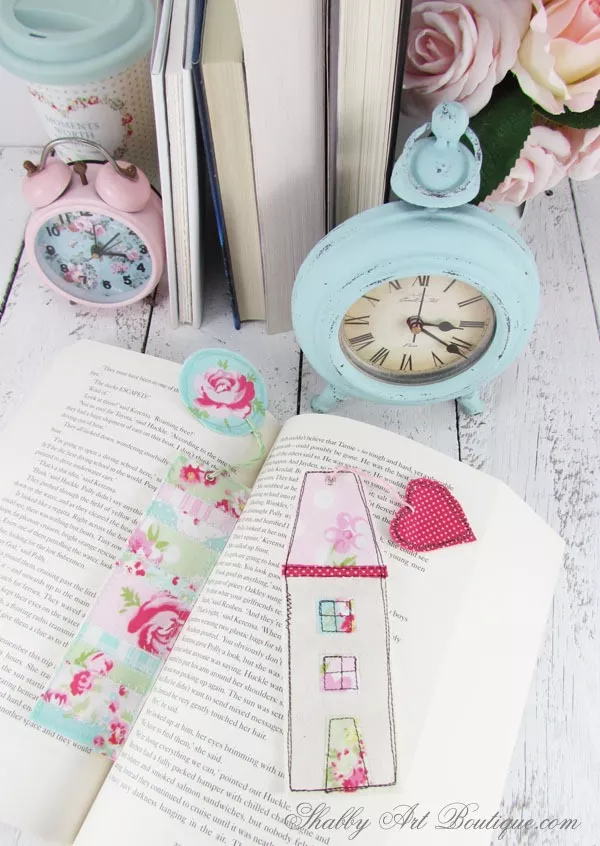
Image From Pinterest
1. Materials Needed for Shabby Fabric Scrap Bookmarks
Before you start making your Shabby Fabric Scrap Bookmarks, gather all the materials you’ll need for the project. The great thing about this craft is that it uses minimal supplies, many of which you may already have at home.
SEE OTHER FACE PATTERNS HERE!
- Fabric Scraps:
- Collect small fabric scraps from your stash. You can use a variety of fabrics, such as cotton, linen, or flannel. Choose fabrics with different textures, patterns, and colors to make the bookmarks vibrant and interesting.
- If you don’t have fabric scraps, you can use old clothes or sheets, or even cut up an old quilt for the fabric pieces.
- Ribbon or Lace:
- For added texture and charm, you can use ribbons, lace, or even strips of fabric as embellishments. These will be tied at the top of the bookmark for a decorative finish.
- Fusible Interfacing:
- Fusible interfacing helps to stiffen the fabric and adds durability to your bookmarks, so they don’t bend or tear easily. You can use lightweight interfacing to keep the bookmarks flexible but sturdy.
- Scissors:
- A good pair of fabric scissors is essential for cutting your fabric into neat and precise shapes.
- Sewing Machine or Needle and Thread:
- You’ll need a sewing machine if you want to stitch your fabric pieces together, but you can also hand-sew the bookmarks if you prefer a slower, more detailed process.
- Fabric Glue (optional):
- If you prefer not to sew, fabric glue is a good alternative to stitch the fabric pieces together.
- Buttons, Beads, or Other Embellishments (optional):
- If you’d like to add a decorative touch to your bookmarks, consider sewing on small buttons, beads, or other embellishments.
- Iron and Ironing Board:
- Pressing your fabric pieces with an iron will help them lay flat and create a professional finish.
2. Step-by-Step Guide to Making Shabby Fabric Scrap Bookmarks
Now that you have your materials ready, it’s time to start making your Shabby Fabric Scrap Bookmarks. Follow this simple, step-by-step guide to create these charming bookmarks.
2.1. Cutting the Fabric Pieces
To get started, cut your fabric scraps into strips that will form the base of the bookmarks.
- Choose Your Fabric for the Main Bookmark:
- Cut the fabric into a rectangular shape. A standard size for a bookmark is about 2 inches by 6 inches, but you can adjust the size based on your personal preference.
- You can create a single fabric bookmark or a patchwork design by sewing together several smaller pieces of fabric.
- Cut the Fusible Interfacing:
- Cut a piece of fusible interfacing slightly smaller than your fabric piece (about 1/4 inch smaller on all sides). This will provide support and prevent the bookmark from becoming too flimsy.
2.2. Preparing the Fabric
- Press the Fabric:
- Press your fabric pieces using the iron to remove wrinkles and make them easier to work with.
- Attach the Fusible Interfacing:
- Follow the instructions on your fusible interfacing package to attach it to the wrong side of your fabric. Typically, this involves placing the interfacing against the fabric and pressing with an iron for about 10-15 seconds.
- Trim Any Excess Fabric:
- Once the interfacing is fused, trim off any excess fabric or interfacing that might hang over the edges of your bookmark.
2.3. Creating the Shabby Look
To achieve the shabby chic look, we will add layers of texture and fabric embellishments.
- Add Scraps of Fabric:
- Cut smaller fabric pieces in varying shapes, sizes, and textures. These can be frayed edges, lace, or even pieces of old clothing or vintage fabric.
- Arrange the fabric scraps in a random, layered pattern on top of the main bookmark fabric. Overlap the pieces to create an interesting, textured design.
- Sew the Layers Together:
- Using your sewing machine or needle and thread, sew around the edges of the fabric scraps to attach them to the main fabric. You can stitch in straight lines, zigzag stitches, or even do some free-motion stitching to create more texture.
- Don’t worry if the stitching looks imperfect – it adds to the shabby chic aesthetic!
- Fray the Edges:
- To give the fabric pieces a distressed look, use your fingers or a small pair of scissors to gently fray the edges of the fabric scraps. This will give your bookmark a more rustic, worn-in feel.
2.4. Adding a Ribbon or Lace
- Cut a Length of Ribbon or Lace:
- Cut a piece of ribbon, lace, or fabric strip to about 5-6 inches long. This will be tied at the top of the bookmark for a decorative touch.
- Attach the Ribbon:
- Fold the ribbon or lace in half and sew or glue it to the top of your bookmark. This creates a small loop that can be used to hang the bookmark from a book or simply adds a pretty finishing detail.
2.5. Final Touches and Embellishments
Now that the basic structure of your Shabby Fabric Scrap Bookmark is complete, you can add any final embellishments.
- Sew on Buttons or Beads:
- For an added decorative touch, sew on small buttons, beads, or even fabric flowers. These will give your bookmarks a more personalized and unique look.
- Trim the Edges:
- Once all your embellishments are attached, trim any uneven edges to give the bookmark a neat and clean finish.
- Iron the Finished Bookmark:
- Give your finished bookmark a final press with the iron to make sure everything is securely in place.
3. Creative Ideas for Customizing Your Shabby Fabric Scrap Bookmarks
Here are some creative ways you can customize your Shabby Fabric Scrap Bookmarks to make them truly one-of-a-kind:
- Use Vintage Fabric:
- Incorporate vintage fabric scraps, such as old tablecloths, handkerchiefs, or linens, to give your bookmarks a nostalgic feel. These pieces can add character and history to your bookmarks.
- Create Holiday or Seasonal Bookmarks:
- Use themed fabrics, such as floral prints for spring or red and green fabrics for Christmas, to create bookmarks for different occasions or holidays.
- Personalize the Bookmarks:
- Personalize your bookmarks with initials, names, or quotes by stitching or embroidering them onto the fabric. This makes for a great gift for friends and family.
- Add Fabric Appliqué:
- Use small fabric shapes, such as hearts, stars, or flowers, and sew them onto the bookmark for a more detailed and artistic look.
-
Join Now!!
🌟Join our exclusive Quilt broadcast list on Messenger! Receive the best patterns, tips, and updates directly in your inbox. Our team is ready to send you delightful content that will inspire your projects. Don’t miss this opportunity to stay updated and create amazing pieces. Join now and be part of this passionate quilt community!✨📩
4. FAQ
1. Can I use fabric glue instead of sewing the bookmarks?
Yes, fabric glue is a great alternative if you don’t want to sew the bookmarks. Just make sure to apply the glue evenly and allow it to dry completely before using the bookmark.
2. How do I make sure the fabric stays in place while I sew?
Pinning the fabric scraps or using fabric glue to temporarily hold the pieces in place before sewing will help keep everything secure as you stitch.
3. Can I use other materials besides fabric for the bookmarks?
While fabric is ideal for the shabby chic style, you can also experiment with other materials such as felt, burlap, or denim for a different look.
4. How do I care for my shabby fabric bookmarks?
Because the bookmarks are made from fabric, it’s best to spot clean them with mild detergent and water. Avoid machine washing, as it could affect the fraying and delicate details.
5. What are some other uses for these fabric scraps?
In addition to bookmarks, you can use your fabric scraps to make keychains, small pouches, or embellishments for clothing and home decor.
PATTERN HERE
Conclusion
Making Shabby Fabric Scrap Bookmarks is an enjoyable and creative way to use up your fabric scraps while creating something beautiful and functional. Whether you keep them for yourself or give them as thoughtful gifts, these bookmarks are sure to be cherished. We hope this tutorial has inspired you to get started on your own fabric scrap bookmarks. Don’t forget to share your creations and leave your feedback or suggestions in the comments below! Happy crafting!