If you’re looking for a delightful and unique quilting project, the Foundation Paper Pieced Carrots Mini Quilt is a fantastic choice! This pattern offers a fun and creative way to incorporate vibrant carrots into your spring-themed quilts. Whether you’re a beginner or an experienced quilter, this mini quilt project will help you sharpen your paper piecing skills while creating a charming piece that celebrates the season.
Foundation paper piecing (FPP) is a method of quilting that allows you to create intricate designs with precision. By using a paper foundation, you sew your fabric pieces directly onto the paper, ensuring accurate piecing. This technique is especially useful for creating complex designs, like the adorable carrot shapes in this mini quilt.
In this guide, we’ll walk you through the process of creating the Foundation Paper Pieced Carrots Mini Quilt, offering tips, step-by-step instructions, and plenty of room for creative customization.Let’s get started and create this cute and vibrant carrot mini quilt!
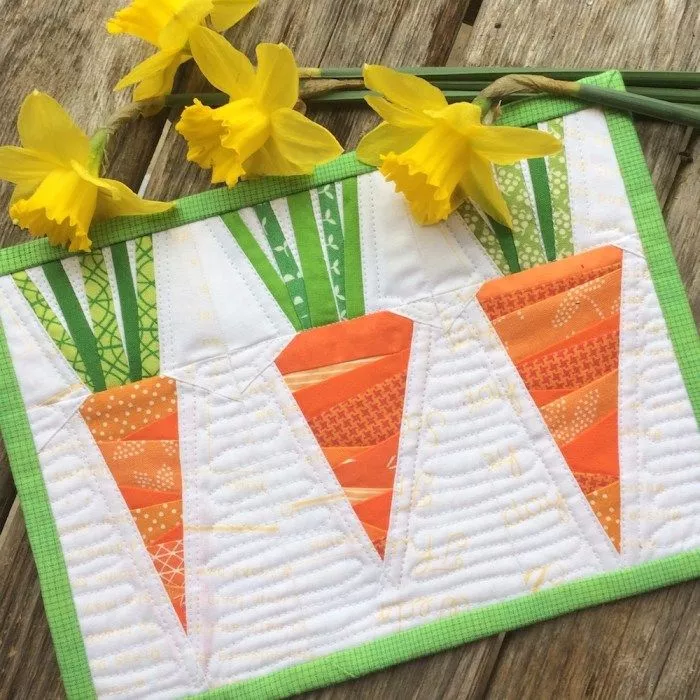
Image From Google
1. Materials You’ll Need for the Foundation Paper Pieced Carrots Mini Quilt
Before you begin sewing, it’s important to gather all the necessary materials for your Foundation Paper Pieced Carrots Mini Quilt. Here’s what you’ll need:
SEE OTHER FACE PATTERNS HERE!
- Fabric: Choose bright, fresh fabrics for the carrots, such as shades of orange and green. For the background, you can opt for a solid color or a fabric that complements the carrot design. You’ll need fabric scraps for the carrot shapes, leaves, and the background.
- Foundation Paper Piecing Paper: The key to this project is foundation paper piecing, so you’ll need specialized paper for this technique. It’s best to use lightweight, tear-away foundation paper that can be easily removed after sewing.
- Rotary Cutter and Cutting Mat: A rotary cutter and mat are essential for cutting fabric pieces with precision. You’ll need them to cut your fabric scraps into small pieces that will fit the paper piecing sections.
- Quilting Ruler: A quilting ruler helps you measure and cut accurate fabric pieces. It’s essential for getting the right size for each piece in the paper piecing pattern.
- Thread: Choose a thread that matches your fabric. For the carrot sections, use a light orange or white thread, and for the green leaves, a bright green thread is perfect.
- Sewing Machine: Since this is a paper piecing project, you’ll need a sewing machine that can handle small, precise stitches. Make sure your machine is equipped with a needle that’s appropriate for quilting.
- Scissors: A sharp pair of fabric scissors is important for trimming fabric pieces to the right size and for cutting away the paper after the piecing is done.
- Iron and Ironing Board: You’ll need an iron to press your seams as you go along. Pressing your fabric as you piece it will give your quilt a more polished and professional finish.
- Carrot Foundation Paper Pattern: Download or print the paper piecing template for the carrot pattern. You’ll need this as your foundation for the paper piecing process.
2. Step-by-Step Guide to Making the Foundation Paper Pieced Carrots Mini Quilt
Now that you have all your materials ready, it’s time to start sewing your Foundation Paper Pieced Carrots Mini Quilt. Follow these steps to create your adorable mini quilt:
2.1. Preparing the Foundation Paper Pattern
- Print or Trace the Pattern: First, print out the Foundation Paper Piecing Carrots pattern. If you’ve downloaded a digital version, make sure to print it at the correct size. Each section of the pattern will include numbers that guide you on which fabric pieces to sew in order.
- Cut the Paper: Cut the foundation paper along the edges of the pattern. You’ll have several individual paper pieces, each one representing a segment of the carrot.
- Label the Sections: Each section of the paper pattern is numbered, starting from 1. These numbers guide the order in which you’ll add fabric pieces. Make sure the numbers are clearly visible and not covered by fabric pieces when you begin sewing.
2.2. Cutting Your Fabric Pieces
- Cut the Carrot Fabric: Using a rotary cutter and ruler, cut your fabric scraps for the carrot shapes. Each segment of the carrot will require a piece of fabric that’s slightly larger than the shape on the paper. For the orange carrot, cut small fabric pieces that will cover the sections of the carrot design. You’ll need several pieces of fabric in different shades of orange for the carrot itself.
- Cut the Green Fabric for the Leaves: For the carrot’s leafy green top, cut small strips of green fabric. These will be pieced into the leaf sections of the pattern. Again, make sure the pieces are large enough to cover the sections on the paper.
- Cut the Background Fabric: Cut a piece of background fabric that’s slightly larger than the finished size of the block. You’ll trim it down once the piecing is complete.
2.3. Sewing the Paper Piecing
- Start with the First Piece: Position the first fabric piece on the foundation paper, making sure it’s right sides together with the paper. Pin it in place. The fabric should extend beyond the line of the first section of the pattern.
- Sewing the Fabric: Using a small stitch length (about 1.5 to 2.0 mm), sew along the first line of the pattern. Make sure to backstitch at the beginning and end to secure the stitch.
- Add the Next Piece: After sewing the first piece, press it open and add the next piece of fabric, aligning it with the next section on the pattern. Continue to sew each piece along the lines, always pressing after each section to keep the seams neat.
- Repeat for Each Section: Continue adding fabric pieces, following the numbered sections on the foundation paper. Take your time to ensure that each piece is placed accurately, and use a lot of pins if necessary to keep everything in place.
- Trim the Excess Fabric: Once the piecing for each carrot is complete, carefully trim the excess fabric around the edges of the foundation paper using your rotary cutter. Be sure to leave a seam allowance of about 1/4″ to 1/8″.
2.4. Assembling the Mini Quilt
- Remove the Paper: After all the fabric pieces are sewn, gently tear away the foundation paper from each section. Be careful not to pull too hard, as this could distort the fabric. The foundation paper should come off easily once the piecing is complete.
- Join the Carrots Together: Once your individual carrot sections are complete, sew them together to form the full carrot design. You can arrange the carrots however you like—whether in a row, scattered across the block, or even forming a pattern.
- Add the Background: Sew your completed carrot design onto the background fabric. Make sure everything is aligned and pressed flat.
- Press and Trim: Once all the pieces are sewn together, give the mini quilt top a final press to smooth out any wrinkles. Trim the edges to the desired size, typically 12″ x 12″ for a standard mini quilt.
2.5. Quilting the Mini Quilt
- Baste the Quilt: Lay the quilt top, batting, and backing fabric together, securing them with quilting pins or spray adhesive. Make sure the quilt is smooth and taut.
- Quilt the Layers: Use your sewing machine to quilt the layers together. You can opt for straight-line quilting or free-motion quilting to add texture to the quilt.
- Trim and Bind: Once the quilting is complete, trim the edges of the quilt to remove any excess batting and backing fabric. Finish the quilt with a simple binding, using a coordinating fabric for a polished look.
3. Customizing Your Foundation Paper Pieced Carrots Mini Quilt
The Foundation Paper Pieced Carrots Mini Quilt is versatile and can be customized to suit your preferences. Here are some ideas for personalization:
- Play with Color: Use different shades of orange and green to create more vibrant or pastel-colored carrots. You can also experiment with fabric patterns, like floral prints or polka dots, to give the carrots a more whimsical feel.
- Add Embellishments: To add a special touch, consider adding embroidery or hand stitching to the carrot tops or the quilt background. You can add little flowers, stitches, or even tiny bugs for a more playful look.
- Size Variations: While this pattern works well for a mini quilt, you can easily scale it up to create a larger quilt. Just increase the number of carrot blocks and adjust the overall size to suit your needs.
4. Fun Ways to Use Your Foundation Paper Pieced Carrots Mini Quilt
Once your Foundation Paper Pieced Carrots Mini Quilt is complete, here are some fun ways to use it:
- Wall Hanging: Display the mini quilt as a seasonal wall hanging in your home. It’s perfect for adding a touch of spring to any room.
- Table Runner: Make a matching table runner using multiple carrot blocks for a cheerful and festive centerpiece during the spring season.
- Cushions or Pillows: Turn your mini quilt into a decorative cushion for your couch or bed. It’s a great way to showcase your love for spring and gardening.
- Gifts: This cute mini quilt would make a thoughtful gift for anyone who loves quilting or gardening. It’s a great way to show off your creative talents!
FAQ
1. What is the best fabric for foundation paper piecing?
Cotton fabric is the best choice for foundation paper piecing. It’s easy to work with, holds its shape well, and is available in many colors and patterns.
Join Now!!
🌟Join our exclusive Quilt broadcast list on Messenger! Receive the best patterns, tips, and updates directly in your inbox. Our team is ready to send you delightful content that will inspire your projects. Don’t miss this opportunity to stay updated and create amazing pieces. Join now and be part of this passionate quilt community!✨📩
2. Can I use this pattern for larger quilts?
Yes, you can! Just make more carrot blocks and increase the size of the background fabric. Adjust the layout to create a larger quilt, such as a lap quilt or even a full-sized quilt.
3. How do I prevent my fabric from shifting while paper piecing?
Use plenty of pins or fabric clips to hold the fabric in place. You can also use a small stitch length to help keep the fabric secure as you sew each section.
4. How can I add texture to my mini quilt?
You can add texture by quilting in different patterns, such as straight lines or free-motion quilting. You can also add embroidery or appliqué details to enhance the quilt’s texture.
5. How do I remove the foundation paper from my quilt?
After completing the paper piecing, gently tear away the foundation paper. Be careful not to distort the fabric, and take your time removing the paper to avoid any tears.
PATTERN HERE
Conclusion
The Foundation Paper Pieced Carrots Mini Quilt is a fun and rewarding project that brings the vibrant colors of spring into your home. By mastering paper piecing, you’ll create a beautiful and charming quilt that can be used in many different ways. We hope this guide has inspired you to try your hand at this fun technique and to create your own adorable mini quilt!
Don’t forget to share your finished projects with us and let us know if you have any tips or suggestions for other fun quilting designs!


