Crocheting is a fantastic hobby that allows you to create unique, personalized items foryour home or as gifts. One fun project that is both practical and adorable is the Crochet a Paw Print Coaster – Pattern. Whether you’re a dog lover or want to add a cute touch to your living space, these paw print coasters are the perfect way to showcase your crochet skills. In this article, we’ll walk you through how to create a paw print coaster, provide tips for making the perfect coaster, and share ways to personalize your designs.
A Crochet Paw Print Coaster is a small, functional, and decorative item designed to protect your surfaces from hot cups, glasses, and mugs. This coaster features a paw print design, making it ideal for animal lovers, especially those with pets. You can crochet a set of these coasters for your home, or they make a great gift for a dog lover’s housewarming or birthday. The pattern is simple to follow and can be customized with different yarn colors to match your décor.
Advertising
Making a Crochet Paw Print Coaster – Pattern is a great project for beginners and advanced crocheters alike. You’ll learn to work in rounds, use basic stitches like single crochet and slip stitch, and practice making small motifs. The coaster itself is quick to make and requires only a small amount of yarn, making it an ideal stash-busting project. Ready to start? Let’s dive into the steps for making this paw print coaster!
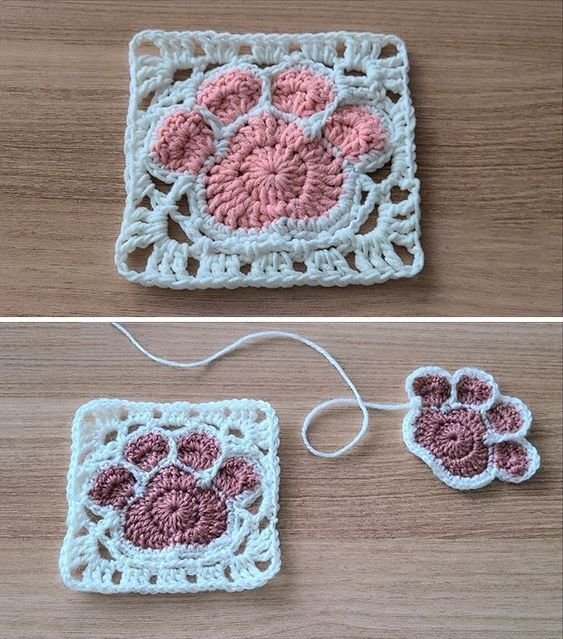
Image From Pinterest
1. Materials Needed for the Crochet Paw Print Coaster
Before you get started, it’s important to gather all the necessary materials for your Crochet Paw Print Coaster – Pattern. Here’s what you’ll need:
Yarn: For this project, you can use medium-weight yarn (worsted weight) that is soft yet durable. Choose a color for the background of your coaster (such as a neutral color like beige or gray), and a contrasting color for the paw print design (like black or brown). You can also use yarn left over from other projects, as this pattern doesn’t require much.
Crochet Hook: A 4.5mm (G-6) or 5mm (H-8) crochet hook works well with worsted weight yarn. The hook size will help you create a firm, sturdy coaster that will hold up to daily use.
Scissors and Yarn Needle: Scissors are needed to cut the yarn when you finish the project, and a yarn needle is necessary for weaving in the loose ends once you’ve completed your coaster.
Stitch Markers: While optional, stitch markers can help you keep track of your rounds and ensure your stitches are evenly spaced throughout the project.
Measuring Tape: A measuring tape will help you determine if your coaster has reached the correct size. Aim for a coaster that is approximately 4 to 5 inches in diameter.
2. How to Crochet the Paw Print Motif
The main feature of this coaster is the paw print design, which is made up of both the paw pad and the toes. To create the Crochet Paw Print Coaster – Pattern, follow these steps:
Advertising
Start with a Magic Ring: Begin by making a magic ring to create the center of your coaster. If you’re not familiar with the magic ring technique, you can alternatively chain 4 and join with a slip stitch to form a ring.
Crochet the Base: Work several single crochet stitches into the magic ring (typically 6 to 8). Pull the ring closed tightly to form a flat circle. This creates the base of your coaster.
Create the Paw Pad: To form the paw pad (the central part of the paw), increase your stitches in the next round to create a slightly larger circle. This is where you will attach the smaller paw toes later on. Work in double crochet or half double crochet for this part to give the paw pad a more raised look.
Crochet the Paw Toes: The next step is to crochet the individual toes of the paw print. To do this, you will make small circles or oval shapes that will be attached around the paw pad. These toes are typically worked in a smaller round, using a simple single crochet stitch. You will need to crochet 4 toes, placing them evenly around the paw pad.
Join the Toes: Once you have crocheted the toes, use a slip stitch to attach each one to the paw pad. Make sure they are positioned symmetrically, ensuring that the paw print design looks even and proportional.
Finish the Motif: After attaching all the toes, continue crocheting around the edges of the paw pad to form a neat, clean border. You can add a few rounds of single crochet to make the coaster thicker and more durable.
3. Assembling and Adding a Border to the Paw Print Coaster
Once your Crochet Paw Print Coaster – Pattern is complete with the paw print design, you can finish it off with a border for extra durability and style. Here’s how:
Crochet Around the Entire Coaster: After finishing the paw print design, continue crocheting around the entire coaster to form a border. Work single crochet stitches evenly around the edge to create a smooth, clean finish. This also gives the coaster a slightly raised edge, making it more functional for holding cups and glasses.
Add a Decorative Edge: If you want to add a bit more flair to your coaster, consider adding a decorative border like a shell stitch or picot edge. This will make your coaster more visually appealing and give it a more professional look.
Weave in Loose Ends: After finishing the border, use a yarn needle to weave in any loose ends from changing yarn colors or finishing the rounds. This will ensure that your coaster has a polished, neat appearance.
Block Your Coaster: While not strictly necessary, blocking your coaster by dampening it slightly and pinning it to shape can help it retain its form and smooth out any uneven edges. Let it dry completely before using it.
4. Customizing Your Crochet Paw Print Coaster
The Crochet Paw Print Coaster – Pattern can be easily customized to suit your style or home décor. Here are some ideas to help you make your coaster unique:
Play with Colors: Experiment with different yarn colors for the background and paw print design. You could match the colors to the theme of your kitchen, living room, or office. For example, you can use bright colors for a fun, modern look, or stick with neutral tones for a more subtle design.
Create a Set of Coasters: If you’re making this as a gift or for your own home, crochet a set of matching paw print coasters. You can create different paw prints with slightly varying designs, colors, or sizes to add variety to the set.
Personalize the Coaster: Add initials, names, or small embellishments to make the coasters more personal. You can use embroidery to stitch a name around the edge or attach small buttons or fabric flowers for added decoration.
Make It Larger or Smaller: If you want to use the Crochet Paw Print Coaster – Pattern for a different purpose, like a hot pad or placemat, you can adjust the size by adding extra rounds or changing the stitch count. For a smaller coaster, simply reduce the number of rounds and stitches to make it more compact.
FAQ
1. What is a paw print coaster?
A paw print coaster is a small crochet item that is designed to protect surfaces from hot cups or mugs while showcasing a cute paw print design. It’s often used as a decorative and functional piece for pet lovers.
2. Can I use any yarn for the paw print coaster?
Yes, you can use any medium-weight yarn (worsted weight) for this project. Make sure the yarn is soft and durable, especially if you plan to use the coaster frequently.
3. How do I make the paw print design stand out more?
To make the paw print more prominent, consider using contrasting yarn colors for the paw pad and toes. You can also add additional rounds of single crochet around the paw print for a bolder look.
4. Can I crochet more than one paw print on a coaster?
Yes! You can crochet multiple paw prints on a single coaster if you want to create a busier design. Just ensure there is enough space between each paw print so the coaster remains functional.
5. How do I join the paw print motif to the coaster?
To attach the paw print motif, simply crochet it onto the base of the coaster during the creation process. Work the paw print directly into the rounds and use slip stitches to secure each part.
6. How can I make the paw print coaster more durable?
For extra durability, crochet a thicker border around the coaster, and consider using a sturdier yarn or adding additional rounds to reinforce the edges.
Conclusion
In this article, we’ve shown you how to create a Crochet Paw Print Coaster – Pattern from start to finish. With a few simple materials and a bit of creativity, you can crochet your own functional, adorable coasters that will add a personal touch to your home. Whether you’re a dog lover or just enjoy cute, handmade projects, these coasters are a great addition to any home. Don’t forget to leave a sincere opinion or share suggestions if you found this guide helpful, and happy crocheting!